
Flickering LED Christmas lights aren’t just annoying—they’re a signal. Unlike incandescent strings that dim or go dark when a bulb fails, LEDs respond to even minor electrical inconsistencies with erratic blinking, strobing, or partial illumination. That rapid on-off pulse isn’t random; it’s diagnostic. Most flickering stems from one of five root causes: a loose or oxidized bulb connection, a damaged controller or rectifier, voltage drop across long runs, moisture intrusion in outdoor-rated sets, or incompatibility with dimmers or smart plugs. The good news? Over 90% of cases resolve in under five minutes—with no tools beyond your fingers and a dry cloth. This isn’t about guesswork or replacing the whole strand. It’s about reading the flicker like a technician reads an error code.
1. Why LEDs Flicker (and Why It’s Not Always a Defect)
LEDs operate on low-voltage DC power. Most plug-in strands use internal rectifiers to convert household AC (120V) to safe DC (typically 12–24V). If that conversion is unstable—or if the current path is compromised—the LED driver can’t maintain steady output. Unlike incandescent filaments that glow continuously due to thermal inertia, LEDs switch on and off thousands of times per second. When voltage sags, the driver resets or pulses erratically, causing visible flicker.
Crucially, not all flicker indicates failure. Some “warm white” or color-changing strands intentionally pulse at 30–60 Hz during transition modes—a design feature, not a fault. But persistent, irregular, or localized flickering—especially if it starts mid-season or spreads across sections—is almost always repairable.
“LED flicker is rarely about the diodes themselves. It’s almost always a contact issue, a power delivery problem, or a failing controller chip. Fix the path—not the light.” — Dr. Lena Torres, Electrical Engineer & Holiday Lighting Consultant, UL Certified Testing Lab
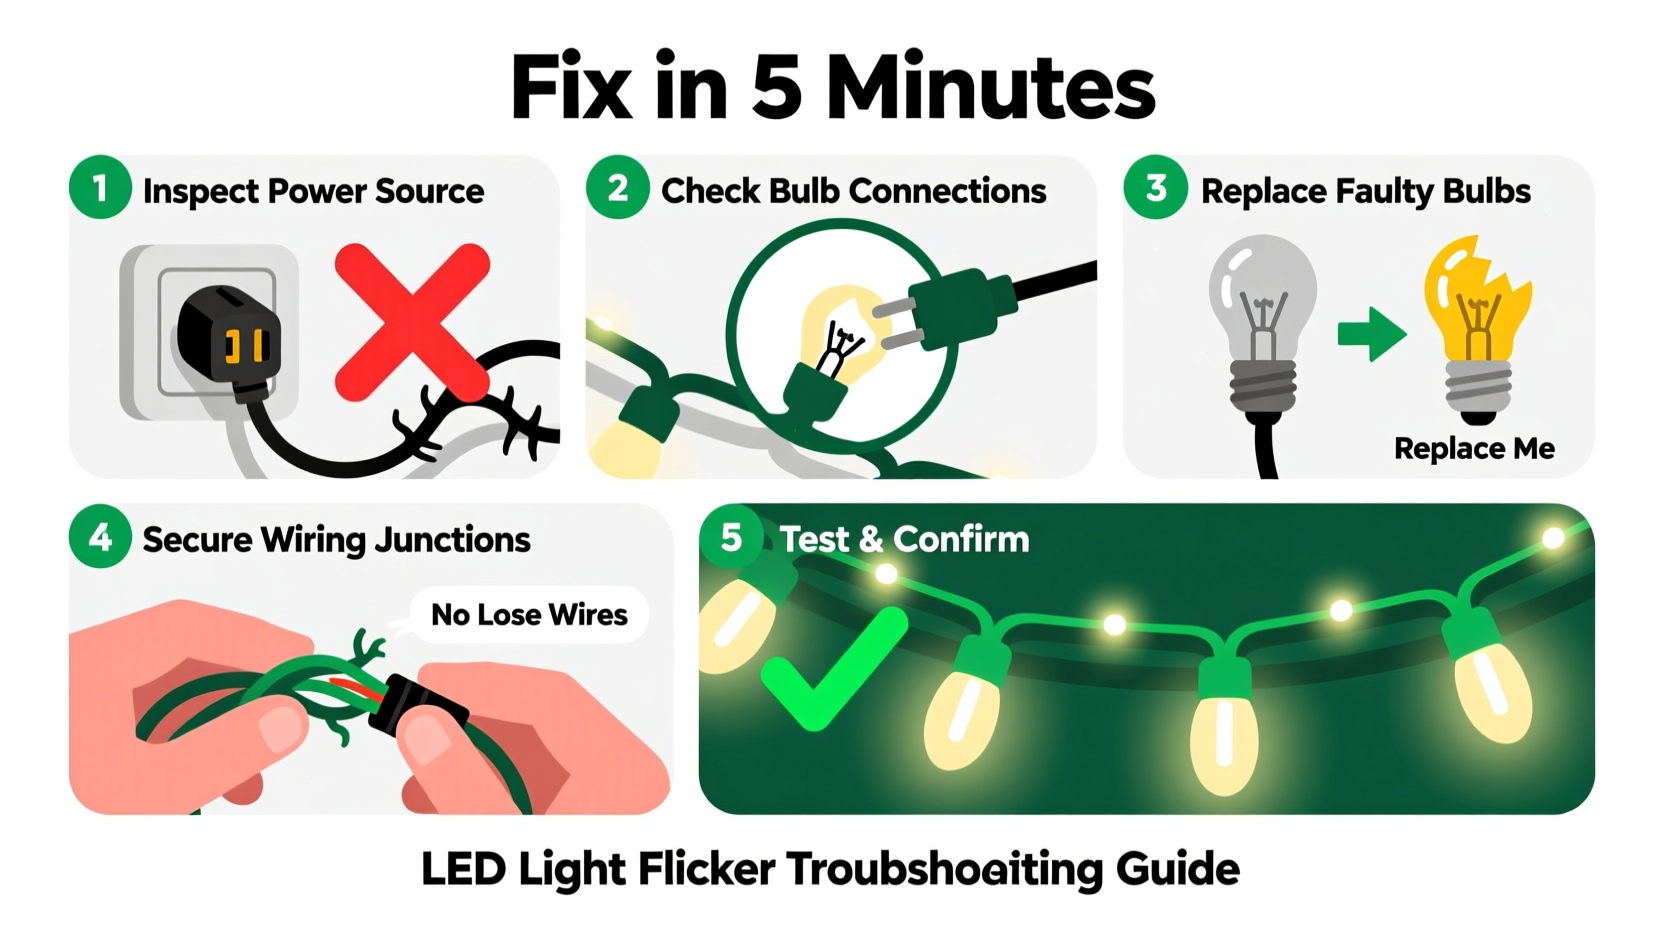
2. The 5-Minute Diagnostic & Repair Sequence
Follow this timed sequence precisely. Each step takes ≤60 seconds—and most issues are resolved by Step 3.
- Unplug and inspect the plug end (0:00–0:45): Look for bent prongs, scorch marks, or cracked housing. Gently wiggle the plug while it’s unplugged—if the cord moves independently from the plug body, the internal connection is loose.
- Check the first three bulbs (0:45–1:30): Starting at the plug end, remove each bulb (twist counterclockwise) and reseat it firmly. Examine the metal base for corrosion (a dull gray or green film) or bent contacts. Wipe clean with a dry microfiber cloth if needed.
- Test the controller or rectifier box (1:30–2:45): If your strand has a small black box near the plug (common on C7/C9, icicle, or programmable lights), press lightly on its casing while the lights are plugged in. If flickering stops or changes rhythm, the box is failing or poorly seated. Unplug, wait 10 seconds, then firmly press the box back into its socket on the cord.
- Isolate the problem section (2:45–4:00): Unplug the strand. If it’s a multi-section string (e.g., 3 sections of 50 lights), unplug one section at a time and test the remaining chain. Flicker disappearing after removing Section 2 means the fault lies there—likely a bulb or socket in that segment.
- Verify power source (4:00–5:00): Plug the strand into a different outlet—preferably on another circuit. If flickering stops, you’ve identified a circuit overload, shared neutral issue, or faulty GFCI. Avoid using extension cords longer than 25 feet or daisy-chaining more than three strands unless rated for it.
3. Common Causes vs. Real-World Fixes (A Practical Table)
| Cause | Symptom Pattern | Immediate Fix | Prevention |
|---|---|---|---|
| Loose or corroded bulb | Flicker isolated to 1–3 adjacent bulbs; may worsen when wind blows or cord shifts | Reseat or replace affected bulb(s); wipe contacts with dry cloth | Store bulbs upright in original packaging; avoid touching metal bases with bare hands (oils accelerate oxidation) |
| Failing rectifier/controller | Entire strand pulses rhythmically (every 1–3 sec); warmth near box; flicker persists even with all bulbs removed | Press controller box firmly into cord socket; if no change, replace controller (sold separately for many brands) | Use only UL-listed controllers; avoid exposing to rain/snow without proper outdoor-rated housing |
| Voltage drop | Flicker increases toward far end of strand; dimming accompanies flicker; worse when multiple strands share one outlet | Reduce total load—unplug one strand or move half to another circuit; use heavier-gauge extension cords (14 AWG or lower) | Limit daisy-chaining to manufacturer’s spec (usually 3–5 sets max); calculate total wattage (LEDs avg 2–5W/100 bulbs) vs. circuit capacity (1,800W max on 15A) |
| Moisture in socket or controller | Flicker appears only after rain or high humidity; intermittent shorting sounds (“tick-tick”) near connections | Unplug, dry thoroughly with compressed air or silica gel packets for 2 hours; apply dielectric grease to plug contacts before reinsertion | Use weatherproof outlet covers; seal unused end plugs with silicone caulk; store indoors in sealed bins with desiccant |
| Dimmer or smart plug incompatibility | Flicker begins only when controlled by app/timer/dimmer; stable when plugged directly into wall | Remove dimmer/smart plug; use only mechanical timers rated for LED loads or dedicated LED-compatible smart switches | Look for “LED-optimized” or “zero-crossing” labeling on smart devices; avoid leading-edge dimmers entirely |
4. Mini Case Study: The Porch Light Puzzle
When Sarah installed her new 200-light warm-white LED icicle set on her front porch, it worked flawlessly for two weeks. Then, every evening around 7:15 p.m., the entire strand began rapid, seizure-like flickering—stopping abruptly at 7:22. She tried swapping outlets, checking bulbs, and even unplugging her neighbor’s holiday display. Nothing helped—until she noticed her smart thermostat cycled the HVAC compressor at exactly 7:15. Her porch outlet shared a circuit with the furnace. The 3,200-watt compressor startup caused a momentary 12V sag on the shared line—enough to destabilize the LED controller’s DC output. She moved the lights to a dedicated garage outlet (on a separate breaker), added a $12 line conditioner, and the flicker vanished. Her fix took 3 minutes—and cost less than a replacement strand.
5. The Essential LED Light Troubleshooting Checklist
Before you reach for the trash bin or order new lights, run through this verified checklist:
- ✅ Unplugged and cooled: Wait 2+ minutes after unplugging—controllers retain residual charge.
- ✅ Bulbs inspected: Removed and reseated first 5 bulbs (starting at plug end) and last 3 (far end).
- ✅ Controller tested: Pressed firmly into cord socket while powered; no overheating detected.
- ✅ Power source validated: Tested on different outlet, different circuit, no extension cord.
- ✅ Environment checked: No visible moisture, ice, or debris in sockets or plug housing.
- ✅ Load verified: Total connected wattage ≤ 80% of circuit rating (e.g., ≤1,440W on 15A).
- ✅ Control device eliminated: Bypassed dimmer, timer, or smart plug—plugged directly into wall.
6. FAQ: Clearing Up Persistent Confusion
Can a single bad bulb really make the whole strand flicker?
Yes—but only in series-wired strands (most traditional mini-lights). These use shunted bulbs: if one filament breaks, current bypasses it via a tiny internal wire. However, if that shunt fails *or* the bulb’s base corrodes, it creates intermittent contact—causing the controller to reset repeatedly. Parallel-wired strands (common in commercial or premium sets) won’t cascade-fail, but a faulty controller will still affect all lights.
Why do my lights flicker only when it’s cold?
Cold temperatures increase electrical resistance in copper wires and reduce lithium-ion battery efficiency in wireless controllers. More critically, thermal contraction can loosen solder joints inside the rectifier box or cause plastic housings to shrink slightly—disrupting contact pressure. This is especially common in older strands stored in unheated garages. Letting the strand warm to room temperature for 10 minutes before testing often resolves it temporarily—but indicates aging components needing replacement.
Is flickering dangerous? Should I be worried about fire?
For modern UL-listed LED strands, flickering itself poses minimal fire risk—it reflects low-power instability, not arcing or overheating. However, *accompanying symptoms* change the risk profile: burning smells, discoloration on the plug or controller, audible buzzing, or warmth exceeding 110°F (43°C) on the cord or box demand immediate discontinuation. Those indicate failing capacitors or short circuits. Replace the strand—don’t repair it.
Conclusion
Flickering LED Christmas lights aren’t a holiday curse. They’re a precise, readable language—one that tells you exactly where to look and what to do. You don’t need a multimeter, soldering iron, or electrician’s license. You need observation, 30 seconds of focused attention per bulb, and the confidence to trust what the lights are showing you. Most flicker vanishes the moment you reseat a single oxidized bulb or shift the load off an overloaded circuit. That five-minute fix isn’t just about restoring twinkle—it’s about reclaiming control over the small, joyful rituals that make the season feel intentional and cared for. Your lights weren’t broken. They were waiting for you to listen.


 浙公网安备
33010002000092号
浙公网安备
33010002000092号 浙B2-20120091-4
Comments
No comments yet. Why don't you start the discussion?