
There’s nothing quite like the satisfaction of pulling a golden, crackling loaf of sourdough from your oven—unless, that is, you slice into it only to find a dense, sticky, gummy crumb. This common frustration can leave even experienced home bakers puzzled. A gummy texture means something went wrong in the fermentation, baking, or cooling process. The good news? It's almost always preventable. Understanding the root causes behind gummy sourdough empowers you to adjust your technique and consistently bake light, airy loaves with an open crumb and satisfying chew.
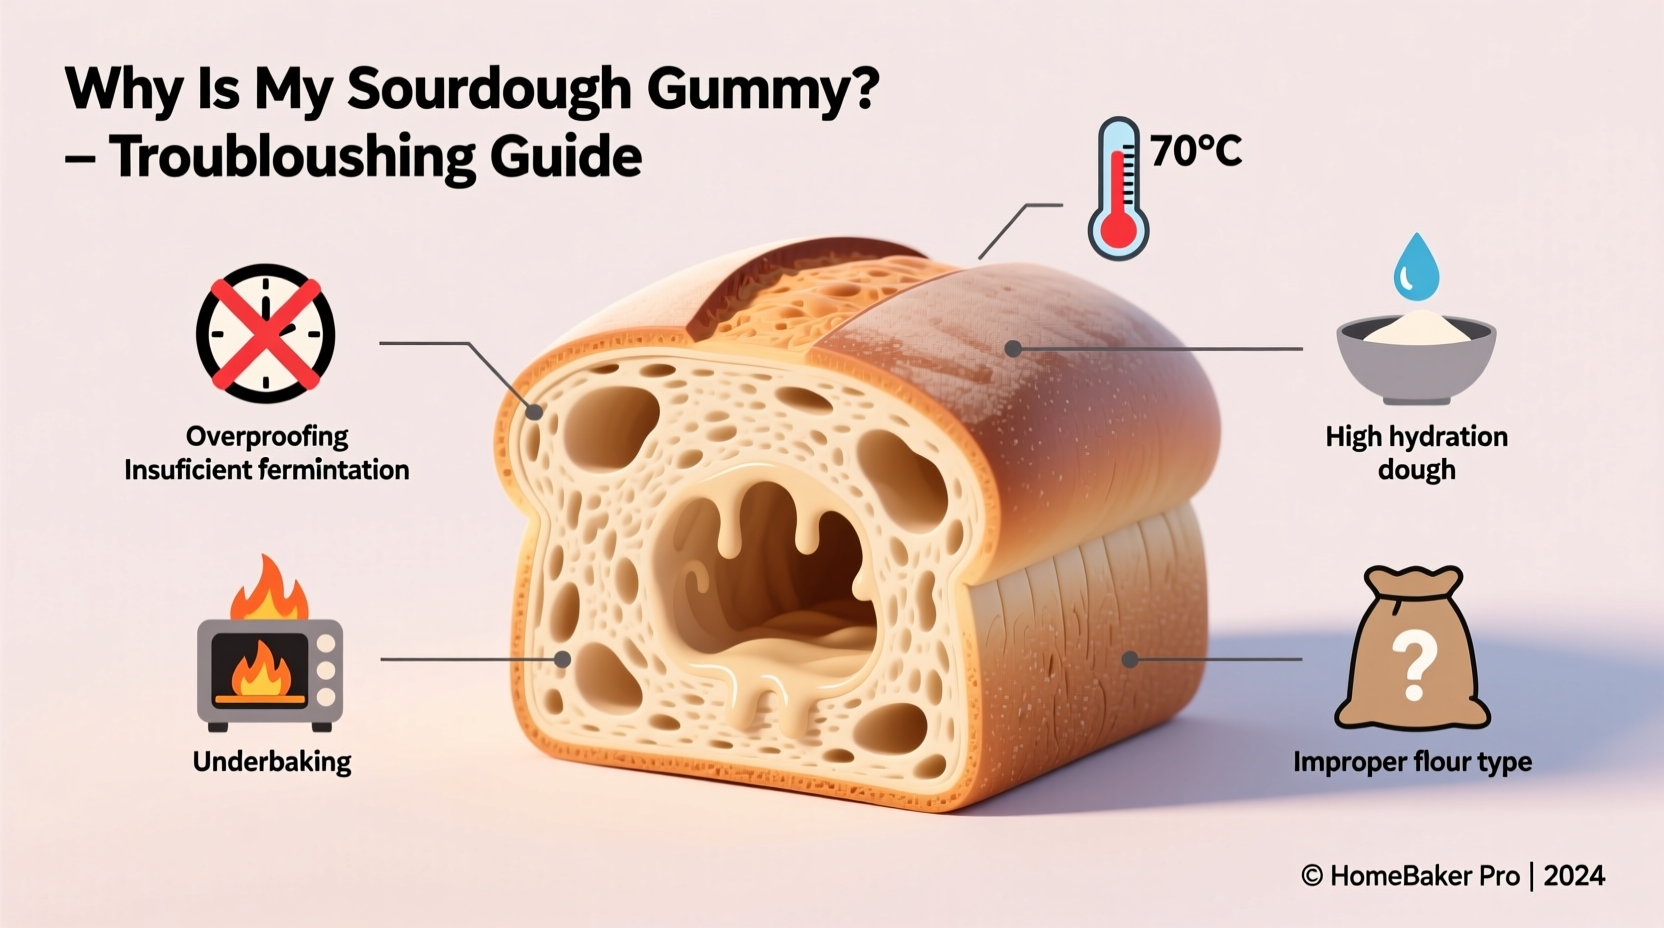
Gummy sourdough typically results from underbaking, improper hydration, insufficient fermentation, or premature slicing. While each of these factors may seem minor on its own, they compound quickly when combined. This guide breaks down every possible cause, explains the science behind them, and provides actionable solutions so you can diagnose and correct the issue with confidence.
Understanding Gummy Texture in Sourdough
A gummy crumb feels moist, sticky, and overly elastic. When pressed, it doesn’t spring back and often clings to the knife. Unlike a properly baked sourdough, which has a slightly dry surface after cooling and a resilient structure, a gummy loaf traps excess moisture within the crumb. This isn’t just about mouthfeel—it indicates incomplete starch gelatinization or residual alcohol and water from fermentation that didn’t evaporate during baking.
The ideal sourdough crumb should be tender but not wet, with irregular holes and a slight tang. Achieving this requires precise control over several variables: flour type, hydration level, fermentation time, proofing temperature, and oven conditions. When any of these are off balance, the result can be a loaf that looks great on the outside but disappoints on the inside.
“Texture issues in sourdough are rarely due to one single mistake—they’re usually the culmination of small imbalances throughout the entire process.” — Dr. Karen McNeil, Food Scientist & Artisan Bread Researcher
Common Causes of Gummy Sourdough and How to Fix Them
1. Underbaking
One of the most frequent reasons for gummy sourdough is simply not baking the loaf long enough. Even if the crust appears dark and crisp, the interior may still contain unevaporated moisture and undercooked starches. Sourdough requires a longer bake than many commercial breads because of its high hydration and dense structure.
To test doneness, use an instant-read thermometer. The internal temperature of a fully baked sourdough loaf should reach at least 205°F (96°C). Below this threshold, starches haven’t fully set, and moisture remains trapped.
2. Cutting Into the Loaf Too Soon
Impatience is the enemy of good sourdough. Slicing into a hot loaf interrupts the final stage of baking—the carryover cooking and moisture redistribution that happens as the bread cools. When cut prematurely, steam escapes unevenly, leaving pockets of gumminess in the crumb.
Always allow your sourdough to cool completely—ideally for 2 to 3 hours—before slicing. This rest period lets the starches retrograde (settle into a stable structure) and allows excess moisture to evaporate evenly.
3. Overhydration Without Proper Gluten Development
High-hydration doughs (75% and above) are popular for their open crumb, but they demand skillful handling. If the gluten network isn’t strong enough to support the water content, the structure collapses during baking, trapping moisture and creating a gummy texture.
To avoid this, ensure thorough autolyse (resting flour and water before adding starter and salt), perform regular stretch-and-folds during bulk fermentation, and assess dough strength by performing the windowpane test.
4. Incomplete Fermentation or Proofing
Underfermented dough lacks sufficient gas production and enzymatic activity. As a result, the yeast and bacteria haven’t broken down enough starches and proteins, leading to poor oven spring and a dense, gummy interior.
Your dough should rise noticeably during bulk fermentation—typically 50–100% increase in volume—and feel airy and jiggly. Use the poke test: gently press the dough; if it slowly springs back and leaves a slight indentation, it’s ready. If it snaps back immediately, it needs more time.
5. Using Low-Protein or Improper Flour
All-purpose flour often lacks the protein content needed for strong gluten development, especially in wetter doughs. Bread flour (12–14% protein) or high-quality artisanal flours provide better structure and absorption.
Additionally, whole grain flours absorb more water but ferment faster due to natural enzymes. If using rye or whole wheat, reduce hydration slightly and shorten bulk fermentation to prevent overactivity and breakdown.
Troubleshooting Checklist: Is Your Process On Track?
Use this checklist to identify where things might be going wrong:
- ✅ Did the internal temperature reach at least 205°F (96°C)?
- ✅ Did you wait 2–3 hours before slicing?
- ✅ Was the dough properly fermented (50–100% rise, jiggly texture)?
- ✅ Did you perform adequate stretch-and-folds (4–6 sets over 2 hours)?
- ✅ Are you using a flour with sufficient protein (bread flour preferred)?
- ✅ Is your starter active and peaking when used?
- ✅ Did you preheat your Dutch oven thoroughly (450–500°F for 45+ minutes)?
- ✅ Is your dough hydration appropriate for your flour and skill level?
Step-by-Step Guide to Preventing Gummy Sourdough
Follow this sequence to bake consistently well-cooked, non-gummy loaves:
- Feed your starter 6–12 hours before mixing. Use it when it’s at peak activity—doubled in size and passing the float test.
- Autolyse flour and water for 30–60 minutes. This hydrates the flour and begins gluten formation without salt inhibiting enzymes.
- Mix in starter and salt, then begin bulk fermentation at a consistent room temperature (75–78°F).
- Perform 4–6 sets of stretch-and-folds over the first 2 hours to build strength.
- Allow bulk fermentation to complete (usually 3–5 hours total). Look for bubbles, domed surface, and slight jiggle.
- Shape gently but firmly, creating surface tension without degassing excessively.
- Proof either at room temp (1–3 hours) or cold (12–16 hours in fridge). Cold proofing enhances flavor and control.
- Preheat oven and baking vessel for at least 45 minutes to ensure proper oven spring and crust formation.
- Bake covered for 20–25 minutes to trap steam, then uncovered for 20–30 minutes to dry out the crumb.
- Check internal temperature—must be at least 205°F (96°C).
- Cool completely on a wire rack for 2–3 hours before slicing.
Do’s and Don’ts: Baking Habits That Make or Break Texture
| Do | Don’t |
|---|---|
| Use a digital scale for precise measurements | Measure ingredients by volume (cups) |
| Preheat your Dutch oven thoroughly | Place dough in a cold or underheated vessel |
| Wait 2–3 hours before slicing | Cut into hot bread right out of the oven |
| Use bread flour for higher hydration doughs | Use all-purpose flour without adjusting hydration |
| Verify doneness with a thermometer | Rely solely on appearance or tapping the bottom |
| Adjust fermentation time based on room temperature | Stick rigidly to recipe times regardless of environment |
Real Example: From Gummy to Gorgeous
Sarah, a home baker in Portland, struggled for months with gummy sourdough despite following online recipes to the letter. Her loaves looked promising—great oven spring, deep color—but every slice revealed a sticky, gluey center. After reviewing her process, she realized three key issues: she was cutting into the bread after just 45 minutes, using all-purpose flour at 78% hydration, and baking for only 35 minutes total.
She adjusted her method: switched to bread flour, extended baking time to 50 minutes (with internal temp verification), and forced herself to wait 3 hours before slicing. The difference was immediate. Her next loaf had a dry, airy crumb with no gumminess. “I couldn’t believe I’d been throwing away perfectly good bread by slicing too soon,” she said. “Now I let it rest, and the texture is restaurant-quality.”
Frequently Asked Questions
Can I rescue a gummy loaf after baking?
Yes—slices of gummy sourdough can often be salvaged by toasting. The dry heat drives off excess moisture and firms up the texture. For whole loaves, return them to a 350°F oven for 10–15 minutes to further bake the interior. However, prevention is far more effective than correction.
Does using a Dutch oven prevent gumminess?
A Dutch oven helps significantly by trapping steam during the first phase of baking, promoting oven spring and crust development. But it won’t fix underlying issues like underproofing or underbaking. Always combine proper technique with the right equipment.
Why does my sourdough taste alcoholic and feel gummy?
An alcoholic flavor paired with gumminess is a clear sign of overfermentation. The yeast and bacteria have consumed too much sugar, producing excess alcohol and weakening the gluten. This leads to poor structure and trapped moisture. Reduce bulk fermentation time or lower the temperature to slow the process.
Final Tips for Consistently Great Sourdough
Perfecting sourdough is a journey of observation, adjustment, and patience. Small changes—like waiting an extra hour to slice or extending bake time by 10 minutes—can transform your results. Keep a baking journal to track variables: room temperature, fermentation duration, hydration, flour type, and outcomes. Over time, patterns will emerge, helping you refine your process.
Remember, every kitchen environment is different. What works in one home may need tweaking in another. Trust your senses—sight, touch, smell—as much as the clock. A well-baked sourdough should feel light for its size, sound hollow when tapped, and reveal a dry, springy crumb when sliced.
“The best sourdough bakers aren’t those who follow recipes blindly—they’re the ones who learn to read the dough.” — Michel Poulin, Master Baker & Instructor
Conclusion
Gummy sourdough doesn’t mean failure—it’s feedback. Each loaf teaches you something about timing, temperature, and technique. By understanding the science behind texture and applying practical fixes, you’ll move past frustration and into mastery. Start with one variable at a time: extend cooling, verify internal temperature, strengthen your gluten development. Small improvements compound into transformative results.


 浙公网安备
33010002000092号
浙公网安备
33010002000092号 浙B2-20120091-4
Comments
No comments yet. Why don't you start the discussion?