
There’s a quiet pride in pulling a freshly baked loaf of sourdough from the oven—golden crust, open crumb, that tangy aroma filling the kitchen. But when you slice into it only to find a heavy, compact interior with no air pockets, disappointment sets in fast. A dense sourdough isn’t just unappealing; it defeats the purpose of all that time, effort, and patience.
Density in sourdough bread isn’t random—it’s a symptom. It tells you something went wrong in the fermentation, structure, or baking process. The good news? Every cause has a solution. Whether you're three loaves deep into your sourdough journey or still mastering your starter, this guide will help you diagnose and correct the most common reasons behind dense sourdough.
Understanding Sourdough Structure: Why Bread Rises (or Doesn't)
Sourdough relies on natural fermentation. Unlike commercial yeast, which acts quickly and predictably, wild yeast and lactic acid bacteria in a sourdough starter work more slowly and are sensitive to environmental conditions. For bread to rise properly, two things must happen:
- Gas production: Yeast consumes carbohydrates in flour and produces carbon dioxide.
- Gas retention: Gluten forms a strong network that traps those gases, allowing the dough to expand.
If either step fails, the result is a flat, dense loaf. Over-mixing, under-proofing, weak gluten development, or an inactive starter can all disrupt this balance. Baking before full fermentation means trapped gas hasn’t had time to inflate the dough. Similarly, if gluten breaks down due to over-fermentation, the structure collapses.
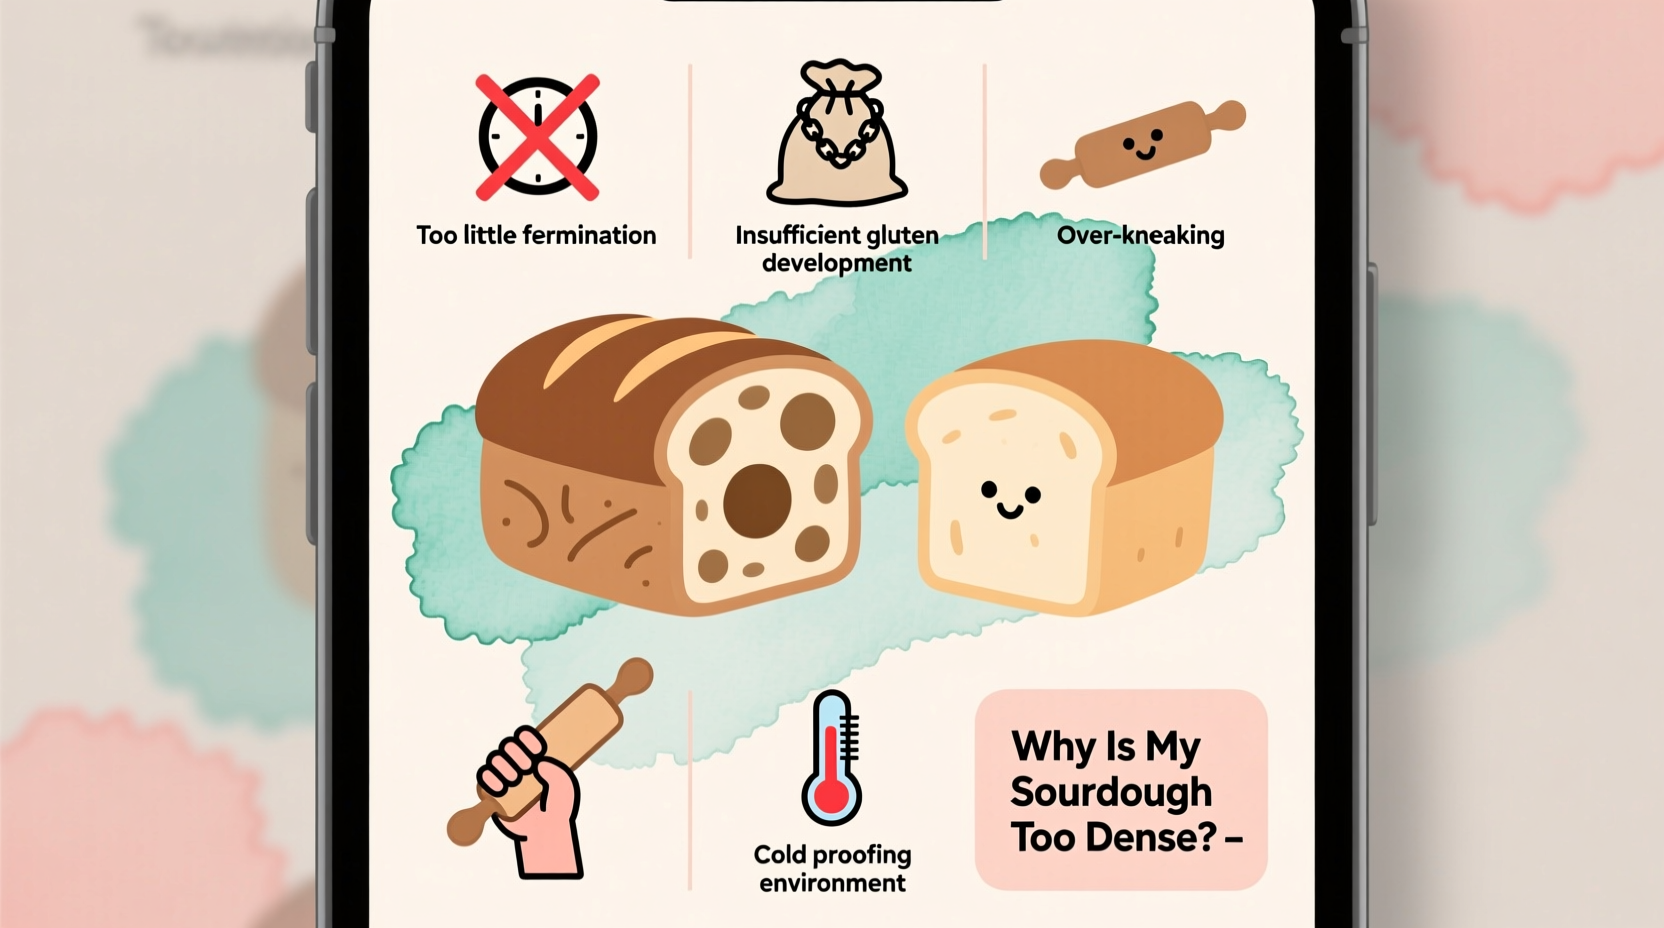
Common Causes of Dense Sourdough—and How to Fix Them
Let’s break down the most frequent culprits behind dense sourdough, based on real baking patterns observed by experienced bakers and instructors.
1. Under-Proofed Dough
One of the top reasons for dense bread is simply not letting the dough ferment long enough. Proofing allows yeast to produce gas and enzymes to strengthen gluten. When cut short, the dough lacks lift.
Signs of under-proofing include:
- A tight, springy feel when poked
- Minimal expansion during bulk fermentation
- Shrinking back quickly after shaping
To avoid this, allow sufficient time during both bulk fermentation and final proof. Time varies by temperature, hydration, and flour type. In cooler kitchens, fermentation may take 6–8 hours instead of 4.
2. Weak or Unfed Starter
Your sourdough starter is the engine of your loaf. If it's sluggish, your bread won’t rise. A healthy starter should double within 4–6 hours of feeding and have a bubbly, slightly tangy aroma.
Bakers often assume their starter is active when it floats in water—but that’s not always reliable. Floating indicates gas, not necessarily strength. Better indicators are volume increase and visible bubbles throughout.
“Many beginners bake with starters that peak too early or collapse before use. Timing matters as much as feeding.” — Daniel Leader, author of *Local Breads* and founder of Bread Alone Bakery
3. Low-Protein Flour
All-purpose flour works, but it lacks the protein needed for strong gluten formation. Bread flour (12–14% protein) provides better structure. Whole grain flours like whole wheat or rye add flavor but absorb more water and weaken elasticity, especially in high percentages.
If using 100% whole grain, expect denser results unless you adjust hydration and fermentation carefully.
4. Over-Hydration or Poor Shaping
High hydration (above 75%) creates a wetter, harder-to-handle dough. Without proper technique, excess water prevents the dough from holding its shape and rising upward rather than spreading out.
Poor shaping fails to create surface tension—the taut outer layer that helps the loaf expand upward during baking. A loose shape collapses easily during oven spring.
5. Baking Too Early or Too Late
Proofing isn’t just about time—it’s about readiness. Bake too soon, and there’s not enough gas. Bake too late, and the gluten breaks down from over-fermentation. Both lead to density.
The poke test is useful: gently press the dough with a fingertip. If it springs back slowly and leaves a slight indent, it’s ready. If it snaps back immediately, it needs more time. If it doesn’t spring back at all, it’s over-proofed.
Troubleshooting Checklist: What to Review Before Baking
Use this checklist before every bake to catch issues early:
- ✅ Is my starter ripe? Did it double within 4–6 hours of feeding?
- ✅ Did I perform the windowpane test to confirm gluten development?
- ✅ Was bulk fermentation long enough? Did the dough rise at least 50–75%?
- ✅ Did I pre-shape and properly shape the loaf with surface tension?
- ✅ Is the final proof complete? Passed the poke test?
- ✅ Is my oven hot enough? Preheated for at least 45 minutes?
- ✅ Am I using a covered vessel (Dutch oven) for steam and heat retention?
Step-by-Step Guide to Achieving Lighter Sourdough
Follow this sequence to maximize rise and minimize density:
- Feed your starter 8–12 hours before mixing dough. Use equal parts flour and water by weight. Let it sit at room temperature until bubbly and doubled.
- Mix ingredients and autolyse for 30 minutes. Combine flour and water first, then add starter and salt later. This improves gluten development.
- Perform coil folds every 30 minutes during the first 2 hours of bulk fermentation. This builds strength without over-kneading.
- Monitor bulk fermentation closely. Look for increased volume, bubbles on the surface, and a jiggly texture. This typically takes 4–6 hours at 72°F (22°C).
- Pre-shape the dough, rest for 20–30 minutes, then final shape tightly. Create surface tension by stretching the top of the dough toward you as you rotate the bowl.
- Proof in the refrigerator overnight (12–16 hours) or at room temperature (2–4 hours), depending on your schedule and ambient temperature. Cold proofing slows fermentation and enhances flavor.
- Preheat Dutch oven at 450°F (230°C) for at least 45 minutes. Transfer dough seam-side up (if scoring), score deeply (½ inch), and bake covered for 20 minutes.
- Uncover and bake another 20–25 minutes until deeply golden brown.
Flour Comparison: Impact on Crumb and Density
| Flour Type | Protein Content | Effect on Crumb | Best Used For |
|---|---|---|---|
| All-Purpose Flour | 10–11% | Moderately open, can be dense if over-hydrated | Beginner loaves, lower hydration recipes |
| Bread Flour | 12–14% | Open crumb, excellent oven spring | Standard sourdough with 70–75% hydration |
| Whole Wheat Flour | 13–14% | Denser, tighter crumb even with good technique | Blends (up to 30%), hearty loaves |
| Rye Flour | 8–9% | Very dense, low rise | Small additions (10–20%) for flavor |
| Type 85/110 (European) | 11–12% | Soft, balanced openness | Artisan-style loaves with mild flavor |
For lighter results, start with at least 80% bread flour and limit whole grains to 20% unless you’re specifically aiming for a rustic, compact loaf.
Real Example: From Brick to Boule
Sarah, a home baker in Portland, struggled for weeks with dense sourdough. Her starter looked active, she followed recipes exactly, yet her loaves were consistently heavy.
She recorded her process and shared it with a local baking group. One member noticed she was shaping immediately after mixing, skipping bulk fermentation. Another pointed out her starter was used 3 hours after feeding—too early, before peak activity.
After adjusting her timing—feeding her starter the night before, allowing a full 5-hour bulk ferment with coil folds, and cold-proofing overnight—her next loaf had a dramatically improved crumb. It wasn’t perfect, but it had holes, spring, and a crisp crust. She realized precision in timing and technique mattered more than strict adherence to recipe times.
“I thought I was doing everything right,” she said. “But sourdough doesn’t care what the clock says. It cares how the dough feels.”
Frequently Asked Questions
Can I fix dense sourdough after baking?
No—once baked, the structure is set. However, dense loaves can still be repurposed. Try slicing and toasting them, making croutons, or using them for panzanella. Prevention is key: focus on starter health, fermentation, and shaping for future bakes.
Why is my sourdough dense even with a strong starter?
A strong starter alone isn’t enough. Other factors include insufficient bulk fermentation, poor shaping (lack of surface tension), or inadequate oven spring due to low heat or lack of steam. Even with great leavening power, weak structure will collapse.
Does refrigerating the dough affect density?
Cold fermentation (retardation) usually improves texture and flavor. However, over-proofing in the fridge can degrade gluten. Limit cold proof to 16 hours max. If your dough feels deflated or gassy after removal, it’s likely over-fermented.
Expert Insight: Fermentation Is a Skill, Not a Formula
“Baking great sourdough isn’t about memorizing timelines. It’s about learning to read the dough—its puffiness, jiggle, smell, and response to touch. That’s how you avoid density.” — Ken Forkish, author of *The Elements of Pizza* and owner of Ken’s Artisan Bakery
Temperature plays a major role. A kitchen at 65°F (18°C) will ferment much slower than one at 78°F (26°C). Dough in a cool environment may need twice as long to reach the same stage. Using a temperature-controlled proofing box or placing dough near a warm appliance can help stabilize results.
Final Tips for Consistently Lighter Loaves
Density is rarely caused by one single mistake—it’s usually a chain of small oversights. Here’s how to stay ahead:
- Keep a baking journal. Note starter ripeness, room temperature, fermentation times, and outcomes. Patterns emerge over time.
- Use a scale. Volume measurements vary widely. Weighing ingredients ensures consistency.
- Don’t rush the process. Sourdough rewards patience. Rushing leads to under-developed dough and poor rise.
- Practice shaping regularly. Watch video tutorials and repeat until you feel confident creating surface tension.
- Bake in a Dutch oven. Trapped steam mimics professional ovens and maximizes oven spring.
Conclusion: Turn Dense Loaves Into Learning Opportunities
Every dense sourdough loaf teaches you something. Instead of frustration, approach each bake as an experiment. Was the starter peaking too early? Did the dough feel slack during shaping? Was the oven hot enough?
Great sourdough isn’t achieved overnight. It’s built through observation, adjustment, and repetition. By understanding the science behind fermentation and structure, you gain control over the variables that lead to success.


 浙公网安备
33010002000092号
浙公网安备
33010002000092号 浙B2-20120091-4
Comments
No comments yet. Why don't you start the discussion?