


Types of Control Arm 4013A087 and Their Applications
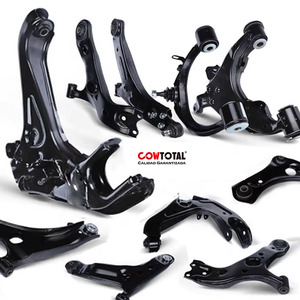
A Control Arm 4013A087 is a vital suspension system component that connects the wheel hub and steering knuckle to the vehicle's chassis. This part plays a key role in maintaining proper alignment, ensuring smooth handling, and enhancing ride comfort. Choosing the correct type for your specific vehicle model ensures optimal performance and longevity.
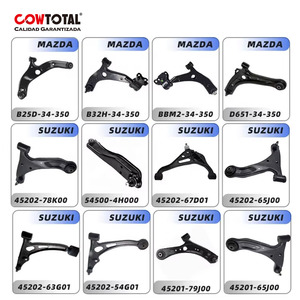
This guide explores the different applications of the Control Arm 4013A087 across various popular car models, explaining their functions and benefits to help car owners make informed maintenance decisions.
Honda Accord Control Arm 4013A087
Specially engineered for Honda Accord vehicles, this control arm ensures precise geometry between the suspension and chassis. It contributes significantly to maintaining directional stability and absorbing road shocks during driving.
Advantages
- Designed specifically for Honda Accord models
- Improves steering responsiveness
- Enhances overall ride quality
- Promotes even tire wear
Considerations
- Not compatible with other vehicle makes
- Requires proper installation technique
Best for: Maintaining OEM specifications in Honda Accords
Chrysler 200 Control Arm 4013A087
The Chrysler 200 variant of the 4013A087 control arm ensures secure attachment of the suspension system to the chassis, helping maintain accurate wheel alignment and vehicle tracking during operation.
Advantages
- Tailored fit for Chrysler 200 models
- Helps prevent uneven tire wear
- Improves cornering stability
- Supports smooth steering input
Considerations
- May require professional installation
- Should be replaced in pairs for balance
Best for: Ensuring precision handling in Chrysler 200 vehicles
Chevy Malibu Control Arm 4013A087
This control arm is designed for Chevy Malibu cars to provide reliable connection between the suspension system and chassis, contributing to consistent handling and directional control under various driving conditions.
Advantages
- Optimized for Chevy Malibu suspension systems
- Improves ride comfort and control
- Helps maintain proper camber angles
- Reduces vibrations from the road
Considerations
- Regular inspection recommended
- Should be replaced if bushings are worn
Best for: Daily drivers needing stable and comfortable performance
Ford Fusion Control Arm 4013A087
Engineered for Ford Fusion models, this control arm helps connect the suspension system to the chassis, playing a crucial role in maintaining stability, especially during turns and highway driving.
Advantages
- Specifically designed for Ford Fusion vehicles
- Provides responsive steering feel
- Ensures even tire contact with the road
- Minimizes body roll during maneuvers
Considerations
- Installation may require alignment check
- Quality varies by manufacturer
Best for: Maintaining precise handling in Ford Fusion sedans
Buick Regal Control Arm 4013A087
Used in Buick Regal models, this control arm links the suspension system to the chassis, helping maintain the vehicle’s stability and precise direction control during dynamic driving situations.
Advantages
- Perfect fit for Buick Regal platforms
- Enhances high-speed stability
- Contributes to smooth steering response
- Improves overall suspension performance
Considerations
- May need bushing replacement over time
- Proper torque specs essential during install
Best for: Performance-oriented Buick Regal owners
Chevy Aveo Control Arm 4013A087
Designed for Chevy Aveo models, this control arm ensures the suspension system remains securely connected to the chassis, supporting consistent wheel alignment and directional accuracy.
Advantages
- Ideal for compact Chevy Aveo models
- Improves fuel efficiency through proper alignment
- Reduces premature tire wear
- Offers budget-friendly replacement option
Considerations
- Lower-end variants may wear faster
- Check ball joint condition during replacement
Best for: Compact sedan owners seeking reliability on a budget
| Vehicle Model | Key Features | Primary Benefits | Recommended Use |
|---|---|---|---|
| Honda Accord | Precision engineering, OEM compatibility | Smooth steering, stable handling | Daily commuting, long-distance drives |
| Chrysler 200 | Secure chassis connection, alignment support | Improved cornering, reduced vibration | City and highway driving |
| Chevy Malibu | Comfort-focused design, vibration reduction | Even tire wear, enhanced ride quality | Family sedans, daily use |
| Ford Fusion | Responsive steering integration | Highway stability, precise handling | Performance driving enthusiasts |
| Buick Regal | High-performance suspension link | Dynamic control, sporty feel | Sport sedans, spirited driving |
| Chevy Aveo | Cost-effective solution, compact design | Economical replacement, improved efficiency | Budget-conscious drivers, city use |
Expert Tip: Always inspect control arms during regular suspension checks or after noticing symptoms like uneven tire wear, steering wander, or clunking noises over bumps. Replacing worn components promptly can prevent more costly repairs down the line.
Specifications and Maintenance of Control Arm 4013A087
Key Specifications to Consider
The Control Arm 4013A087 is a critical suspension component that ensures proper wheel alignment and vehicle handling. Understanding its specifications will help you select the correct part for your vehicle and ensure optimal performance:
Model Number
The model number "4013A087" identifies this control arm as a precision-engineered replacement or OEM part designed for compatibility with specific vehicle models.
This number also serves as a reference point when cross-checking parts catalogs, ensuring you're getting the exact fitment required by your vehicle's suspension system.
Material Composition
Manufactured from high-strength steel, the 4013A087 control arm provides excellent structural integrity and resistance to bending or warping under load.
This material choice ensures long-term durability even in demanding driving conditions, offering superior strength-to-weight ratio compared to aluminum or composite alternatives.
Surface Treatment Options
Available with multiple surface treatments including zinc plating, powder coating, and painting, each option enhances corrosion resistance while maintaining aesthetic appeal.
Zinc-plated surfaces offer excellent rust protection in humid environments, while powder-coated finishes provide additional impact resistance and UV stability for vehicles operating in harsh conditions.
Weight Characteristics
Weighing between 3kg and 5kg, the 4013A087 strikes an ideal balance between robust construction and weight efficiency for modern suspension systems.
This optimized weight range contributes to improved fuel economy without compromising structural reliability or ride quality across various vehicle platforms.
Dimensional Variants
Designed with variable dimensions to accommodate different vehicle configurations, typical measurements include:
- Length: 250mm – 350mm
- Width: 120mm – 180mm
- Height: Approximately 60mm
These variations ensure precise fitment across multiple makes and models while maintaining proper suspension geometry and clearance requirements.
Bushing Hardness Rating
Equipped with bushings rated at 60-70 Shore A hardness, this control arm offers a balanced compromise between vibration damping and suspension responsiveness.
This medium-firm durometer range helps reduce road noise transmission while maintaining sufficient compliance for comfortable daily driving experiences.
Ball Joint Design
Features a loaded ball joint assembly complete with protective boot seal and grease fitting for extended service life.
This design prevents contamination from dirt and moisture while allowing for periodic lubrication maintenance to preserve smooth articulation and prevent premature wear.
Mounting Hole Dimensions
Mounting hole diameters ranging from 12mm to 15mm ensure compatibility with various chassis mounting systems across different vehicle applications.
Proper alignment of these mounting points is crucial for maintaining suspension geometry and preventing uneven tire wear patterns during operation.
| Specification | Performance Impact | Selection Guidance |
|---|---|---|
| Control Arm Angle (5-10°) | High | Maintains proper suspension travel and wheel alignment; incorrect angles can cause handling instability and accelerated tire wear |
| Ball Joint Greaseability | Medium | Serviceable joints allow for maintenance extending component lifespan versus sealed non-serviceable designs |
| Corrosion Resistance Level | High | Powder-coated arms best for coastal regions; zinc plating effective for moderate climates |
| Hardware Inclusion | Medium | Complete kits with new bolts/nuts recommended for easier installation and safer torque values |
Recommended Maintenance Practices
To maximize the longevity and performance of your Control Arm 4013A087, follow these comprehensive maintenance guidelines:
Important: When replacing any suspension component like the 4013A087 control arm, consider replacing associated bushings and ball joints simultaneously for balanced performance. Mixing old and new components may lead to uneven wear and compromised handling characteristics.
How to Choose Control Arm 4013A087 for Wholesale Distribution
Selecting and managing inventory of the control arm 4013A087 requires strategic planning and market awareness. This critical suspension component is widely used in various vehicle models, making it a staple product for automotive parts distributors. However, multiple factors influence its availability and pricing, requiring buyers to adopt informed procurement strategies.
Global Supply Chain Dynamics
The control arm 4013A087 supply chain spans international manufacturing hubs, making it vulnerable to global disruptions. The ongoing effects of events like the COVID-19 pandemic continue to impact logistics networks through:
- Labor shortages at production facilities
- Shipping container shortages and port congestion
- Increased freight costs affecting final pricing
- Component material shortages (e.g., steel, rubber)
Strategic insight: Monitor geopolitical developments and maintain contingency plans for alternative sourcing
Economic and Regulatory Factors
Trade policies significantly impact the cost structure of importing control arms. Key considerations include:
- Tariff schedules from major exporting countries
- Customs regulations and documentation requirements
- Environmental compliance standards
- Quality certification requirements (e.g., ISO, TS 16949)
Critical action: Regularly review trade agreements and regulatory updates that affect your sourcing regions
Demand Forecasting Strategies
Precise demand forecasting is essential for maintaining optimal inventory levels of control arm 4013A087. Effective approaches include:
- Analyzing historical sales data with seasonal adjustments
- Monitoring vehicle registration trends for compatible models
- Tracking average replacement intervals based on mileage patterns
- Considering regional climate impacts on part longevity
Pro tip: Implement predictive analytics tools to improve forecast accuracy
Inventory Management Techniques
Modern inventory practices help mitigate supply chain volatility while optimizing working capital:
- Just-in-Time (JIT): Minimizes holding costs but requires reliable suppliers
- Safety stock: Provides buffer against unexpected demand surges
- Economic Order Quantity (EOQ): Balances ordering and holding costs
- Vendor Managed Inventory (VMI): Shifts responsibility to supplier
Key consideration: Balance between inventory turnover and service level targets
Procurement Recommendation: Develop relationships with multiple suppliers across different geographic regions to create redundancy in your supply chain. This approach protects against localized disruptions while potentially offering price competition benefits. Consider establishing local partnerships as backup sources during extended lead times.
| Risk Factor | Mitigation Strategy | Implementation Cost | Effectiveness Rating |
|---|---|---|---|
| Supplier concentration risk | Diversify supplier base geographically | Moderate | ★★★★☆ |
| Lead time variability | Maintain safety stock buffer | Low | ★★★☆☆ |
| Demand fluctuations | Implement advanced forecasting | High | ★★★★★ |
| Currency fluctuations | Hedge currency exposure | High | ★★★☆☆ |
| Regulatory changes | Maintain compliance monitoring system | Moderate | ★★★★☆ |
Warehouse Optimization Tip: Implement ABC analysis to prioritize control arm 4013A087 inventory management. Classify this part as 'A' category due to its high demand frequency and value, warranting tighter inventory control and more frequent reordering cycles. Position these units in easily accessible locations to streamline picking and reduce handling time.
DIY Replacement Guide for Control Arm 4013A087
Replacing the control arm (model 4013A087) is a manageable task for intermediate-level DIYers with basic mechanical skills and the right tools. This guide will walk you through the process of safely removing and installing a new control arm, ensuring your vehicle's suspension system remains in top condition. A properly functioning control arm helps maintain proper wheel alignment, tire wear, and overall driving stability.
Safety Warning: Always work on a securely supported vehicle. Never rely solely on a jack to hold up a vehicle during undercarriage work. Use jack stands rated for your vehicle’s weight and wear protective gloves and eyewear throughout the process.
Understanding the Control Arm
The control arm connects the vehicle’s chassis to the wheel hub assembly, allowing controlled movement of the suspension while maintaining the correct geometry. Over time, bushings can wear out or become damaged, leading to clunking noises, uneven tire wear, or poor handling. Replacing the entire control arm (like model 4013A087) often offers better reliability than replacing just the bushings.
Tools and Materials Required
- Jacking system (floor jack + jack stands)
- Complete socket set (standard and metric sizes)
- Ratchet wrenches and extensions
- Torque wrench (essential for proper bolt tightening)
- New control arm (part number 4013A087 or compatible replacement)
- Lubricant or grease (if specified by manufacturer)
- Bushing driver tool or hammer (for bushing installation if needed separately)
- Lug wrench or breaker bar
- Safety glasses and gloves
Pro Tip: Before purchasing a new control arm, verify compatibility with your vehicle make, model, and year. Some models may require separate bushings or come pre-assembled with them included.
Step-by-Step Replacement Procedure
- Preparation
- Park the vehicle on a level, flat surface and engage the parking brake.
- Gather all necessary tools and materials before starting.
- Loosen the lug nuts slightly before lifting the vehicle for easier access once the wheel is off.
- Lift the Vehicle Safely
- Use a floor jack to raise the vehicle at the designated jacking point near the wheel you’ll be working on.
- Securely place jack stands beneath the frame rails or subframe and lower the vehicle onto them.
- Double-check that the vehicle is stable and won’t shift during the procedure.
- Remove the Wheel
- Completely remove the lug nuts and take off the wheel to expose the wheel hub and suspension components.
- Set the wheel aside in a safe location.
- Locate the Control Arm
- Identify the control arm connected between the chassis and the wheel hub assembly.
- Inspect the surrounding area for any signs of rust, damage, or excessive wear that might affect the removal process.
- Remove Mounting Bolts
- Using a socket and ratchet, remove the bolts securing the control arm to both the chassis and the steering knuckle (wheel hub).
- If the bolts are seized due to corrosion, apply penetrating oil and allow it to soak before attempting removal.
- Keep track of washers and spacers — they must be reinstalled in the same configuration.
- Detach the Control Arm
- Gently pry the control arm away from the mounting points using a pry bar or large screwdriver.
- If stuck due to rust buildup, lightly tap with a hammer to loosen it. Avoid damaging nearby components.
- Once free, carefully lower and remove the old control arm from the vehicle.
- Install the New Control Arm
- Position the new control arm (4013A087) into place, aligning it with the mounting holes on both the chassis and the wheel hub assembly.
- Ensure that bushings are seated correctly and not twisted or pinched.
- If required, apply a small amount of grease to the bushing sleeves as per manufacturer instructions.
- Reinstall and Torque Mounting Bolts
- Insert the bolts through the mounting points and hand-tighten them first.
- Use a torque wrench to tighten each bolt to the manufacturer's recommended torque specifications. This step is crucial for safety and longevity.
- Do not overtighten — this can cause premature bushing wear or damage to the control arm mounting points.
- Reattach the Wheel
- Slide the wheel back onto the wheel studs and hand-tighten the lug nuts.
- Lower the vehicle slightly so the wheel touches the ground but does not fully bear the weight yet.
- Use the torque wrench to tighten the lug nuts to the manufacturer’s specification in a star pattern.
- Final Lowering and Inspection
- Completely lower the vehicle to the ground and remove the jack stands.
- Give the control arm a visual inspection to ensure everything is secure and properly aligned.
- Test Drive and Final Checks
- Take the vehicle for a short test drive at low speeds to check for unusual noises or vibrations.
- Listen for clunks or squeaks that could indicate loose bolts or improper installation.
- After driving, recheck the control arm bolts to ensure they haven't loosened during initial operation.
| Stage | Key Tasks | Common Mistakes | Recommended Tools |
|---|---|---|---|
| Preparation | Loosening lugs, gathering tools | Not verifying part compatibility or missing torque specs | Lug wrench, service manual |
| Removal | Removing bolts, detaching control arm | Over-tightening seized bolts, losing hardware | Penetrating oil, breaker bar |
| Installation | Aligning and torquing new arm | Misalignment, incorrect torque values | Torque wrench, pry bar |
| Reassembly | Reattaching wheel, final checks | Improper lug nut torque, missed inspections | Wheel chocks, floor jack |
Expert Advice: If your vehicle has been experiencing symptoms like pulling to one side, uneven tire wear, or vibration, consider getting a professional alignment after completing the control arm replacement. This ensures optimal performance and longevity of your suspension components.
Control Arms in Vehicle Suspension Systems – Frequently Asked Questions
A1: Control arms, commonly referred to as A-arms due to their typical shape resembling the letter "A," are crucial components of a vehicle's suspension system. They serve as pivotal links connecting the wheel hub assembly to the vehicle’s chassis or frame. This connection allows the wheels to move vertically in response to road irregularities while maintaining proper alignment and directional stability.
The primary function of a control arm is to enable smooth vertical motion of the wheel while preventing unwanted lateral movement. By doing so, it ensures consistent tire contact with the road surface, enhancing both ride comfort and handling performance. Control arms also play a vital role in preserving correct camber angles and toe settings, which directly influence tire wear patterns and steering accuracy.
In essence, control arms contribute significantly to safe driving dynamics by ensuring predictable vehicle behavior under various road conditions and driving maneuvers.
A2: The number of control arms in a vehicle depends largely on its suspension design. Most modern cars equipped with independent front suspensions typically utilize two control arms per wheel — an upper and a lower control arm. This dual-arm configuration offers superior geometry control for optimal tire contact and precise steering characteristics.
- Front-Wheel Drive Vehicles: Often feature a single lower control arm paired with a strut assembly that handles the upper suspension duties.
- Sportier Models: May use double-wishbone (double A-arm) setups for enhanced handling precision.
- Older Trucks and SUVs: Sometimes employ multi-link or leaf spring-based systems with more than two control arms per axle.
It's important to note that rear suspension systems may also include control arms, especially in vehicles with independent rear suspensions. Always refer to your vehicle's specific service manual for accurate component counts and configurations.
A3: While control arms are built for durability, they do experience gradual wear over time, primarily through their bushings and ball joints. These components absorb constant stress from road vibrations and suspension articulation. Early warning signs of a deteriorating control arm include:
- Unusual Noises: Squeaking, clunking, or rattling sounds when turning or driving over bumps often indicate worn bushings or loose ball joints.
- Steering Instability: A shaky or wandering steering feel can point to excessive play in the suspension linkage caused by a weakened control arm.
- Uneven Tire Wear: Misalignment resulting from a compromised control arm leads to irregular tread wear patterns across one or more tires.
- Poor Wheel Alignment: The vehicle pulling to one side or requiring frequent realignments suggests underlying suspension issues involving control arms.
- Visual Indicators: Physical inspection might reveal cracked rubber bushings, grease leakage, or visible separation between ball joint components.
One particular model known for early control arm wear is the control arm 4013a087 found in certain compact sedans and hatchbacks. Regular inspections during maintenance visits can help catch these symptoms early before they escalate into safety concerns.
A4: Driving with a damaged or excessively worn control arm poses serious safety risks and should be avoided. As a central component in maintaining suspension geometry and tire contact, a malfunctioning control arm compromises several critical aspects of vehicle operation:
- Reduced Stability: A weak control arm can cause unpredictable weight transfer and body roll, increasing the likelihood of skidding or losing control during sudden maneuvers.
- Increased Accident Risk: Loss of tire-to-road adhesion at high speeds or on slippery surfaces becomes more likely with compromised suspension linkages.
- Secondary Damage: Faulty control arms place additional strain on other suspension components such as shocks, struts, tie rods, and CV joints, potentially leading to costly repairs.
- Legal Concerns: In some jurisdictions, vehicles with visibly damaged suspension parts may fail safety inspections or emissions tests.
The control arm 4013a087, in particular, has been associated with premature failure in certain models, emphasizing the importance of timely replacement. For safety reasons, it is strongly advised to address any control arm issues immediately rather than risk continued operation with compromised suspension integrity.
A5: Replacing a control arm is considered an intermediate to advanced-level automotive repair task. While experienced DIYers with appropriate tools and mechanical knowledge can undertake this job, it presents several challenges that make it unsuitable for beginners:
- Required Tools: Includes impact wrenches, ball joint separators, press machines, torque wrenches, and proper jack stands.
- Technical Knowledge: Proper procedures involve understanding suspension geometry, torque specifications, and realignment requirements.
- Complex Disassembly: Requires removing wheels, brake components, suspension bolts, and sometimes subframe mounts depending on the vehicle layout.
- Bushings and Ball Joints: Installing new bushings or ball joints often necessitates hydraulic presses or specialized tools not commonly owned by casual mechanics.
To ensure safety and proper installation, most manufacturers recommend having control arm replacements performed by certified technicians at reputable auto repair shops. If attempting a DIY replacement, always consult factory service manuals and verify that you have access to all necessary equipment and expertise beforehand.