


Types of Dirt Bikes for $200
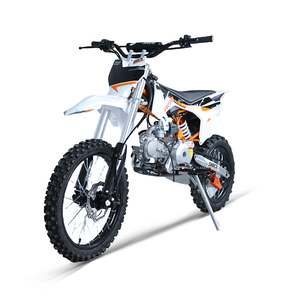
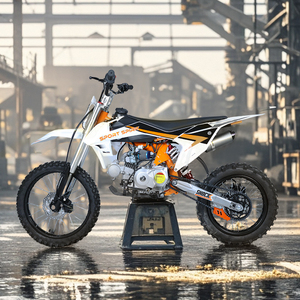
A dirt bike is a specialized motorcycle designed for off-road riding on challenging surfaces such as sand, mud, gravel, and dirt trails. These bikes are typically not street legal and are built to handle rough terrain with superior suspension systems, knobby tires, and lightweight frames.
If you're looking to get started in the world of off-road riding or want an affordable option within a budget of around $200, there are several types of dirt bikes that may fit your needs depending on your skill level, age, and intended use. Here’s a detailed breakdown of the most common types of dirt bikes available in this price range:
Beginner Dirt Bikes
Designed specifically for new riders or younger individuals just getting into off-road riding. These bikes emphasize ease of use, safety, and control rather than performance.
Advantages
- Lower seat height for better ground reach
- Lightweight construction for easy handling
- Smaller engines for manageable power delivery
- Ideal for learning without intimidation
Limitations
- Less powerful for advanced riders
- Not suitable for racing or high-speed riding
- Limited customization potential
Popular Models: Kawasaki KX65, Suzuki RM85
Best for: Kids and teens, novice riders, backyard practice, small tracks
Honda CRF Series
The Honda CRF family is known for its reliability and versatility across different terrains and rider experience levels. The entry-level models are especially popular among beginners and trail riders.
Advantages
- Reputable brand with proven reliability
- Versatile for both trail riding and light racing
- Low seat height for confidence and control
- Easy to find replacement parts and service
Limitations
- More expensive higher-end models
- May require upgrades for serious racing
- Some models can be heavier than competitors
Popular Model: Honda CRF230F (223cc engine)
Best for: Trail riding, beginner-friendly adventures, training
Trail Dirt Bikes
Tailored for long-distance off-road journeys, trail dirt bikes prioritize comfort, endurance, and protection features to tackle extended rides through rugged environments.
Advantages
- Comfortable seating for extended rides
- Large fuel tanks for longer range
- Included handguards and skid plates for protection
- Durable build for consistent trail use
Limitations
- Heavier than racing-focused models
- Less agile on tight motocross tracks
- Higher maintenance due to prolonged use
Best for: Forest trails, mountain paths, all-day excursions
Adult Dirt Bikes
These bikes are built for experienced riders who demand more power and durability from their machines. They are ideal for tackling aggressive terrain and high-performance scenarios like racing.
Advantages
- High-performance engines for speed and torque
- Stronger frames for impact resistance
- Superior suspension systems for rough terrain
- Customizable for racing and technical riding
Limitations
- Difficult for beginners to manage
- Higher cost for top-tier models
- Require more physical strength and skill
Popular Model: Honda CRF450R (449cc engine)
Best for: Racing, motocross, expert-level off-road riding
| Type | Engine Size | Target Rider | Primary Use | Key Features |
|---|---|---|---|---|
| Beginner Dirt Bikes | 50cc–125cc | New riders, children | Learning, practice | Low seat height, lightweight, small engine |
| Honda CRF | 230cc–450cc | All skill levels | Trails, training | Reliable, versatile, comfortable |
| Trail Dirt Bikes | 250cc–450cc | Intermediate to advanced | Long-distance riding | Large fuel tank, durable components, protective gear |
| Adult Dirt Bikes | 400cc–450cc | Experienced riders | Racing, motocross | Powerful engine, advanced suspension, race-ready design |
Expert Tip: When purchasing a used dirt bike for around $200, always inspect the frame for cracks, check the engine's compression, and test ride it if possible. A pre-purchase inspection can save you from costly repairs down the road.
Specifications and Maintenance of Dirt Bikes for 200 cc Models
Key Specifications to Consider When Choosing a 200 cc Dirt Bike
Selecting the right dirt bike involves understanding specific performance and fitment characteristics that influence riding experience, safety, and long-term satisfaction. The following specifications are particularly important when choosing a 200 cc model:
Engine Capacity
Dirt bikes with engine capacities under 200 cc are ideal for young riders (typically under 16 years old) due to their manageable power output. For new adult riders, models between 125 cc and 200 cc provide an excellent balance between usability and performance.
This range allows beginners to develop control while offering enough power for trail riding or light motocross applications without overwhelming the rider.
Seat Height
The seat height should allow the rider to place both feet firmly on the ground while seated. This ensures better control during stops and technical maneuvers.
Most 200 cc dirt bikes have seat heights ranging from 34 to 37 inches, making them suitable for riders between 4'10" and 5'6". Adjustable seats or suspension settings can further tailor this fit to individual needs.
Bike Weight
A lightweight frame is crucial for easy handling, especially for less experienced riders. Most 200 cc dirt bikes weigh between 180 and 220 pounds fully fueled.
Lighter bikes improve maneuverability in tight trails and reduce fatigue over extended rides, allowing riders to focus more on technique and control.
Power Delivery Characteristics
For beginners, smooth and predictable power delivery is essential. A well-tuned 200 cc engine should offer linear acceleration without sudden surges of power.
This characteristic helps build confidence and improves throttle control, which is vital for developing proper riding techniques and safety awareness.
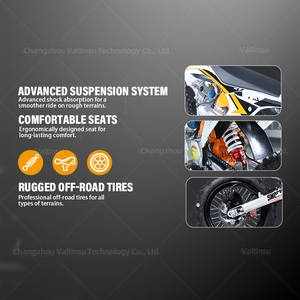
Suspension System
Quality adjustable suspension systems are critical for adapting to different terrains and rider weights. Look for forks and rear shocks that allow compression and rebound damping adjustments.
Properly tuned suspension enhances comfort, traction, and control by maintaining tire contact with the ground across varied terrain conditions.
Braking System Performance
Effective braking systems should offer strong stopping power with progressive feel. Disc brakes are standard on 200 cc dirt bikes, typically featuring single-piston calipers front and rear.
Hydraulic disc brakes provide better modulation and consistency compared to mechanical systems, especially in muddy or wet conditions where performance matters most.
| Specification | Importance | Selection Tips |
|---|---|---|
| Manual Transmission | High | Look for a smooth-shifting six-speed gearbox with an easy-to-pull clutch lever, especially for younger or smaller riders |
| Tire Tread Pattern | Medium | Choose tires appropriate for your primary riding environment – soft terrain requires aggressive knobbies, while hardpack favors shallower treads |
| Fuel Capacity | Medium | Smaller fuel tanks (1.5-2 gallons) keep weight down but limit ride duration; consider refueling logistics for longer trail sessions |
| Ground Clearance | High | Higher clearance (12-14 inches) prevents frame scraping on rough trails and obstacles |
Recommended Maintenance Practices for 200 cc Dirt Bikes
Regular maintenance is essential for keeping your 200 cc dirt bike performing at its best while extending its service life. The following practices will help maintain optimal mechanical condition:
Important: When replacing any critical component like suspension parts, brakes, or drivetrain elements, always replace all related wear items simultaneously. Mixing new and worn components can create imbalance in performance characteristics and accelerate premature wear of newly installed parts.
How to Choose Dirt Bikes for 200
Selecting the ideal dirt bike within a budget of $200 requires careful evaluation of multiple factors to ensure you get the best value and performance suited to your riding needs. Whether you're a beginner or an experienced rider looking for an affordable option, understanding key selection criteria will help you make an informed decision.
Rider's Age and Size
The physical attributes and experience level of the rider play a crucial role in selecting a suitable dirt bike. Smaller riders, especially younger ones, benefit from lightweight frames and lower seat heights that allow them to maintain better control and balance. This is particularly important when navigating rough terrain or during extended rides.
- Kids and teens often find bikes like the Kawasaki KX65 or Suzuki RM85 manageable due to their compact design and 2-stroke engines
- Adults with average height and weight can opt for mid-sized models with higher ground clearance
- Taller riders should look for bikes with adjustable handlebars and longer wheelbases
Key consideration: Ensure the rider can comfortably place both feet on the ground while seated
Engine Size and Performance
Engine displacement significantly affects the power output, speed capabilities, and overall handling characteristics of a dirt bike. Choosing the appropriate engine size depends on the rider's skill level, intended use, and comfort with throttle response.
- 50cc-125cc: Ideal for beginners and young riders seeking manageable power delivery
- 150cc-250cc: Great all-around options for trail riding and light motocross use
- 300cc-450cc: Designed for experienced riders seeking competitive performance
Performance note: Larger engines generally provide more low-end torque but may be harder to manage for novice riders
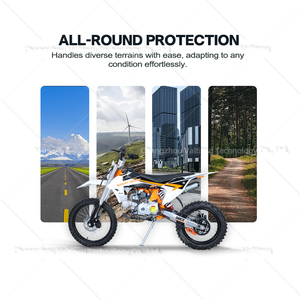
Type of Terrain
Different terrains demand different bike configurations to optimize traction, suspension travel, and maneuverability. Understanding where you'll ride most frequently helps narrow down your choices to models specifically engineered for those conditions.
- Sandy areas: Look for wide tires and long-travel suspension (e.g., Honda CRF450R)
- Rocky trails: Prioritize ground clearance and durable frame construction
- Wooded paths: Lightweight trail-specific models like the KTM XC-W 300 excel in tight environments
- Motocross tracks: Purpose-built racing machines with aggressive geometry
Terrain tip: Consider tire tread patterns matched to your primary riding surface
Riding Style and Intended Use
Your preferred riding style greatly influences which dirt bike will best suit your needs. Manufacturers engineer specific models for particular disciplines, balancing agility, durability, and comfort accordingly.
- Aggressive off-road/motocross: High-performance models like Suzuki RM-Z450 with race-tuned suspension
- Recreational trail riding: Versatile options such as Honda CRF230F with comfortable ergonomics
- Enduro/adventure: Dual-sport capable bikes with street legal modifications
- Beginner training: Entry-level models with reduced power outputs and forgiving handling
Style impact: Racing-oriented bikes typically sacrifice comfort for track-ready responsiveness
Budget and Cost Considerations
While initial purchase price is important, it's essential to consider the total cost of ownership when selecting a dirt bike. Maintenance frequency, parts availability, insurance premiums, and fuel efficiency all contribute to long-term expenses.
- Entry-level bikes like the Kawasaki KLX140G offer excellent value with minimal maintenance costs
- Mid-range models like Yamaha YZ250F provide enhanced performance at a reasonable increase in cost
- Premium machines require greater investment in both purchase price and upkeep
- Used bikes can offer significant savings if properly inspected before purchase
Financial advice: Allocate ~10-15% of purchase price annually for maintenance and gear replacement
Popular Budget-Friendly Models Under $200
Several reliable dirt bikes fall within the $200 range, offering various features tailored to different rider profiles and preferences. While prices may vary slightly depending on condition and location, these models represent strong value propositions:
- Honda CRF150F: Reliable single-cylinder engine, great for trail riding
- Kawasaki KLX110L: Excellent starter bike with user-friendly power delivery
- Yamaha TT-R125LE: Electric start convenience and smooth-running engine
- Suzuki DR-Z50: Perfect for young riders or complete beginners
Recommendation: Research local market values and inspect used bikes thoroughly before purchasing
Buying Advice: When working within a tight budget, prioritize mechanical soundness over cosmetic appearance. A well-maintained bike with some scratches will serve you better than one in pristine condition with neglected maintenance. Always test ride any used bike before purchase to assess its performance and comfort fit.
| Model | Engine Type | Recommended For | Average Price Range |
|---|---|---|---|
| Honda CRF150F | 149cc air-cooled single | Trail riding, recreational use | $1,800 - $2,200 (used) |
| Kawasaki KLX110L | 112cc air-cooled single | Beginners, youth riders | $1,500 - $1,900 (used) |
| Yamaha TT-R125LE | 125cc liquid-cooled single | New riders, trail enthusiasts | $1,700 - $2,100 (used) |
| Suzuki DR-Z50 | 49cc air-cooled single | Young children, first-time riders | $1,200 - $1,600 (used) |
How to DIY and Replace Dirt Bike Brake Pads on a 200cc Model
Many manufacturers of 200cc dirt bikes provide comprehensive maintenance and repair manuals to assist users in performing essential repairs and replacements. These guides are invaluable for tasks such as replacing the engine, adjusting the suspension, or repairing the braking system. In this guide, we will focus specifically on replacing brake pads — one of the most common maintenance tasks that every dirt bike owner should be familiar with.
Safety Warning: Always ensure the bike is securely mounted and the area is clear before starting any work. Wear protective gloves and eyewear when handling cleaning agents or lubricants.
Why Brake Pad Replacement Matters
Brake pads are crucial components of your dirt bike's braking system. Over time, they wear down due to friction during use. Worn-out brake pads can significantly reduce stopping power and compromise rider safety. Replacing them regularly ensures optimal performance, especially after aggressive off-road riding or prolonged exposure to mud and dust.
Maintenance Tip: Check your brake pads every 10–20 hours of riding. If the pad thickness is less than 2mm, it’s time for replacement. Never ride with excessively worn pads as this can damage the brake discs and calipers.
Step-by-Step Brake Pad Replacement Guide
- Preparation
- Park the dirt bike on a flat surface and engage the parking brake if applicable.
- Secure the bike using a center stand or paddock stand for stability.
- Gather all necessary tools: new brake pads, brake cleaner spray, clean rags, lubricant (preferably silicone-based), wrenches, and screwdrivers.
- Refer to your service manual for specific instructions related to your bike model.
- Wheel Removal
- Loosen the axle nuts or quick-release mechanism depending on your bike’s design.
- Lift the appropriate wheel (front or rear) and remove it from the frame.
- Take off the wheel spacers and set them aside in a safe place.
- Remove the brake disc from the hub to access the caliper more easily.
- Caliper Disassembly
- Locate the caliper — usually mounted near the wheel hub and connected to the brake disc.
- Use a socket wrench to loosen and remove the bolts securing the caliper to the fork (for front brakes) or swingarm (for rear brakes).
- Carefully lift the caliper off without pulling on the brake hose to avoid damaging it.
- If possible, hang the caliper using a bungee cord or wire to prevent strain on the hydraulic lines.
- Replacing the Brake Pads
- Slide out the old brake pads from the caliper housing. They may require a gentle push from the back or removal of retaining clips.
- Inspect the caliper pistons for dirt or corrosion. Use brake cleaner and a soft cloth to clean them thoroughly.
- Insert the new brake pads into the caliper, ensuring they sit flush and align properly with the brake disc.
- Avoid touching the friction surface of the pads with bare hands to prevent contamination.
- Reassembly
- Reinstall the caliper onto the brake mounting bracket and secure it with the bolts.
- Tighten the bolts to the manufacturer’s recommended torque specifications.
- Refit the brake disc and wheel assembly, making sure everything is aligned correctly.
- Reconnect the brake lever linkage or adjust the lever free play as needed.
- Testing and Final Checks
- Before riding, pump the brake lever several times to seat the pads against the disc.
- Visually inspect all connections, bolts, and lines for tightness and leaks.
- Take the bike for a short test ride at low speed to ensure the brakes respond smoothly and effectively.
- Listen for unusual noises like squealing or grinding which may indicate improper installation or pad alignment issues.
| Stage | Essential Tools | Common Issues | Time Required |
|---|---|---|---|
| Preparation | Socket set, tire stand, service manual | Misplaced parts, missing tools | 15–30 minutes |
| Wheel & Caliper Removal | Wrenches, screwdrivers, zip ties | Damaged brake lines, stuck caliper bolts | 30–45 minutes |
| Pad Installation | Brake pads, brake cleaner, gloves | Improper seating, contamination | 20–30 minutes |
| Reassembly & Testing | Lubricant, torque wrench, pressure tester | Leaking fluid, poor brake response | 30–60 minutes |
Expert Tip: After installing new brake pads, allow for a break-in period of about 10–15 stops before engaging in heavy braking. This helps the pads and discs bed in together for better performance and longevity.
Additional Maintenance Tips
While you're working on your brakes, consider checking the following components to ensure overall system health:
- Brake Fluid: Check the level and condition of the brake fluid. Cloudy or dark-colored fluid may need flushing and replacing.
- Brake Disc: Inspect for deep grooves, warping, or cracks. A damaged disc should be replaced to avoid uneven pad wear.
- Caliper Sliders: Ensure they move freely and are lubricated. Sticking sliders can cause uneven pad wear and reduced braking efficiency.
Dirt Bike FAQs for Beginners and Young Riders
For novice riders, 4-stroke dirt bikes are generally the better option due to their smoother and more predictable power delivery. These engines provide a linear throttle response that's easier to manage, allowing new riders to build confidence gradually.
On the other hand, 2-stroke dirt bikes offer a sharper powerband with more immediate acceleration once the engine reaches higher RPMs. This can be difficult for inexperienced riders to control, especially in off-road conditions where maintaining balance and momentum is crucial.
- Advantages of 4-stroke engines:
- Easier to ride for extended periods
- Better low-end torque for hill climbing and technical trails
- More forgiving for learning clutch and throttle control
While some experienced riders appreciate the lightweight nature and raw power of 2-strokes, most riding schools and training programs recommend starting with a 4-stroke engine before progressing to more advanced models.
The break-in period for a new dirt bike typically spans the first 10 to 15 hours of operation or approximately 500 miles, depending on the manufacturer's specifications. This critical phase allows the engine components to wear in properly and seat correctly, which contributes to long-term reliability and performance.
During this period, it's essential to follow these best practices:
- Avoid sustained high RPM operation
- Change gears frequently to vary engine speed
- Do not exceed recommended load limits
- Perform regular oil changes as specified (often after the first few hours)
Adhering to proper break-in procedures helps prevent premature engine wear, ensures optimal fuel efficiency, and maximizes the lifespan of your dirt bike. Always consult your owner's manual for model-specific guidelines.
Maintaining a clean air filter is crucial for protecting your dirt bike's engine and ensuring peak performance. In general, air filters should be inspected and cleaned after every ride, especially if ridden in dusty or muddy conditions.
Key maintenance tips include:
- Clean after each ride under normal conditions
- Inspect more frequently during extreme riding conditions
- Replace foam or paper elements when worn or damaged
- Use appropriate cleaning solutions and lubricants
A dirty air filter restricts airflow, leading to reduced power output, increased fuel consumption, and potential engine damage from ingested particles. Regular cleaning not only maintains performance but also extends the life of your dirt bike's engine by preventing abrasive wear.
An 11-year-old rider should typically start with a dirt bike equipped with a 50cc to 90cc engine, not 22-24cc as previously stated. The 22-24cc range would actually apply to much younger children, around 3 to 5 years old. For an 11-year-old, appropriate sizing considers both physical development and experience level.
| Rider Age | Recommended Engine Size | Typical Frame Size |
|---|---|---|
| 5-7 years | 50cc | 16"-18" wheel |
| 8-10 years | 70cc-90cc | 19"-21" wheel |
| 11-14 years | 90cc-125cc | 21"-24" wheel |
Proper fit is essential – the child should be able to touch the ground with the balls of their feet while seated, reach all controls comfortably, and handle the weight of the bike when stopped. Starting with a smaller, lighter bike allows young riders to develop skills safely before moving up to larger machines.
Yes, electric start dirt bikes are excellent choices for beginners. The electric start system offers several advantages that make learning to ride more accessible and less frustrating:
- Eliminates the need for precise kickstarting technique
- Reduces physical strain during repeated startup attempts
- Allows focus on fundamental riding skills rather than engine starting mechanics
- Provides reliable ignition in various weather conditions
Modern electric start systems are durable and relatively lightweight, adding minimal complexity to the bike. They're particularly beneficial for new riders who may struggle with timing and force required for traditional kickstarts, especially when restarting on hills or in challenging terrain.
However, it's still valuable to understand kickstart operation as a backup method in case of battery failure or electrical issues, even when primarily using an electric start dirt bike.