All categories
Featured selections
Trade Assurance
Buyer Central
Help Center
Get the app
Become a supplier
Alibaba
Vehicle Accessories, Electronics, & Tools
Vehicle Tools
Other Vehicle Tools
Popular in your industry
Cute Car Decoration
Smart In-Car Entertainment
Bling Car Decoration
Sports Car Decoration
Camping
Camouflage Car Decoration
Previous slide
Next slide
Instrument cluster repair tools
(65 products available)
Previous slide
Next slide
7 Speed DSG Double Clutch Installer Remover Dual-clutch Transmission
Tool
Kit For VAG VW Audi DSG T10373 T10376 T10323
$
32
.00 - $
45
.00
Min. Order: 5 sets
10 yrs
CN
Supplier
4.8/5.0
·
45 reviews
·
"Fast delivery"
Contact supplier
Chat now
Previous slide
Next slide
Test Leads Multimeter Diagnostic
Tools
Test Point Probe Leads Kit CAT III 1000V CAT IV 600V With Threaded Alligator Clips
Ready to Ship
$
6
.80 - $
10
.00
Min. Order: 10 pieces
Shipping per piece: $1.71
19 yrs
CN
Supplier
5.0/5.0
·
18 reviews
·
"Fast delivery"
Contact supplier
Chat now
Previous slide
Next slide
Car Auto Meter Speedometer Panel Digital Dashboard
Instrument
Cluster
For Land Range Rover Evoque L538 2012-2018
Ready to Ship
$
798
.00 - $
868
.00
Min. Order: 1 piece
5 yrs
CN
Supplier
4.6/5.0
·
41 reviews
·
"Timely Shipping"
Contact supplier
Chat now
Previous slide
Next slide
RoadNavi Custom Car
Instrument
Cluster
Auto Digital Speedometer For Chevrolet Camaro 2010-2015 Car Radio Navigation
Ready to Ship
$
858
.00 - $
928
.00
Min. Order: 1 piece
Shipping per piece: $78.16
5 yrs
CN
Supplier
4.6/5.0
·
41 reviews
·
"Timely Shipping"
Contact supplier
Chat now
Previous slide
Next slide
RoadNavi Car Digital
Cluster
For Toyota LC70 LC75 LC76 LC79 Lcd Speedometer Multifunctional
Instrument
Dashboard
Ready to Ship
$
798
.00 - $
868
.00
Min. Order: 1 piece
5 yrs
CN
Supplier
4.6/5.0
·
41 reviews
·
"Timely Shipping"
Contact supplier
Chat now
Previous slide
Next slide
High Quality For Deutsch 9Pin J1939 Truck To OBD16pin Cable Female 16 For J1939 Male Diagnosctic
Tool
Connector
$
5
.00 - $
8
.00
Min. Order: 5 pieces
1 yrs
CN
Supplier
4.3/5.0
·
1 reviews
Contact supplier
Chat now
Previous slide
Next slide
CGpro Automotive Universal Car Key Programmer, Car Digital
Instrument
Cluster
Repair
Tool
Ready to Ship
$
363
.00 - $
495
.00
Min. Order: 1 piece
Shipping per piece: $27.17
4 yrs
CN
Supplier
4.2/5.0
·
4 reviews
·
"Perfect service"
Contact supplier
Chat now
Previous slide
Next slide
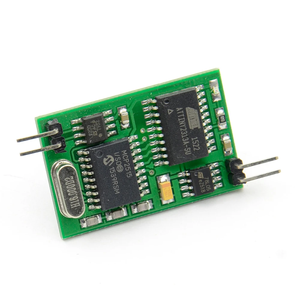
High Quality For Re-nault CAN BUS Emulator for
Instrument
Cluster
Repair
diagnostic
tool
For Re-nault In Stock
Ready to Ship
$
10
.40 - $
14
.90
Min. Order: 5 sets
Shipping per piece: $4.70
2 yrs
CN
Supplier
4.5/5.0
·
50 reviews
·
"received on time"
Contact supplier
Chat now
1
2
1
/
2