


Types of Lima Xenon Models
The Lima Xenon series is a versatile range of vehicles designed to meet the diverse needs of various industries and transportation sectors. With three distinct models—Xenon 1K, Xenon 2K, and Xenon 3K—this lineup offers tailored solutions for commercial fleets, luxury transport, and emergency services. Each model brings unique features that cater to specific use cases while maintaining reliability, safety, and efficiency.
Lima Xenon 1K
A practical and cost-efficient vehicle designed for schools, public transport, and commercial fleets. The Xenon 1K emphasizes safety, affordability, and functionality.
Advantages
- Cost-effective operation and maintenance
- Spacious cabin with customizable seating options
- Excellent visibility for safe driving conditions
- Equipped with standard airbags and ABS for safety
- Reliable engine with fuel-efficient performance
Limitations
- Basic interior design with limited luxury features
- Fewer advanced technology integrations
- Not ideal for high-end or executive transportation
Best for: School buses, corporate fleets, logistics, and freight transportation
Lima Xenon 2K
A premium vehicle tailored for luxury transportation, offering enhanced comfort, cutting-edge technology, and a refined driving experience.
Advantages
- High-quality interior with luxurious finishes
- Advanced infotainment system with navigation and smartphone integration
- Sound-dampening materials for a quiet ride
- Smooth handling and responsive steering
- Ideal for long-distance travel and VIP services
Limitations
- Higher acquisition and maintenance costs
- Less suited for rugged or frequent daily use
- May require specialized servicing
Best for: Executive transportation, airport transfers, and corporate events
Lima Xenon 3K
A high-performance vehicle engineered specifically for emergency services, offering agility, durability, and mission-critical features.
Advantages
- Potent engines for rapid response times
- All-wheel drive (AWD) or four-wheel drive (4WD) for superior traction
- Enhanced safety systems including roll cages and crash protection
- Excellent visibility and ergonomics for first responders
- Designed for easy communication and coordination in critical situations
Limitations
- More expensive than standard models
- Specialized training may be required for optimal use
- Not suitable for non-emergency or general-purpose applications
Best for: Police, fire departments, EMS, and government agencies
| Model | Primary Use | Key Features | Comfort Level | Performance Focus |
|---|---|---|---|---|
| Lima Xenon 1K | School & Commercial Transport | Spacious cabin, Safety Systems (ABS, Airbags), Fuel Efficiency | Moderate | Economy & Practicality |
| Lima Xenon 2K | Premium & Executive Transport | Luxury Interior, Advanced Tech, Quiet Ride | High | Comfort & Refinement |
| Lima Xenon 3K | Emergency Services | High-Performance Engine, AWD/4WD, Enhanced Safety | Moderate | Agility & Response Time |
Expert Tip: When selecting between the Lima Xenon models, always consider your primary usage scenario. For example, if you're operating a school bus fleet, prioritize the Xenon 1K for its cost-efficiency and safety features. For luxury transport, invest in the Xenon 2K’s premium comforts and tech. Emergency services should opt for the Xenon 3K's performance and safety capabilities.
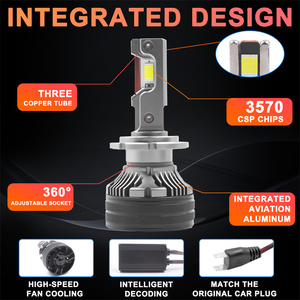
Specifications and Maintenance of Lima Xenon Headlight Kits
Understanding Key Specifications
Lima Xenon headlight kits are designed to deliver superior lighting performance for vehicles. To ensure you select the right product for your needs, it’s important to understand the key specifications that define these systems:
Bulb Type and Size
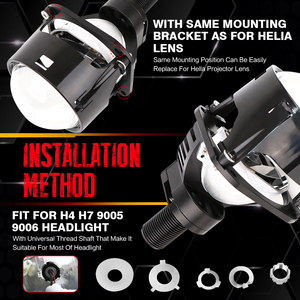
The bulb type determines compatibility with your vehicle's headlight housing. Common types include H1, H3, H4, H7, H11, 9004, 9005, 9006, 9007, 9012, and D2. Each has a unique base design and overall dimensions to fit specific automotive configurations.
Choosing the correct bulb type ensures proper installation and optimal positioning within the reflector or projector housing system.
Wattage Options
Available wattages typically range from 35W (standard), 55W (high output), to 75W (extreme output). While higher wattages produce brighter light, they also consume more power and may generate additional heat.
It's essential to verify your vehicle's electrical system can handle higher wattage bulbs without overloading circuits or affecting other components like alternators or fuses.
Color Temperature Range
Lima Xenon headlights offer various color temperatures measured in Kelvin (K). Lower values like 3000K produce warm yellow tones ideal for fog penetration, while higher values up to 12000K emit cool bluish-white light that enhances visibility during clear conditions.
Most drivers prefer 4300K-6000K as this mimics natural daylight and provides excellent contrast without compromising legal road use in many regions.
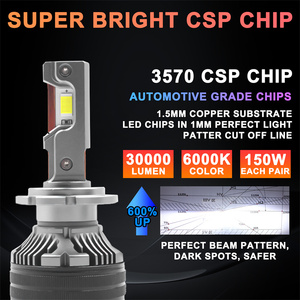
Lumen Output
Lumens measure total visible light emitted by the bulb. Lima Xenon units typically range between 2500-5000 lumens per bulb depending on model and configuration.
Higher lumen outputs improve nighttime visibility but should be balanced with beam pattern control to prevent glare for oncoming traffic.
| Specification | Description | Recommended Standards |
|---|---|---|
| Voltage Requirements | Determines electrical compatibility with vehicle systems | Standard 12V systems; models supporting 10-14V provide better stability across varying electrical loads |
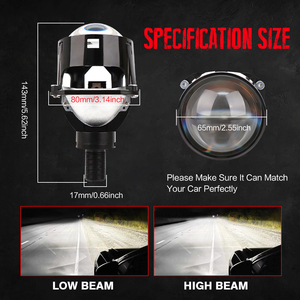
| Physical Dimensions | Length and diameter measurements for proper fitment | Lengths 50-130mm / Diameters 25-50mm – verify with manufacturer diagrams before purchase |
| Adjustable Brightness | Allows customization of light intensity | Look for dimming capabilities or dual-beam controls for enhanced versatility |
| Certifications | Indicates compliance with safety and quality standards | Mandatory: CE, RoHS | Recommended: E-mark, SAE, DOT for road legality and reliability |
Essential Maintenance Practices
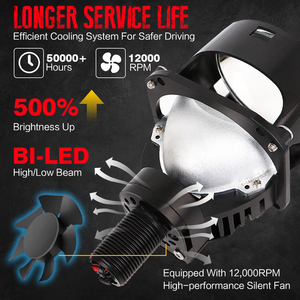
Proper maintenance significantly extends the lifespan of Lima Xenon headlights, which can last up to 20,000 hours with appropriate care. Follow these best practices to maintain optimal performance:
Important: When replacing any component in a xenon system, always replace both headlights simultaneously. Mixing old and new units creates uneven lighting patterns that compromise safety and accelerate wear on newer components due to mismatched operating conditions.
How to Choose Lima Xenon Headlight Bulbs
Selecting the ideal Lima Xenon headlight bulbs requires careful consideration of multiple technical and practical factors to ensure optimal visibility, safety, and compatibility with your vehicle's lighting system.
Wattage and Brightness Considerations
Lima Xenon bulbs typically produce significantly more light output than conventional halogen bulbs while maintaining energy efficiency. The wattage directly affects both brightness and heat generation.
- Standard replacements usually range from 35W-55W depending on application
- Higher wattage provides increased illumination but generates more heat
- Ensure electrical system can handle increased power draw
- Consider beam pattern changes with different wattages
Important: Exceeding manufacturer-recommended wattage may damage headlight housings or wiring
Bulb Size and Compatibility
Proper fitment is crucial for both performance and legal compliance. Each vehicle model has specific bulb socket types and physical dimensions requirements.
- Common sizes include H1, H3, H4, H7, H11, 9005, 9006
- Verify exact fit using vehicle owner's manual or online compatibility tools
- Check for proper orientation and locking mechanism engagement
- Some models require additional adapters or modifications
Measurement tip: Compare base type, glass length, and filament position specifications
Color Temperature Options
The color temperature of Lima Xenon bulbs significantly impacts both aesthetics and functional visibility. Measured in Kelvin (K), this rating determines the light's hue and perceived brightness.
- 4000K-4500K: Standard "Xenon White" - optimal balance of brightness and visibility
- 5000K: Pure white light - excellent for night driving
- 6000K: Slight blue tint - enhanced aesthetic appeal with good visibility
- 8000K+: Deep blue/purple tones - primarily for show purposes due to reduced visibility
Visibility note: Higher Kelvin ratings appear whiter/blue but may actually reduce road illumination effectiveness
Installation Requirements
Installation complexity varies significantly between different Lima Xenon bulb models and vehicle applications. Proper installation ensures longevity and optimal performance.
- Plug-and-play options work as direct replacements without modifications
- Ballast-required systems need professional installation
- Some vehicles need relay harnesses to prevent error codes
- Waterproof vs standard designs affect durability in wet conditions
Safety warning: Always disconnect battery before installation and avoid touching glass portion of bulb
Selection Advice: For most drivers, starting with a 4300K-5000K bulb offers the best combination of visibility, legal compliance, and aesthetic appeal. If upgrading from factory halogen bulbs, consider that xenon technology will provide approximately twice the light output while consuming similar power. For those seeking maximum performance, look for bulbs with enhanced UV cutoff features to protect headlight lenses from degradation.
| Purpose | Recommended Color Temp | Visibility Rating | Aesthetic Appeal |
|---|---|---|---|
| Nighttime highway driving | 4000K-4500K | ★★★★☆ | ★★★☆☆ |
| Daily commuting | 4300K-5000K | ★★★★★ | ★★★★☆ |
| Show/styling focus | 6000K-8000K | ★★☆☆☆ | ★★★★★ |
| Foggy/mist conditions | 3000K-3500K | ★★★★★ | ★☆☆☆☆ |
Comprehensive DIY Guide for Replacing Lima Xenon Headlights
Upgrading to or replacing Lima Xenon headlights is an effective way to enhance visibility and aesthetics during night driving. While the process can seem complex at first, with proper preparation and tools, this task can be accomplished by most car owners in a home garage. This detailed guide will walk you through every step of the replacement process while offering valuable tips to ensure success.
Safety Warning: Always work on a cool engine and disconnected battery to prevent electrical shock. Wear protective gloves when handling xenon bulbs to avoid oil contamination which can cause hotspots and reduce bulb lifespan.
Essential Tools and Materials
Before beginning your headlight replacement, gather all necessary tools and materials. Having everything prepared in advance will streamline the process and prevent interruptions.
- Owner's Manual: Contains vehicle-specific instructions and bulb specifications
- Socket Wrench Set: For removing bolts securing the headlight assembly
- Torx Screwdriver: Required for vehicles using security Torx bolts
- Nitrile Gloves: Prevents oil transfer from hands to the glass surface of the xenon bulb
- Lima Xenon Bulbs: Ensure correct bulb type (e.g., H4, H7, D2S/D2R) matching your headlight housing
- Clean Microfiber Cloth: For cleaning lens surfaces if needed
- Flashlight or Work Light: Helps illuminate tight engine bay spaces
| Tool Category | Required Items | Optional Accessories | Purpose |
|---|---|---|---|
| Basic Hand Tools | Socket set, screwdrivers | Magnetic tray, extension bars | Removing headlight assembly hardware |
| Protection Gear | Nitrile gloves, safety glasses | Work gloves, face mask | Safeguarding against debris and bulb contamination |
| Diagnostic Tools | Multimeter (optional) | Headlight alignment tool | Testing electrical connections and beam pattern |
| Cleaning Supplies | Isopropyl alcohol, lint-free cloths | Plastic polish, lens restoration kit | Maintaining clean electrical contacts and lens clarity |
Pro Tip: Consider replacing both headlights simultaneously even if only one has failed. This ensures balanced illumination and avoids having to repeat the process soon after.
Step-by-Step Replacement Procedure
- Preparation and Access
- Turn off the vehicle and engage the parking brake
- Allow the engine to cool completely before starting
- Locate the headlight access panel behind the headlight unit – typically found in the engine compartment
- Consult your owner’s manual for specific bolt locations and removal sequence
- Removing Old Components
- Remove any covers or shields blocking access to the headlight assembly
- Disconnect the wiring harness from the back of the headlight unit
- If applicable, remove retaining clips or brackets holding the old bulb in place
- Gently pull the old bulb straight out without twisting to avoid damaging connectors
- Handling New Lima Xenon Bulbs
- Always handle new bulbs with clean nitrile gloves – never touch the glass with bare hands
- Avoid dropping or bumping the bulb as internal components can be fragile
- Match the base type of the new bulb with the original to ensure proper fitment
- Keep bulbs in their packaging until ready for installation to protect from contaminants
- Installing New Bulbs
- Align the new Lima Xenon bulb with the socket according to manufacturer markings
- Insert the bulb straight into the socket without excessive force
- Secure any locking tabs or clips that hold the bulb in place
- Reconnect the wiring harness ensuring it clicks securely into place
- Final Assembly and Testing
- Replace any removed covers or panels behind the headlight unit
- Reinstall all bolts and fasteners to factory torque specifications
- Start the vehicle and turn on the headlights to verify proper operation
- Check both high and low beam functions if applicable
Important Note: If the headlight does not illuminate immediately, double-check all connections before testing again. Avoid repeated attempts to start the lights without resolving connection issues.
Post-Installation Checks and Maintenance
After successfully installing your new Lima Xenon headlights, perform these additional checks to ensure optimal performance:
- Verify beam pattern alignment – adjust if necessary according to owner’s manual instructions
- Inspect for any water intrusion signs in the headlight assembly
- Check for secure connections periodically during the first few weeks
- Monitor color consistency between both headlights
- Keep lenses clean using appropriate automotive glass cleaner
Maintenance Tip: Regularly inspect headlight seals and wiring connections every 6 months or during routine maintenance intervals to ensure continued reliable operation.
By following this comprehensive guide, you can confidently replace your Lima Xenon headlights and significantly improve nighttime visibility and driving safety. Remember to always consult your vehicle’s owner’s manual for specific instructions related to your make and model.
Frequently Asked Questions About Headlights and Ballasts
Using a 35W ballast with a 55W bulb is not recommended. The mismatch between the ballast and bulb wattage can lead to several issues:
- Inadequate Power Supply: A 35W ballast cannot deliver the necessary electrical current for a 55W bulb, resulting in insufficient light output.
- Reduced Lifespan: Continuous operation underpowered conditions may cause stress on the bulb components, leading to premature failure.
- Color and Performance Issues: The bulb may not reach its intended color temperature or brightness level, affecting visibility and aesthetics.
For optimal performance and longevity, always match the ballast wattage to the bulb's specifications.
The distinction between 35W and 55W ballasts primarily revolves around power delivery, light output, and thermal characteristics:
| Feature | 35W Ballast | 55W Ballast |
|---|---|---|
| Power Output | Lower (standard HID applications) | Higher (performance-oriented lighting) |
| Brightness | Moderate light output | High-intensity light output |
| Heat Generation | Less heat produced | Significantly more heat generated |
| Lifespan | Longer life expectancy | Shorter due to higher stress levels |
| Application | Factory HID systems, daily driving | Racing, off-road, or specialty lighting |
Choosing the right ballast depends on your vehicle’s design, legal requirements, and desired lighting performance.
While replacing xenon headlights in pairs is not mandatory, it is highly advisable for several reasons:
- Consistent Light Output: Over time, one bulb may degrade faster than the other, causing uneven illumination that can impair night-time visibility.
- Matching Color Temperature: New bulbs maintain their factory color rating better than older ones, which tend to yellow or dim over time. Replacing both ensures a uniform appearance.
- Prevent Electrical Imbalance: If one side fails first, the remaining bulb may experience increased voltage stress, potentially shortening its lifespan as well.
Replacing both bulbs at once helps maintain safety, aesthetics, and long-term reliability of your headlight system.
Xenon lights can be retrofitted into many vehicles, but compatibility varies depending on the original lighting setup:
- HID-Compatible Vehicles: Cars originally equipped with HID headlights can accept standard xenon upgrades without additional hardware.
- Halogen Systems: Installing xenon bulbs directly into halogen fixtures is not recommended and may result in improper beam patterns or glare. A complete HID conversion kit—including ballasts and wiring—is required.
- Legal Considerations: In some regions, retrofitting non-OEM xenon systems may violate road safety regulations. Always verify local laws before installation.
For best results and compliance, consult a professional installer or choose kits specifically designed for your vehicle make and model.
Absolutely—35W HID (High-Intensity Discharge) bulbs are significantly brighter than traditional halogen bulbs. Here's why:
- Light Output: HID bulbs produce up to three times more lumens per watt than halogens, offering superior visibility without drawing more power.
- Color Temperature: HIDs typically emit a whiter or bluer light (4000K–6000K range), which appears brighter and mimics natural daylight, improving contrast perception.
- Efficiency: They consume less energy while delivering greater brightness, making them ideal for extended nighttime driving or adverse weather conditions.
Upgrading to 35W HIDs provides enhanced safety and visual clarity, especially in low-light environments, compared to standard halogen setups.