


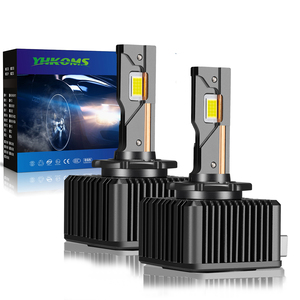


Types of Osram D1S 6000K HID Headlight Bulbs
The Osram D1S 6000K is a premium-grade High-Intensity Discharge (HID) headlight bulb designed to deliver superior illumination and enhance nighttime visibility for drivers. These bulbs emit a crisp white light with a color temperature of 6000K—closely resembling natural daylight—which not only improves road clarity but also gives vehicles a modern, sophisticated appearance.
Available in multiple variants, the Osram D1S 6000K series offers tailored performance options to suit different driving conditions and preferences. Whether you're looking for maximum brightness, enhanced style, or balanced functionality, there’s a version that fits your needs.
Cool Blue Intense
This variant features a distinctive blue tint while maintaining a 6000K color temperature. It delivers a bright, clean white light that significantly outperforms standard halogen bulbs in terms of clarity and output. While slightly less luminous than the standard 6000K D1S model, it adds a stylish aesthetic appeal that many car enthusiasts prefer.
Advantages
- Stylish blue-tinted white light
- Improved visibility over halogens
- Modern look ideal for show cars
- Reliable OEM-level performance
Limitations
- Slightly lower lumen output than standard D1S
- May appear too cold for some users' taste
Best for: Drivers who value aesthetics alongside good performance, especially on tuner or luxury vehicles
Night Breaker Laser
The top-tier option in the Osram D1S lineup, the Night Breaker Laser delivers the highest lumen output among all 6000K variations. Engineered for optimal visibility, this bulb illuminates the road further and more clearly, making it ideal for night driving, rural roads, or anyone seeking the brightest possible lighting solution.
Advantages
- Maximum brightness available in D1S series
- Extended beam reach for safer driving
- Enhanced contrast and clarity on the road
- Excellent for low-light environments
Limitations
- Higher cost compared to other variants
- May be overly bright for urban settings
Best for: Performance drivers, frequent night travelers, and those prioritizing visibility over styling
Standard D1S 6000K
The original and most commonly used version of the Osram D1S 6000K series, this bulb strikes a balance between brightness, color temperature, and longevity. It provides a consistent white light without excessive tinting, making it suitable for both daily commuting and long-distance travel.
Advantages
- Balanced white light with minimal tint
- Reliable and proven performance
- Cost-effective choice for most drivers
- Compatible with most factory ballasts
Limitations
- Not as bright as Night Breaker Laser
- Lacks the visual flair of Cool Blue Intense
Best for: Everyday use, OEM replacements, and drivers seeking reliable lighting without extremes
| Variation | Color Temperature | Luminosity | Style | Recommended Use |
|---|---|---|---|---|
| Standard D1S 6000K | White (6000K) | Good | Neutral, OEM-like | Daily driving, general use |
| Cool Blue Intense | Blue-tinged White (6000K) | Moderate | Stylish, vibrant | Show cars, personalization |
| Night Breaker Laser | Pure White (6000K) | Excellent | Performance-focused | Night driving, safety-conscious users |
Expert Tip: When installing any Osram D1S 6000K bulb, ensure proper alignment with the reflector housing to maximize beam pattern efficiency and avoid glare for oncoming traffic. Always handle bulbs with gloves to prevent oil transfer from skin, which can cause hotspots and reduce lifespan.
Specification and Maintenance of Osram D1S 6000K HID Headlight Bulbs
The following are some of the key specifications that buyers should be aware of when purchasing the Osram D1S 6000K HID headlight bulbs. Understanding these details will help ensure optimal performance, compatibility, and safety for your vehicle's lighting system.
Key Specifications to Consider
Wattage
The Osram D1S 6000K operates at a standard wattage of 35 watts, making it an efficient option for high-intensity discharge (HID) lighting. This wattage is designed to provide bright illumination without overloading your vehicle’s electrical system.
Higher wattage generally correlates with increased brightness, but it's crucial to stick to the manufacturer-recommended power levels to maintain bulb longevity and prevent damage to the ballast or wiring.
Voltage
These bulbs operate at 85 volts during normal function. This voltage level ensures proper ignition and consistent light output throughout the bulb's operation.
It's important that the vehicle’s ballast system matches this voltage requirement. Using mismatched components can lead to premature failure, flickering lights, or inconsistent beam patterns.
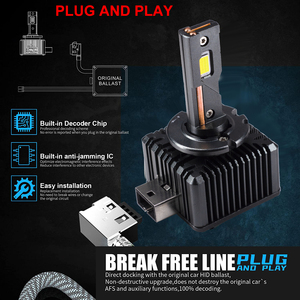
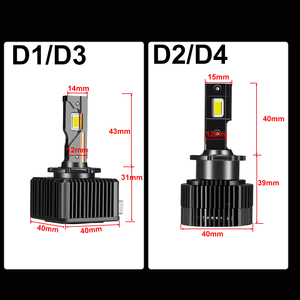
Base Type
The Osram D1S 6000K uses the P32d-6 base type, which is a standardized design commonly found in many modern vehicles equipped with HID systems.
This base ensures secure installation and reliable electrical connection. However, always verify compatibility with your specific make and model using the vehicle manual before installation to avoid fitting issues.
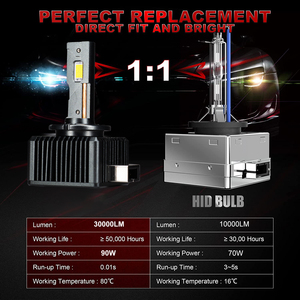
Luminous Flux
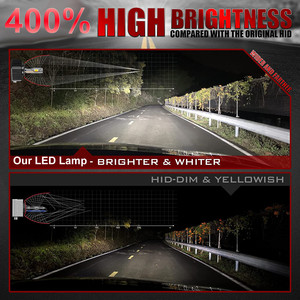
With a luminous flux rating of 3200 lumens, the D1S 6000K provides strong, clear visibility on the road ahead—significantly brighter than traditional halogen bulbs.
This high lumen output makes the D1S ideal for night driving and adverse weather conditions, helping improve driver safety by illuminating the roadway more effectively.
Color Temperature
The "6000K" in the product name refers to the bulb's color temperature, which produces a crisp white light with a subtle blue hue. This color spectrum closely mimics natural daylight, enhancing clarity and reducing eye strain.
This color temperature strikes a balance between aesthetic appeal and functional visibility, making it suitable for most drivers who want both style and performance from their headlights.
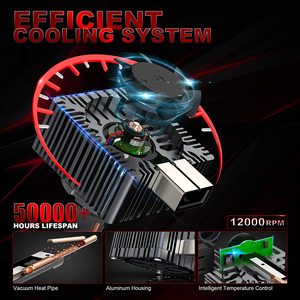
Lifetime Rating
Designed for durability, the Osram D1S 6000K has a rated lifespan of approximately 2000 hours under normal operating conditions.
This is considered standard for quality HID bulbs and reflects the expected wear from regular use. Factors such as voltage stability, heat exposure, and vibration can affect actual lifespan.
| Specification | Details | Notes |
|---|---|---|
| Wattage | 35W | Standard power consumption for HID applications; energy-efficient and bright |
| Voltage | 85V | Requires compatible ballast for proper operation |
| Base Type | P32d-6 | Universal fitment but check vehicle compatibility |
| Luminous Flux | 3200 Lumens | Brighter than typical halogen alternatives |
| Color Temperature | 6000K | White light with slight blue tint; excellent visibility |
| Lifespan | ~2000 Hours | Varies with usage and environmental factors |
Essential Maintenance Practices
Proper maintenance of the Osram D1S 6000K headlight bulbs is essential not only for maximizing their lifespan but also for ensuring safe driving conditions through consistent and reliable illumination.
Important: When replacing Osram D1S 6000K bulbs, never touch the glass portion of the bulb with bare hands. Oils from your skin can create hotspots that may cause the bulb to crack or fail prematurely. Always handle the bulb by its base or use gloves during installation.
How to Choose OSRAM D1S 6000K Headlight Bulbs
Selecting the right OSRAM D1S 6000K headlight bulb is essential for achieving optimal visibility, safety, and aesthetic appeal. With a balanced blend of brightness and natural white light, these bulbs are popular among drivers seeking enhanced nighttime illumination without excessive glare or unnatural hues.
Vehicle Compatibility
Not all vehicles are compatible with the same types of headlight bulbs. The OSRAM D1S 6000K is specifically designed for use in certain high-intensity discharge (HID) systems found in modern cars. It’s crucial to verify that your vehicle supports D1S bulbs before purchasing.
- Check your vehicle owner's manual for bulb specifications
- Confirm whether your headlights are factory HID or have been retrofitted
- Consult with an automotive lighting expert if unsure about compatibility
Important: Installing incompatible bulbs can cause electrical issues or void warranties
Brightness and Lumen Output
The OSRAM D1S 6000K offers a standard lumen output of approximately 3,200 lumens per bulb, which is significantly brighter than traditional halogen lights. However, some aftermarket versions may vary in performance.
- Look for bulbs labeled as “Standard” or “Premium” from OSRAM for reliable output
- Avoid ultra-bright aftermarket variants unless they meet legal standards
- Ensure both bulbs are replaced together for even illumination
Tip: A higher lumen rating doesn’t always mean better visibility—balance is key
Color Temperature Considerations
OSRAM D1S 6000K bulbs emit a daylight white light (around 6000 Kelvin), closely resembling natural sunlight. This color temperature provides excellent contrast and clarity without the bluish tint associated with higher Kelvin ratings.
- 6000K offers superior road illumination compared to 4300K (yellowish) or 8000K+ (blue/white)
- Ideal for reducing eye strain during long drives
- Legal for road use in most regions
Note: Higher Kelvin ratings may appear brighter but often sacrifice actual light output
Purchasing from Reputable Sources
Due to the popularity of OSRAM products, counterfeit versions are widely available. Purchasing from verified suppliers ensures you receive genuine OSRAM D1S 6000K bulbs with authentic performance characteristics and longevity.
- Use platforms like Alibaba.com to find certified distributors
- Check for holographic stickers and batch numbers on packaging
- Read customer reviews and look for seller certifications
Warning: Counterfeit bulbs can degrade quickly and potentially damage your headlight system
Installation Tip: When replacing D1S bulbs, avoid touching the glass portion of the bulb with bare hands. Oils from your skin can create hotspots when heated, leading to premature failure. Always use gloves or clean cloth when handling.
| Color Temperature | Light Appearance | Visibility Performance | Legal Road Use |
|---|---|---|---|
| 4300K | Warm White / Slight Yellow | Moderate | Yes |
| 6000K | Daylight White | Excellent | Yes |
| 8000K | Cool Blue-White | Fair | No (in many regions) |
| 10000K+ | Purple-White | Poor | No |
Pro Tip: For maximum performance and longevity, consider having your OSRAM D1S 6000K bulbs installed by a professional technician. Proper alignment and connection ensure safe and effective operation over time.
DIY Replacement Guide for Osram D1S 6000K Headlight Bulbs
Replacing your Osram D1S 6000K headlight bulbs is a practical and cost-effective task that many vehicle owners can perform at home. This guide provides detailed instructions to help you complete the process safely and efficiently. Some car manufacturers may have restrictions regarding bulb replacement, so it's always wise to review your warranty terms before proceeding.
Safety Warning: Always ensure the vehicle is turned off and the headlights have cooled down before beginning any work. Wear gloves and safety glasses to protect yourself from glass fragments and oils that could reduce bulb lifespan.
Tools and Materials Required
- New Osram D1S 6000K HID bulb (ensure compatibility with your vehicle)
- Torx screwdriver set (commonly T20 or T25, depending on make/model)
- Clean gloves (preferably lint-free to avoid oil transfer)
- Safety glasses or protective eyewear
- Owner’s manual for reference and specific instructions
Pro Tip: Consider purchasing a replacement kit that includes both bulbs to maintain balanced lighting output and aesthetics between both headlights.
Step-by-Step Replacement Process
- Preparation and Safety Check
- Ensure the engine is off and the key is removed from the ignition
- Allow the headlights to cool completely if they were recently used
- Open the hood and locate the back of the headlamp assembly
- Accessing the Bulb Holder
- Depending on your vehicle, you may need to remove plastic covers, clips, or panels to reach the back of the headlight unit
- Use a Torx screwdriver to carefully remove any retaining screws securing the access panel
- Keep all removed hardware in a safe place to avoid loss
- Bulb Removal
- Locate the D1S bulb holder behind the headlamp
- Gently twist the holder counterclockwise to unlock it from the housing
- Remove the old bulb from the holder by pulling it straight out
- Installing the New Bulb
- Take the new Osram D1S 6000K bulb and handle it only by the base to prevent oil residue from your skin from affecting performance
- Insert the new bulb into the holder ensuring proper alignment
- Reinsert the holder into the headlamp assembly and twist clockwise to lock it securely in place
- Final Assembly and Testing
- Replace any access panels or covers you removed earlier and secure them with screws or clips
- Close the hood and turn on the headlights to verify the new bulb is functioning correctly
- Check both low and high beam settings if applicable
| Stage | Key Actions | Common Issues | Recommended Tools |
|---|---|---|---|
| Preparation | Turn off vehicle, allow cooling, gather tools | Rushing the process, improper tool selection | Torx screwdrivers, gloves, safety glasses |
| Disassembly | Removing panels and accessing bulb holder | Misplacing screws, damaging plastic clips | Plastic pry tools, magnetic tray for hardware |
| Replacement | Removing old bulb, installing new one without touching glass | Improper seating, broken pins, oil contamination | Clean gloves, replacement bulb packaging |
| Testing | Reassembling and checking headlight function | Incorrect installation, loose connections | Owner’s manual, multimeter (if testing circuits) |
Installation Note: The orientation of the bulb inside the holder is crucial for optimal beam pattern. Make sure the base of the bulb is fully seated and aligned according to the manufacturer’s specifications.
Post-Installation Considerations
After replacing your Osram D1S 6000K bulbs, consider the following maintenance tips:
- Regularly check for condensation or fogging inside the headlamp assembly, which may indicate a seal issue
- Inspect wiring connections periodically to ensure no corrosion or loosening has occurred
- Wipe off dust or debris from the lens cover using a microfiber cloth to maintain brightness
- If one bulb fails soon after replacement, check for voltage irregularities or ballast issues
Remember, while this guide offers general steps for Osram D1S 6000K replacement, each vehicle model may present unique challenges. Always consult your owner's manual for specific details related to your vehicle's lighting system. If you're unsure about any step or encounter difficulties, seeking assistance from a professional technician is recommended.
Frequently Asked Questions About Volvo S60 Suspension
Volvo S60 shocks and struts don’t have a fixed replacement interval like oil changes or brake pads, as their lifespan depends heavily on driving conditions and usage. Typically, they should be inspected regularly and replaced when signs of wear appear.
Common indicators that your suspension components may need attention include:
- Poor handling: If the car feels unstable or harder to control, especially during braking or sharp turns.
- Excessive bouncing: When the vehicle bounces excessively after hitting bumps or speed bumps, it suggests that the shocks are no longer effectively damping movement.
- Uneven tire wear: Worn shocks can lead to uneven contact between tires and the road, causing irregular tread wear.
- Fluid leaks: Visible oil or fluid leakage from the shock absorber body is a clear sign of failure.
- Nose diving or swaying: The front end dips significantly during braking, or the car sways more than usual in corners.
A professional mechanic can perform a detailed visual inspection and test drive to accurately assess whether replacement is necessary. As a general guideline, shocks and struts may last anywhere from 50,000 to 100,000 miles under normal driving conditions.
Yes, upgrading the suspension on your Volvo S60 is possible and can enhance performance, aesthetics, or comfort depending on your goals. However, any modification must be carefully selected to ensure compatibility with the vehicle's design and specifications.
Popular suspension upgrades include:
- Performance shocks/struts: Offer improved damping characteristics for better cornering and stability.
- Lowering springs: Reduce ride height for a sportier look and improved center of gravity, though this may impact ride comfort and ground clearance.
- Coilovers: Fully adjustable systems that allow tuning of ride height, stiffness, and damping—ideal for enthusiasts but typically more expensive.
- Suspension bushings: Upgrading to polyurethane bushings can reduce flex and improve responsiveness.
While stiffer or lowered setups can improve handling, they may also introduce harshness over rough roads, increase stress on other components, and potentially void certain warranties. It’s important to consult with a qualified technician or suspension specialist who understands Volvo platforms to recommend the best options for your driving style and needs.
Volvo OEM (Original Equipment Manufacturer) suspension parts come with a limited warranty that varies based on the specific component. Generally:
- OEM parts: Typically carry a 4-year/50,000-mile warranty if installed at an authorized Volvo dealership, covering defects in materials and workmanship.
- Aftermarket parts: Usually offer a minimum one-year warranty, though some premium brands provide extended coverage up to 3 years or even lifetime warranties, depending on the manufacturer's terms and conditions.
It's essential to check the exact warranty details provided by the seller or manufacturer, particularly for aftermarket components. Proper installation and maintenance are usually required to maintain warranty validity. Some warranties may exclude labor costs unless specified otherwise.
When purchasing suspension parts, always keep your receipts and service records to support any future warranty claims.
Mixing different brands of suspension components is generally not recommended. Ideally, all suspension elements—including shocks, struts, springs, mounts, and bushings—should be from the same brand or designed to work together as a system.
The reasons include:
- Inconsistent performance: Different brands may have varying spring rates, damping forces, and tolerances, which can affect balance and handling unpredictably.
- Reduced longevity: Mismatched parts may wear unevenly or place undue stress on connected components.
- Safety concerns: Improperly matched suspension parts could compromise vehicle stability, especially under hard braking or cornering.
If you're unable to source matching components due to availability or budget constraints, ensure that the parts you choose are compatible with the Volvo S60's suspension geometry and load ratings. Always consult a knowledgeable mechanic before mixing brands to avoid compromising ride quality or safety.