


Types of Reverse Camera 4 Pin
The 4-pin reverse camera has four wires that connect to the monitor or video interface, providing a stable video signal. The first, second, and third wires transmit positive, negative, and video signals, while the fourth wire may be used for audio or additional control signals, depending on the system's design. This configuration ensures reliable communication between the camera and the display for precise video transmission.
Expert Tip: When choosing a 4-pin camera system, confirm the pin configuration matches your existing setup to avoid compatibility issues during installation.
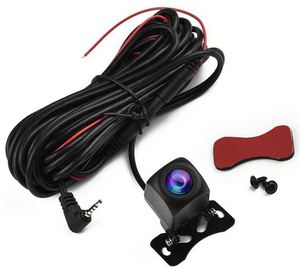
Universal 4-pin RCA Reverse Camera
This versatile and widely used camera system features a standard 4-pin connector where the first three pins connect to power and ground, while the last transmits video signal.
Key Features:
- Adjustable lens angle for wider viewing
- Night vision capability with infrared LEDs
- Compatible with various vehicle types
- Standard RCA video output
4-pin Auto Rearview Camera
Designed specifically for integration with existing auto rearview mirror systems, this camera connects directly to the mirror's wiring harness via a standard 4-pin connector.
Key Features:
- Seamless integration with rearview mirrors
- Auto brightness adjustment
- Compact design for discreet installation
- Reduces blind spots behind the vehicle
Wireless 4-pin Reverse Camera
Eliminates the need for long video cables by using Wi-Fi or 2.4GHz transmission technology to transmit video signals wirelessly from camera to monitor.
Key Features:
- Simplified installation without running cables
- Flexible camera placement options
- Real-time video transmission
- Ideal for larger vehicles or complex installations
| Camera Type | Best For | Installation Complexity | Key Advantage |
|---|---|---|---|
| Universal 4-pin RCA | General purpose use in various vehicles | Moderate | Versatility and compatibility |
| Auto Rearview | Factory mirror integration | Easy to Moderate | Seamless OEM-like integration |
| Wireless 4-pin | Larger vehicles or complex installations | Easy | No need for running long cables |
Specifications and Maintenance of Reverse Camera 4 Pin
Understanding the key specifications of 4-pin reverse cameras is essential for selecting the right system for your vehicle and ensuring optimal performance. Each specification contributes to the overall functionality and effectiveness of the camera system.
Camera Resolution
Affects image clarity and detail. Higher resolution provides better quality images.
Common options: 420, 480, 600, and 700 TV lines
Recommendation: At least 600 TV lines for clear visibility
Viewing Angle
Determines the field of view covered by the camera.
Range: 120° to 180°
Recommendation: 170° for optimal balance between width and distortion
Night Vision
Enables clear viewing in low-light conditions using infrared technology.
Feature: IR LEDs illuminate area behind vehicle
Recommendation: Minimum 6 IR LEDs for adequate night visibility
Waterproof Rating
Indicates resistance to water and dust intrusion.
Standard ratings: IP67 or IP68
Recommendation: Minimum IP67 for outdoor installation
Cable Length
Determines installation flexibility and routing options.
Range: 16 to 66 feet
Recommendation: Choose based on vehicle size and camera location
Installation Method
Affects ease of setup and professional assistance needs.
Options: DIY or professional installation
Recommendation: DIY for basic setups, professional for complex integrations
Maintenance Guidelines
Regular maintenance ensures your 4-pin reverse camera system continues to function properly and extends its service life. Follow these essential maintenance practices:
| Maintenance Task | Frequency | Procedure |
|---|---|---|
| Clean Camera Lens | Monthly or as needed | Use a soft, lint-free cloth to gently wipe the lens. For stubborn dirt, use mild lens cleaner. |
| Check Cable Connections | Quarterly | Ensure all cables are securely connected and inspect for damage or wear. |
| Inspect Camera Housing | Quarterly | Check for cracks, water infiltration, or damage that could compromise waterproofing. |
| Test System Functionality | Monthly | Verify camera activates when in reverse and image quality is consistent. |
| Clean Mounting Area | Bi-annually | Remove dirt and debris around the camera mount to prevent buildup. |
Important: Never use harsh chemicals or abrasive materials when cleaning camera components, as these can damage lens coatings and waterproof seals.
How to Choose a Reverse Camera 4 Pin
Selecting the right 4-pin reverse camera system for your specific needs requires careful consideration of several factors. Whether for personal use or business applications, the following comprehensive guide will help you make an informed decision.
For Personal Vehicles
When choosing a 4-pin reverse camera for personal use, focus on these key considerations:
- Compatibility with existing display system
- Ease of DIY installation
- Weather resistance for your climate
- Quality night vision for residential parking
For Business Applications
Business users should prioritize these factors when selecting 4-pin systems:
- Durability for frequent use
- Fleet-wide compatibility
- Enhanced safety features
- Cost-effectiveness at scale
Key Selection Criteria
| Selection Factor | Considerations | Importance |
|---|---|---|
| Business Needs | Logistics companies need better coverage; service businesses need basic safety features | Critical |
| Budget & Value | Consider long-term value rather than just upfront cost; factor in accident prevention savings | High |
| Installation Complexity | Wired systems offer reliability but require more installation time than wireless options | Medium |
| Environmental Durability | Choose cameras with appropriate IP ratings for your operating environment | High |
| Field of View | Wider FOV reduces blind spots; consider vehicle size when selecting angle | High |
| Night Vision Capability | Essential for operations beyond daylight hours; look for quality IR LEDs | Medium to High |
| Vehicle Compatibility | Different vehicles have unique mounting requirements and blind spot challenges | Critical |
| System Integration | Consider compatibility with existing vehicle systems like GPS or tracking | Medium |
| Wired vs. Wireless | Wireless offers easier installation; wired provides more reliable signal | Medium |
Professional Tip: When selecting a 4-pin reverse camera for commercial vehicles, prioritize systems that offer both wide viewing angles and high durability ratings. The initial investment in a higher-quality system typically pays for itself through reduced accidents and longer service life.
How to DIY and Replace Reverse Camera 4 Pin
Replacing an existing 4-pin reverse camera or installing a new system can be accomplished as a DIY project with the right tools and careful attention to detail. Follow this comprehensive guide for a successful installation.
Tools and Materials Needed
| Item | Purpose |
|---|---|
| New 4-pin reverse camera system | The main component being installed |
| Monitor or display unit (if replacing) | Displays the camera feed |
| Power wiring (12V system) | Provides power to the camera |
| Video cable (RCA cable) | Transmits video signal from camera to display |
| Mounting hardware | Secures camera in position |
| Wrench set | For removing and installing hardware |
| Electrical tape or heat shrink tubing | Insulates and protects wire connections |
| Wire strippers and crimpers | For preparing and connecting wires |
Step-by-Step Installation Guide
Step 1: Remove the Old Camera
Begin by removing the mounting hardware that holds the old camera in place. Carefully disconnect all wiring connections, noting the position and function of each wire for reference during the new installation.
Step 2: Connect the New Camera to the Wiring
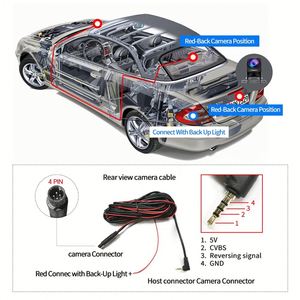
Locate the 4-pin connector on your new camera. The wires should be labeled or color-coded as follows:
- Power (12V) - typically red
- Ground - typically black
- Video Out (RCA) - typically yellow
- Trigger wire (optional) - varies by manufacturer
Step 3: Connect the Wires
Connect the camera's wires to the vehicle's wiring system:
- Connect the power wire to the vehicle's 12V power source (often the reverse light circuit)
- Connect the ground wire to a suitable grounding point on the vehicle
- Connect the video output to the monitor's video input
Use electrical tape or heat shrink tubing to insulate and protect each connection.
Step 4: Connect to the Monitor
Locate the RCA input on your monitor or display unit. Connect the camera's video output (usually a yellow RCA connector) to this input to establish the video signal pathway.
Step 5: Mount the New Camera
Following the manufacturer's guidelines, mount the camera in the desired position. This typically involves:
- Cleaning the mounting surface thoroughly
- Removing adhesive backing if applicable
- Positioning the camera for optimal viewing angle
- Securing with screws or adhesive as appropriate
Step 6: Test the System
Before finalizing the installation:
- Start the vehicle
- Engage the reverse gear
- Verify the display shows the camera feed
- Check image quality and viewing angle
- Make adjustments as needed before securing all components permanently
Safety Note: Always disconnect the vehicle's battery before working on electrical components to prevent short circuits or electrical damage. Reconnect only when ready to test the system.
Frequently Asked Questions
A 4-pin reverse camera is a vehicle safety device with four wires: one for video transmission, one for power ground, one for power positive, and one for sensor signal. The camera activates when the vehicle is in reverse gear, receiving power from the reverse light circuit and displaying the rear view on a connected monitor to assist with backing up safely.
To wire a 4-pin reverse camera:
- Locate the reverse light wire in your vehicle
- Connect the camera's red (power) wire to the reverse light wire
- Connect the black (ground) wire to the vehicle chassis ground
- Connect the video output wire (typically yellow RCA connector) to your display monitor
- The fourth wire (typically blue) connects to the display trigger or may not be used in some setups
Always consult your specific camera's instructions as wire colors and functions may vary between manufacturers.
The key differences between 4-pin and 2-pin cameras are:
| Feature | 4-Pin Camera | 2-Pin Camera |
|---|---|---|
| Wire Configuration | Power positive, ground, video, and trigger/sensor | Typically just power and video |
| Installation Complexity | More complex with additional connections | Simpler with fewer wires to connect |
| Functionality | Often includes additional features like guidelines or sensor integration | Basic functionality with fewer features |
The 4-pin configuration offers more versatility and features, while the 2-pin design prioritizes simplicity.
A 4-pin camera is primarily used as a vehicle reverse camera system to improve safety and visibility when backing up. Common applications include:
- Assisting drivers in seeing obstacles directly behind the vehicle that might be in blind spots
- Facilitating precise parking in tight spaces
- Improving safety around children, pets, and pedestrians when reversing
- Helping drivers connect to trailers without assistance
- Enhancing visibility when backing large vehicles like RVs, trucks, or commercial vehicles
The 4-pin configuration allows for more sophisticated features compared to simpler camera systems.