


Types of Toyota 4Runner Front Lower Control Arms
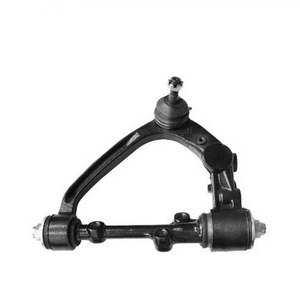
The Toyota 4Runner front lower control arm is a crucial component of the vehicle's suspension system, connecting the wheel hub assembly to the chassis. It plays a vital role in maintaining proper wheel alignment, ensuring stable handling, and absorbing road shocks for improved ride comfort. The control arm is equipped with bushings at both ends that help dampen vibrations and reduce noise from the road surface.
Depending on your driving needs and the specific model year of your 4Runner, there are several types of front lower control arms available. Each type offers unique benefits tailored to different driving conditions and performance requirements.
Standard Control Arms
These are factory-installed control arms designed for everyday driving conditions. They provide a balanced mix of durability, comfort, and cost-effectiveness.
Advantages
- Cost-effective replacement option
- Smooth ride quality with minimal vibration
- Designed for OEM fit and function
- Easy to source and replace
Limitations
- Limited strength for heavy off-road use
- May wear faster under aggressive driving
- Not ideal for lifted or modified vehicles
Best for: Daily commuting, stock suspension setups, urban driving
Forged Control Arms
Built for serious off-road enthusiasts, forged control arms are stronger and more durable than standard stamped steel versions. These arms are engineered to withstand the rigors of extreme terrain and high-stress environments.
Advantages
- Exceptional strength and impact resistance
- Durable under harsh off-road conditions
- Maintains precise geometry under stress
- Longer lifespan compared to standard arms
Limitations
- Higher cost than standard replacements
- Heavier than some aftermarket options
- May require professional installation
Best for: Off-road adventures, trail riding, rugged terrain applications
Adjustable Control Arms
Designed for vehicles that have been lifted or lowered, adjustable control arms allow fine-tuning of suspension geometry to maintain proper alignment and handling characteristics.
Advantages
- Allows precise alignment adjustments
- Restores proper caster and camber angles
- Improves handling after suspension modifications
- Helps prevent premature tire wear
Limitations
- More complex setup required
- Higher initial investment
- Requires alignment after installation
Best for: Lifted or lowered 4Runners, modified suspensions, performance tuning
Aftermarket Performance Arms
Engineered for enhanced performance and often made from lightweight materials like aluminum or chromoly steel, these arms offer superior strength-to-weight ratios and improved articulation.
Advantages
- Lightweight yet extremely strong
- Improved suspension articulation
- Better feedback and responsiveness
- Corrosion-resistant coatings available
Limitations
- Premium pricing
- May require additional components
- Overkill for casual drivers
Best for: High-performance builds, custom fabrication, serious off-roaders
| Type | Strength | Ride Quality | Customization | Ideal Use Case |
|---|---|---|---|---|
| Standard | Good | Excellent | Low | Daily driving, OEM replacement |
| Forged | Excellent | Good | Medium | Off-road, heavy-duty use |
| Adjustable | Very Good | Good | High | Suspension mods, lifted rigs |
| Performance | Excellent | Very Good | High | Racing, competition, custom builds |
Expert Tip: When replacing your Toyota 4Runner’s front lower control arms, especially if modifying the suspension, always have a professional alignment performed afterward to ensure optimal handling, tire wear, and safety.
Specifications and Maintenance of the Toyota 4Runner Front Lower Control Arm
The front lower control arm is a critical component of the Toyota 4Runner's suspension system, responsible for connecting the wheel hub to the vehicle frame while allowing vertical movement. Proper maintenance and understanding of its specifications are essential for ensuring safe driving conditions, optimal handling, and extended lifespan of related components.
Maintenance Best Practices
To keep your Toyota 4Runner’s front lower control arm in peak condition, follow these detailed maintenance procedures:
Daily Inspection
Visually inspect the control arms daily for signs of wear or damage. Look closely at bushings for cracking or deformation, check ball joints for looseness, and examine the control arm itself for any bends or corrosion.
Early detection of issues can prevent more severe suspension problems and costly repairs down the road.
Periodic Lubrication
Lubricate bushings and ball joints according to the manufacturer’s recommended schedule using high-quality, automotive-grade grease suitable for your driving conditions.
Proper lubrication reduces friction, prevents premature wear, and ensures smooth operation of moving parts under various temperature and terrain conditions.
Regular Wheel Alignment
Performing regular wheel alignments helps maintain correct suspension geometry. Misalignment can place undue stress on the control arm, leading to uneven tire wear and potential structural fatigue.
Wheel alignment should be checked after any significant impact (like hitting a pothole) or every 6,000 to 10,000 miles as part of routine maintenance.
Tire Rotation
Rotating tires at regular intervals promotes even wear across all four tires, which helps reduce uneven loading on the front lower control arms caused by imbalanced tread depths.
This practice not only extends tire life but also supports consistent suspension performance and reduces strain on control arm components.
Replacement of Worn Components
If bushings or ball joints show signs of wear—such as excessive play, squeaking noises, or visible deterioration—they should be replaced immediately to avoid further damage to the control arm assembly.
Replacing worn components promptly preserves the integrity of the suspension system and maintains safe vehicle handling characteristics.
Avoid Overloading
Exceeding the vehicle’s recommended load capacity puts unnecessary stress on the suspension system, particularly the front lower control arms, increasing the risk of structural failure or accelerated wear.
Always adhere to Toyota’s specified weight limits for both cargo and towing to protect suspension components and ensure safe operation.
Avoid Rough Driving Conditions
Driving over rough roads, large potholes, or speed bumps at high speeds can cause immediate damage to the front lower control arms and other suspension components.
Drive cautiously in such conditions to minimize shock loads on the suspension system and prolong the life of your control arm assembly.
Professional Inspection
If you notice symptoms like clunking noises, steering wander, uneven tire wear, or vibration, have your control arms inspected by a qualified mechanic as soon as possible.
Professionals have the tools and expertise to accurately diagnose issues and perform necessary repairs or replacements safely and effectively.
| Maintenance Task | Frequency | Benefits |
|---|---|---|
| Visual Inspection | Daily or weekly | Early issue detection, prevention of major failures |
| Lubrication | Every 5,000–10,000 miles | Reduces wear, improves component longevity |
| Wheel Alignment | Every 6,000–10,000 miles or post-impact | Improves handling, protects suspension geometry |
| Tire Rotation | Every 5,000–7,500 miles | Promotes even wear, enhances control arm durability |
| Component Replacement | As needed | Maintains safety and system integrity |
Important: Neglecting control arm maintenance can lead to compromised handling, reduced braking efficiency, and even catastrophic suspension failure. Always address abnormal symptoms immediately and consult a professional when in doubt.
How to Choose Toyota 4Runner Front Lower Control Arm
Selecting the right front lower control arm for a Toyota 4Runner involves more than just finding a part that fits. It requires understanding customer needs, vehicle specifications, and quality considerations to ensure optimal performance and longevity.
Determine Customer Requirements
Before recommending or purchasing a control arm, assess what the customer truly needs. Are they seeking a stock replacement or looking to upgrade for enhanced performance? This distinction will guide your product selection strategy.
- OEM replacements: Ideal for customers prioritizing factory fit and function
- Aftermarket upgrades: Preferred by those seeking improved durability or performance features
- Lifted vehicles: May require extended or reinforced control arms
Pro tip: Ask about driving conditions, usage patterns, and budget constraints
Verify Vehicle Compatibility
Toyota 4Runners have seen multiple generations since their introduction, with significant changes in suspension design over time. Confirming the model year is crucial for proper fitment.
- FJ60 (1987-1990) - Early body-on-frame design
- FZJ80 (1991-1997) - Transition to more modern systems
- T100/5VZ-FE (1996-2002) - Engine and drivetrain updates
- TX/TX Limited (2003-present) - Modern platform with various trim levels
Critical check: Cross-reference part numbers with official OEM databases
Partner with Specialists
Collaborating with experienced control arm suppliers provides numerous advantages beyond simple product availability. These experts can help navigate complex applications and offer valuable technical support.
- Access to application-specific knowledge
- Ability to source rare or discontinued models
- Insights into current market trends and popular configurations
- Technical guidance on installation requirements
Warranty benefit: Reputable suppliers typically offer comprehensive warranty coverage
Assess Quality Standards
The quality of control arms varies significantly between manufacturers. Establish clear quality benchmarks before making purchasing decisions.
- Look for ISO-certified manufacturing processes
- Check for OE-equivalent materials and construction
- Consider powder-coated finishes for corrosion resistance
- Evaluate bushing materials and grease fittings
Quality indicator: Premium brands often include wear indicators and serviceability features
Buying Recommendation: When comparing OEM vs. aftermarket options, consider the long-term value proposition. While OEM parts offer guaranteed compatibility, premium aftermarket brands may provide enhanced durability through improved materials and design refinements. Always verify that aftermarket parts meet or exceed original equipment specifications.
| Application Type | Recommended Source | Key Considerations | Average Cost Range |
|---|---|---|---|
| Stock replacement | OEM or premium aftermarket | Exact fitment, factory alignment specs | $80 - $150 |
| Performance upgrade | Specialty aftermarket | Heavy-duty bushings, reinforced frame | $120 - $250 |
| Lifted vehicle | Custom fabrication shop | Extended geometry, adjustable settings | $200 - $400 |
| Rust-prone region | Corrosion-resistant specialist | Zinc-plated or composite construction | $150 - $300 |
Additional Considerations
When selecting a front lower control arm for a Toyota 4Runner, it's important to think beyond the immediate purchase. Consider factors like installation requirements, maintenance accessibility, and potential future modifications. Some advanced control arms feature adjustable camber settings or grease fittings for extended service life.
Installation note: Many modern control arms come pre-assembled with bushings and ball joints already installed, which can save significant labor during installation. However, these complete assemblies typically cost more than replacing individual components.
DIY Guide to Replacing the Front Lower Control Arm on a Toyota 4Runner
Replacing the front lower control arm on your Toyota 4Runner is a moderately challenging but rewarding DIY task that can significantly improve handling and ride quality when done correctly. This guide will walk you through each step of the process, providing additional context and tips to ensure success while minimizing risks.
Safety Warning: Always work on a stable, level surface with proper jack points and jack stands. Never rely solely on a jack to support the vehicle. Wear safety glasses and gloves to protect yourself from sharp edges and potential fluid exposure.
Understanding the Role of the Front Lower Control Arm
The front lower control arm connects the steering knuckle to the vehicle's frame, playing a crucial role in maintaining suspension geometry, wheel alignment, and overall ride stability. Over time, bushings can wear out or ball joints may become loose, leading to clunking noises, uneven tire wear, and poor handling. Timely replacement ensures continued safe operation and prevents further damage to related components.
Step-by-Step Replacement Process
- Preparation and Safety Measures
- Park the 4Runner on a flat, level surface and engage the parking brake for added security.
- Disconnect the negative terminal of the battery to prevent any accidental electrical shorts during the procedure.
- Refer to the owner’s manual to locate the front lower control arms and understand their connection points.
- Invest in a comprehensive repair manual specific to your 4Runner model year for detailed torque specs and diagrams.
- Gather essential tools including a floor jack, jack stands, socket set, breaker bar, pry bar, ball joint separator tool (or pickle fork), and safety gear.
- Lift the front end of the vehicle using a floor jack at the designated jacking points and secure it on jack stands placed under sturdy frame rails.
- Remove the front wheels to gain full access to the suspension components.
- Carefully separate both the upper and lower ball joints from the steering knuckle using either a ball joint separator tool or by gently tapping them out with a hammer and drift punch. Be cautious not to damage the threads or surrounding components.
- Removing the Old Control Arm
- Locate the mounting bolts that secure the control arm to the frame—typically two or three large bolts depending on the model year.
- Loosen the bolts using a socket and breaker bar before attempting removal to avoid stripping fasteners.
- If the control arm is stuck due to corrosion or old grease buildup, use a pry bar to gently coax it free from its mounting brackets without damaging adjacent parts.
- Once the old control arm is removed, inspect the mounting area for any signs of rust, cracks, or misalignment that could affect installation of the new unit.
- Installing the New Control Arm
- Position the new control arm into place, ensuring it aligns perfectly with the mounting holes on the frame.
- Insert the mounting bolts and hand-tighten them first to allow for minor adjustments if needed.
- Torque the bolts to the manufacturer's specifications once alignment is confirmed. Refer to your repair manual for exact values.
- Reinstall the ball joints into the new control arm, making sure they are properly seated and secured according to factory guidelines.
- Double-check all connections, especially the ball joint attachment to the steering knuckle, to ensure there is no play or looseness.
- Final Steps and Vehicle Reassembly
- Slowly lower the 4Runner from the jack stands using the floor jack until it rests securely on the ground.
- Reconnect the negative battery cable to restore power to the vehicle’s systems.
- Remount the front wheels, tightening the lug nuts in a star pattern to ensure even pressure distribution.
- Take the vehicle for a short test drive to verify that everything feels normal and listen for any unusual noises coming from the front suspension.
- Consider having a professional alignment performed afterward, especially if you noticed uneven tire wear or pulling prior to the replacement.
| Phase | Key Tasks | Common Mistakes | Essential Tools |
|---|---|---|---|
| Preparation | Vehicle positioning, battery disconnection, gathering tools | Rushing preparation, inadequate support under the vehicle | Jacks, jack stands, wheel chocks, repair manual |
| Disassembly | Removing wheels, separating ball joints, loosening control arm bolts | Damaging ball joint threads, improper use of tools | Ball joint separator, breaker bar, pry bar |
| Installation | Aligning new control arm, torquing bolts, reattaching ball joints | Incorrect torque settings, misalignment | Torque wrench, alignment guides |
| Reassembly | Lowering vehicle, reconnecting battery, reinstalling wheels | Overlooking final checks, skipping alignment | Lug wrench, torque wrench |
Pro Tip: Before installing the new control arm, apply anti-seize lubricant to the bolt threads to make future replacements easier. Also, consider replacing bushings or ball joints as a preventive measure if they show any signs of wear, even if they aren’t completely failed yet.
Post-Replacement Considerations
After completing the control arm replacement, monitor your vehicle’s handling and suspension performance over the next few days. Pay attention to how the steering feels, whether there are any new vibrations or noises, and if the vehicle pulls to one side. These symptoms may indicate an issue with installation or alignment. If you're unsure about any part of the process, consult a qualified mechanic for a second opinion or assistance.
Frequently Asked Questions About Control Arms
A1: The control arm, also known as an A-arm or wishbone, is a pivotal component of a vehicle's suspension system. It connects the steering knuckle and wheel hub assembly to the vehicle’s frame, allowing vertical movement of the wheels while maintaining proper alignment. This critical linkage ensures that the tires remain in consistent contact with the road surface, even when navigating over bumps, potholes, or uneven terrain.
Control arms come in both upper and lower configurations depending on the suspension design (such as double wishbone or MacPherson strut systems). They work in tandem with other suspension components like ball joints, bushings, and shocks to provide stability, handling precision, and ride comfort.
A2: The Toyota 4Runner typically features two lower control arms in its front suspension system—one on the driver’s side and one on the passenger’s side. These arms connect the front axle assembly to the vehicle’s frame and allow for vertical motion of the front wheels to absorb road irregularities.
Depending on the model year and trim level, some 4Runners may be equipped with additional suspension enhancements such as skid plates or off-road tuned suspensions, but the standard configuration includes two main front control arms. Rear suspension setups usually differ and do not incorporate control arms in the same way as the front.
A3: Control arms are engineered to be durable and often last for the lifetime of the vehicle under normal driving conditions. However, their longevity can be significantly affected by environmental factors and driving habits:
- Rust and corrosion: In regions where roads are salted during winter, exposure to moisture and chemicals can accelerate rust formation, weakening the metal structure.
- Off-road use: Frequent travel over rough terrain, rocks, or deep potholes can stress the control arms beyond typical wear levels.
- Accidents or impacts: Hitting large obstacles at high speed can bend or crack the control arm, compromising its structural integrity.
It’s recommended to inspect control arms during routine maintenance intervals, especially if you notice unusual vibrations, steering issues, or uneven tire wear—early detection can prevent more costly repairs later.
A4: A deteriorating control arm can lead to various symptoms that affect ride quality, safety, and overall vehicle performance. Common indicators include:
- Clunking or knocking noises: Especially noticeable when going over bumps or turning the steering wheel.
- Uneven tire wear: Misalignment caused by worn bushings or bent arms can lead to premature tire degradation.
- Steering wander or pulling: The vehicle may drift to one side unexpectedly, requiring constant correction.
- Vibration in the steering wheel: Felt especially at higher speeds, indicating instability in the suspension geometry.
- Poor handling: Reduced responsiveness or a generally "loose" feeling in corners and turns.
If any of these signs appear, it’s important to have your suspension system inspected by a qualified mechanic to determine whether the control arms need replacement.
A5: While minor cosmetic damage such as scratches or light surface rust might be repairable through cleaning and protective coating, structural damage like bends, cracks, or broken welds cannot be safely or effectively restored. Therefore, most manufacturers and automotive professionals recommend replacing a damaged control arm rather than attempting to repair it.
Repair attempts—especially welding or reshaping—can compromise the original strength and geometry of the component, leading to further safety risks and potential failure under stress. Replacing a damaged control arm with a new OEM (Original Equipment Manufacturer) or high-quality aftermarket unit ensures optimal performance, durability, and safety.
| Option | Description | Recommendation |
|---|---|---|
| Replacement | Installing a new control arm | ✅ Recommended for best safety and reliability |
| Welding/Bending Repair | Attempting to fix structural damage | ❌ Not advised due to risk of failure |
| Bushing Replacement | Replacing only the rubber or polyurethane bushings | ✅ Acceptable if the arm itself is undamaged |
In conclusion, always prioritize safety and performance when dealing with suspension components like control arms. If in doubt, consult a certified technician or refer to factory service manuals for proper diagnosis and replacement guidelines.