


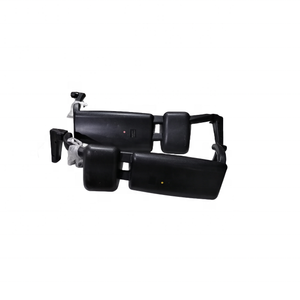


Types of Tractor Rear View Mirrors
Tractor rear view mirrors are essential safety components that come in various designs to meet different operational needs. Each type offers unique advantages depending on your tractor model and working environment.
Convex Tractor Mirrors
These mirrors feature a rounded surface that provides a significantly wider field of view. They're particularly valuable for agricultural applications where operators need comprehensive visibility of surrounding areas.
Best for: Minimizing blind spots, agricultural work, improved spatial awareness
Electric Mirrors
Featuring internal cabin controls, these mirrors can be adjusted without leaving the operator's seat. This convenience is invaluable for larger tractors with wider body profiles.
Best for: Large tractors, frequent adjustment needs, operator convenience
Folding Mirrors
Available in both manual and automatic versions, these mirrors can be folded inward to reduce the tractor's overall width when navigating tight spaces.
Best for: Narrow passages, reducing sidewall damage risk, transport situations
| Mirror Type | Key Features | Best Application | Limitations |
|---|---|---|---|
| Heated Mirrors | Built-in heating elements that melt ice, snow, and frost | Cold climate operations, winter conditions | Higher power consumption, more complex installation |
| Blind Spot Mirrors | Secondary mirrors installed within main mirrors | Enhanced safety in high-traffic areas | Smaller viewing area, requires proper adjustment |
| Camera-based Systems | Cameras replacing traditional mirrors with in-cabin display | Advanced operations, night work, precision tasks | Higher cost, technical complexity, power requirements |
Expert Tip: For maximum visibility and safety, consider combining multiple mirror types on your tractor. Many operators install both convex main mirrors with smaller blind spot mirrors for comprehensive coverage of all surrounding areas.
Mirror Selection By Tractor Application
Different agricultural and construction applications benefit from specific mirror configurations:
- Row Crop Work: Convex mirrors with wide-angle view to monitor implement positioning
- Livestock Operations: Heated mirrors to maintain visibility in all weather conditions
- Roadway Transport: Folding mirrors to navigate narrow passages and reduce transport width
- Construction Sites: Camera systems for precision positioning in complex environments
- Night Operations: Camera-based systems with night vision capabilities
Specifications and Maintenance of Tractor Rear View Mirrors
Understanding the technical specifications of tractor mirrors ensures optimal performance, safety compliance, and long-term durability. Proper maintenance practices will extend their functional lifespan and maintain visibility in all conditions.
Essential Mirror Specifications
Glass Quality
- Shatterproof construction for operator safety
- Scratch-resistant coating for durability
- Low light transmission rating to reduce glare
- Distortion-free reflection for accurate visibility
Mirror Coatings
- Anti-fog technology prevents condensation
- Hydrophobic coatings repel water droplets
- UV-resistant layers prevent sun damage
- Anti-reflective treatments reduce glare
Frame & Housing
- Corrosion-resistant materials for durability
- Vibration-dampening design for stability
- Impact-resistant construction for field durability
- Weather-sealed connections for electrical components
Maintenance Insight: Most mirror failures occur not from glass damage but from mounting bracket fatigue. Regular inspection of mounting hardware is just as important as keeping the mirror surface clean. Apply anti-vibration compound to mounting bolts to prevent loosening during operation.
Comprehensive Maintenance Protocol
| Maintenance Task | Frequency | Tools/Materials | Importance |
|---|---|---|---|
| Structural Inspection | Weekly | Visual check, socket wrench set | Critical - Prevents unexpected failure |
| Surface Cleaning | Daily/As needed | Microfiber cloth, non-abrasive cleaner | High - Maintains visibility |
| Damage Assessment | Monthly | Flashlight for detailed inspection | Medium - Identifies replacement needs |
| Adjustment Mechanism Lubrication | Quarterly | Silicone lubricant, small brush | Medium - Ensures smooth operation |
| Electrical Connection Check | Seasonally | Multimeter, electrical contact cleaner | High - For heated/electric mirrors |
Preventative Care Recommendations
Recommended Practices
- Use protective covers when storing tractor long-term
- Apply silicone lubricant to moving parts quarterly
- Clean with microfiber cloth and appropriate glass cleaner
- Check electrical connections before winter season
- Retighten mounting hardware after heavy vibration work
Practices to Avoid
- Using abrasive cleaners that can damage coatings
- Pressure washing directly at mirror housings
- Over-tightening adjustment mechanisms
- Ignoring small cracks that can expand with vibration
- Using household glass cleaners on specialized coatings
Choosing the Right Tractor Rear View Mirror
Selecting the optimal rear view mirror for your tractor requires careful consideration of multiple factors. The right choice enhances safety, improves operational efficiency, and ensures compliance with relevant regulations.
Key Selection Criteria
| Selection Factor | Considerations | Impact on Performance |
|---|---|---|
| Tractor Type & Usage | Agricultural, construction, compact, utility | Determines required field of view and durability needs |
| Mirror Size & Adjustment | Balance between visibility area and practicality | Affects blind spot coverage and operator convenience |
| Shape & Design | Round, rectangular, oval, or combination designs | Influences field of view characteristics and mounting options |
| Glass Quality | Optical clarity, distortion resistance, safety features | Directly impacts visibility quality and safety |
| Installation Complexity | Mounting requirements, wiring needs (for electric/heated) | Affects installation time, cost, and feasibility |
| Environmental Factors | Climate conditions, dust levels, moisture exposure | Determines need for specialized coatings or heated options |
Selection Insight: Rather than focusing solely on price, calculate the mirror's total cost of ownership by considering durability, replacement intervals, and maintenance requirements. Premium mirrors often provide better visibility and last significantly longer, offering better value despite higher initial cost.
Additional Selection Considerations
Durability Factors
Choose mirrors with UV-stabilized materials, corrosion-resistant metal components, and vibration-resistant mounting systems. These features ensure longevity in harsh agricultural environments with exposure to sun, chemicals, and continuous vibration.
Look for: Weather-sealed housings, powder-coated frames, stainless hardware
Style & Aesthetics
While functionality is paramount, selecting mirrors that complement your tractor's design maintains its professional appearance. Modern tractors benefit from streamlined, contemporary mirror designs that reduce wind resistance.
Consider: Color-matched options, integrated designs, aerodynamic profiles
Enhanced Functionality
Advanced mirror features like integrated LED turn signals, position lights, or automatic folding mechanisms provide additional safety and convenience benefits beyond basic visibility.
Advanced options: Integration with guidance systems, telescoping capability, breakaway safety design
Mirror Selection Process Flowchart
- Assess your tractor's primary operation environment (field, road, construction)
- Identify key visibility challenges (blind spots, implement monitoring)
- Determine essential features (heating, electric adjustment, folding)
- Compare mounting options compatible with your tractor model
- Check regulatory requirements for your region and operation type
- Evaluate price points within your budget range
- Read user reviews for real-world performance insights
- Make selection based on best value proposition (not just lowest price)
How to DIY and Replace Tractor Rear View Mirror
Many tractor rear view mirrors can be replaced without professional assistance, saving time and service costs. This step-by-step guide will help you complete the replacement safely and effectively.
Required Tools & Materials
Essential Tools
- Socket wrench set (standard and metric)
- Power drill with appropriate bits
- Safety glasses for eye protection
- Work gloves for hand protection
- Measuring tape for precise positioning
Necessary Materials
- Mirror adhesive (for non-framed mirrors)
- Masking tape for temporary positioning
- Microfiber cloth for cleaning surfaces
- Thread-locking compound for secure fastening
- Anti-vibration pads for mounting areas
Optional Equipment
- Wire crimpers (for electric/heated mirrors)
- Electrical tape for wire connections
- Heat shrink tubing for weatherproof connections
- Soldering iron for permanent electrical joints
- Multimeter for testing electric components
Safety Warning: Always wear safety glasses when removing old mirrors. Glass can break unexpectedly, and small fragments can cause serious eye injury. Disconnect the tractor's battery before working on electric or heated mirrors to prevent electrical shock.
Step-by-Step Replacement Guide
Select the Correct Replacement Mirror
Match the new mirror to your existing one in terms of size, mounting style, and features. For tractors with specialized requirements, consult the operator's manual for exact specifications. OEM (Original Equipment Manufacturer) parts ensure perfect fitment.
Remove the Existing Mirror
Use the appropriate socket wrench to carefully loosen and remove the mounting hardware. For electric mirrors, disconnect wiring harnesses, noting their connection points. Keep all hardware organized for potential reuse with the new mirror.
Prepare the Mounting Surface
Clean the mounting area thoroughly to remove dirt, old adhesive, and corrosion. A clean mounting surface ensures proper adhesion and prevents future loosening due to contamination. Check for damaged threads and repair if necessary.
Position and Secure the New Mirror
For adhesive-mounted mirrors, apply a thin, even layer of adhesive to the mounting base. For bracket-mounted mirrors, position carefully and start threading mounting bolts by hand before tightening. Use masking tape to hold position during initial installation.
Connect Electrical Components (if applicable)
For electric or heated mirrors, carefully connect wiring according to the manufacturer's instructions. Use heat shrink tubing or electrical tape to weatherproof connections. Test functionality before final positioning.
Final Adjustment and Testing
After installation, adjust the mirror to the optimal position for visibility. Test all functions (folding, heating, electric adjustment) to ensure proper operation. Make final tightening adjustments to eliminate vibration while avoiding overtightening.
Installation Tip: Apply a small amount of thread-locking compound to mounting bolts before final tightening. This prevents them from loosening due to tractor vibration during operation, extending the service life of your newly installed mirror.
Questions and Answers
Convex tractor rearview mirrors provide multiple significant advantages for operators:
- Substantially wider field of view compared to flat mirrors
- Reduced blind spots around the tractor's perimeter
- Better visibility of implements and trailing equipment
- Enhanced safety when maneuvering in tight spaces
- Improved awareness of nearby workers or obstacles
The curved surface allows operators to monitor large areas behind and beside the tractor with a single glance, though objects may appear smaller than they actually are. Many professional operators prefer installing convex mirrors as secondary mirrors alongside standard flat mirrors for comprehensive visibility.
Maximizing the lifespan of tractor rearview mirrors requires a combination of proper selection, installation, and maintenance practices:
Longevity Best Practices
- Choose mirrors with stainless steel or powder-coated frames
- Install vibration-dampening gaskets beneath mounting points
- Apply thread-locking compound to prevent hardware loosening
- Clean regularly with non-abrasive, ammonia-free cleaners
- Use protective covers during long-term storage
- Inspect and tighten mounting hardware monthly
- Apply anti-corrosion treatment to metal components
- Adjust mirrors with care to prevent mechanism damage
Practices That Reduce Lifespan
- Using high-pressure washers directly on mirror assemblies
- Ignoring small cracks or damage that can worsen
- Over-tightening adjustment mechanisms
- Letting electrical connections corrode (for heated mirrors)
- Using abrasive cleaners that damage protective coatings
- Forcing folding mechanisms beyond their designed range
- Neglecting to lubricate moving components
Electric and manual adjustment mirrors differ significantly in functionality, convenience, and application:
| Feature | Electric Adjustment Mirrors | Manual Adjustment Mirrors |
|---|---|---|
| Adjustment Method | Interior cabin controls/buttons | Physical repositioning from outside |
| Operator Convenience | High - adjustable while operating | Low - requires stopping and exiting |
| Installation Complexity | Higher - requires wiring and controls | Lower - mechanical mounting only |
| Cost | Generally higher | Generally lower |
| Maintenance Needs | More complex - electrical components | Simpler - mechanical components only |
| Best Applications | Larger tractors, frequent adjustment needs | Smaller tractors, stable viewing positions |
| Weather Vulnerability | More vulnerable to electrical issues | Less vulnerable to failure |
Electric adjustment mirrors are particularly valuable for operations requiring frequent mirror position changes, such as transitioning between field work and road transport. Manual mirrors remain popular for their simplicity, reliability, and lower cost, especially in smaller tractors used for consistent tasks.