


Types of Triangle Car Emergency Kits
A triangle car emergency kit is a crucial safety tool that equips drivers with essential items to manage unexpected situations on the road. These kits are tailored to meet different driving scenarios and personal needs. Choosing the right type of emergency kit can significantly enhance your preparedness for roadside incidents, weather-related emergencies, or family travel.
Basic Emergency Kit
This entry-level kit contains fundamental tools and supplies needed during minor roadside emergencies. It's ideal for everyday use and includes essentials like a first aid kit, reflective warning triangle, flashlight with extra batteries, basic tools, and jumper cables.
Advantages
- Affordable and widely available
- Compact size fits easily in most vehicles
- Meets minimum legal requirements in many regions
- Covers basic safety and survival essentials
Limitations
- Limited supplies for extended emergencies
- May lack specialized tools for complex repairs
- Minimal comfort-focused items
Best for: Daily commuters, city drivers, budget-conscious users
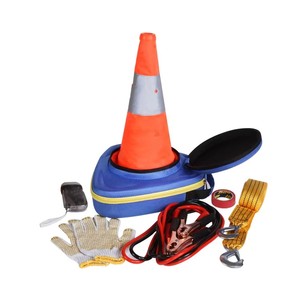
Roadside Emergency Kit
An advanced version designed specifically for handling vehicle breakdowns or accidents while on the road. This kit builds upon the basic emergency kit by adding tools that help get you back on the road quickly and safely.
Advantages
- Includes tools for common roadside repairs
- Contains recovery equipment like tow straps
- May include tire inflator and repair kit
- More comprehensive than basic kits
Limitations
- Bulkier than basic kits
- Higher cost than minimal kits
- May contain redundant tools for urban drivers
Best for: Long-distance travelers, frequent highway users, performance vehicle owners
Winter Emergency Kit
Specially designed for cold weather conditions, this kit addresses the unique challenges posed by icy roads, reduced visibility, and extreme temperatures. The winter emergency kit contains season-specific tools that ensure both vehicle functionality and personal safety in harsh conditions.
Advantages
- Essential for safe winter driving
- Contains cold-weather specific tools
- Includes thermal protection items
- Helps maintain vehicle operability in snow
Limitations
- Less useful in warmer climates
- Seasonal usage pattern
- Requires periodic inspection after storage
Best for: Winter drivers, mountain travelers, residents in cold climate zones
Family-Sized Emergency Kit
Tailored for families with multiple members, these kits provide sufficient supplies for all passengers during an emergency situation. They're particularly valuable for long family trips or when transporting children, elderly individuals, or pets who may have special needs during an emergency.
Advantages
- Ample supplies for multiple people
- Includes family-specific necessities
- Better psychological comfort for groups
- Addresses diverse age group requirements
Limitations
- Large storage footprint
- Heavier weight
- Potentially higher cost per person
Best for: Family vacations, school transportation, road trip enthusiasts
| Type | Core Components | Special Features | Ideal For | Recommended Storage Location |
|---|---|---|---|---|
| Basic Emergency Kit | First aid kit, warning triangle, flashlight, jumper cables, basic tools | Minimalist approach | Daily commuting | Glove compartment or under front seat |
| Roadside Emergency Kit | All basic components plus tow strap, tire repair kit, air compressor | Versatile repair options | Long-distance travel | Trunk or cargo area |
| Winter Emergency Kit | All basic components plus ice scraper, snow brush, thermal blanket, shovel | Extreme weather readiness | Cold climate driving | Trunk with easy access |
| Family-Sized Emergency Kit | Multiples of all essential items, plus food rations and water packets | Group safety focus | Family outings | Rear cargo area or roof box |
Expert Tip: Regularly inspect your emergency kit every 3-6 months to check expiration dates on items like first aid supplies, battery life in flashlights, and the condition of tools. Replenish used items immediately after any emergency use.
Storage Recommendation: Consider keeping a small basic emergency kit in each vehicle you frequently drive, especially if multiple family members use different cars. This ensures everyone has immediate access to essential safety items.
Specifications and Maintenance of Triangle Car Emergency Kits
When selecting a comprehensive car emergency kit, it's crucial to understand the components and specifications that define its effectiveness in critical situations. A high-quality triangle car emergency kit should be well-equipped, durable, and easy to access when needed. Below is an in-depth look at the essential items typically included in such kits and how to properly maintain them.
Essential Components and Their Specifications
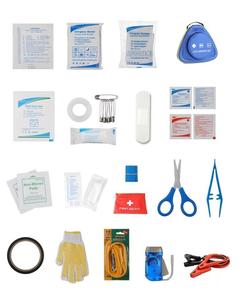
First-Aid Kit
A complete first-aid kit is one of the most vital components of any emergency kit. It typically includes sterile bandages, antiseptic wipes, adhesive tape, gauze pads, disposable gloves, tweezers, scissors, an emergency thermal blanket, and a printed first-aid manual.
The contents must meet basic medical standards for treating minor injuries until professional help can arrive. Look for kits with FDA-approved materials and clearly labeled compartments for easy access during emergencies.
Emergency Flashlight
An LED flashlight powered by replaceable or rechargeable batteries ensures visibility in low-light conditions. Some advanced models include features like SOS strobe modes, waterproof housing, and magnetic bases for hands-free operation.
Regularly test the flashlight, replace batteries annually, and clean the lens and contacts to prevent corrosion and ensure optimal brightness when needed most.
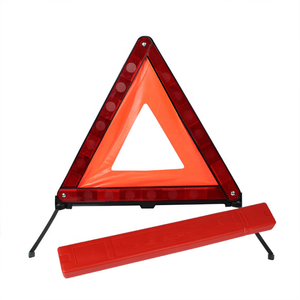
Reflective Warning Triangle
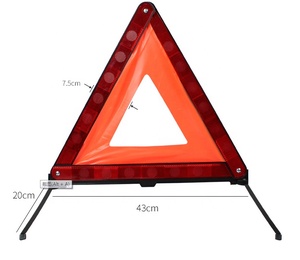
This safety device alerts other drivers to your vehicle’s presence on the roadside. It should be constructed from durable, weather-resistant materials with highly reflective surfaces visible from a distance of at least 150 meters.
Ensure the legs are sturdy and the reflective panels are free from dirt or damage. Store the triangle in a dry location and inspect it monthly for cracks or fading reflectivity.
Roadside Assistance Tools
These tools usually include jumper cables, a compact tire inflator with sealant, a tow strap, and a tire pressure gauge. Jumper cables should be thick enough (at least 4-gauge) to handle standard vehicles, with insulated clamps to protect against sparks.
Inspect the cables and clamps for wear, clean terminals regularly, and check tow straps for frayed edges or damaged stitching. Replace any component showing signs of deterioration.
Tire Inflator with Sealant
This tool helps you temporarily fix a flat tire and reinflate it to reach the nearest service station. The inflator should connect easily to your vehicle’s power outlet or battery and have a built-in pressure gauge.
Shake the inflator periodically to mix the sealant and check the hose for leaks or cracks. Ensure the product has a valid expiration date and store it upright to avoid clogging.
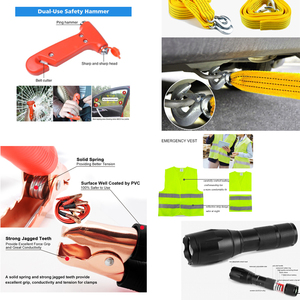
Multitool or Swiss Army Knife
A multitool provides multiple functions in a compact form, including pliers, screwdrivers, blades, wire cutters, and sometimes even glass breakers or seatbelt cutters.
Lubricate moving parts occasionally, keep blades sharp, and inspect all tools for proper function. Wipe down metal components with a dry cloth after each use to prevent rust formation.
| Component | Key Specification | Maintenance Tip |
|---|---|---|
| First-Aid Kit | Includes sterile dressings, gloves, and trauma manual | Check contents every 6 months; replace expired or used items |
| Flashlight | LED light source with minimum 100 lumens output | Replace batteries annually; clean contact points |
| Warning Triangle | Reflective surface visible up to 150 meters | Clean reflective surfaces monthly; check leg stability |
| Jumper Cables | Minimum 4-gauge thickness with rubber-insulated clamps | Inspect for corrosion; store in dry environment |
| Tire Inflator | Capable of inflating passenger tires to 35 psi | Shake before use; check hose integrity |
| Multitool | At least 6 integrated tools including cutting blade | Lubricate joints; inspect functionality quarterly |
Maintenance Best Practices
To ensure your triangle car emergency kit remains functional and ready for use, follow these maintenance guidelines:
Important: Never assume your emergency kit is fully prepared without checking. An incomplete or poorly maintained kit can lead to serious consequences in an emergency situation. Always perform a full inventory before long trips and after any incident where the kit was used.
How to Choose Triangle Car Emergency Kit
Selecting the right triangle car emergency kit is crucial for ensuring safety during unexpected breakdowns or roadside emergencies. A well-equipped kit provides visibility and protection for both the driver and oncoming traffic, especially in low-light conditions or high-speed areas. Below are key considerations when choosing an emergency kit that meets your needs and complies with local regulations.
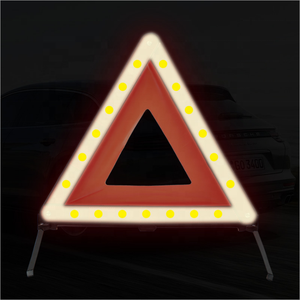
Reflective Triangles
Every effective triangle car emergency kit should include at least one reflective triangle. These triangular reflectors serve as a visual warning to approaching vehicles, giving them ample time to slow down or change lanes safely. The reflectivity of these triangles ensures visibility even in poor lighting conditions such as dusk, dawn, or inclement weather.
- Ensure the triangle has highly visible red and white patterns
- Look for materials that remain durable over time and resist fading
- Verify that the triangle meets international or national safety standards (e.g., ECE R104 or DOT)
Pro Tip: Place the triangle at least 160 feet behind your vehicle to maximize visibility and effectiveness.
Roadside Flares
In addition to reflective triangles, many kits include roadside flares for enhanced visibility. These flares emit a bright, sustained light that can be seen from much greater distances than passive reflectors. They are particularly useful in situations where immediate attention is needed, such as accidents or nighttime breakdowns.
- Choose between traditional chemical flares or LED alternatives
- LED flares are reusable and safer, while chemical flares provide brighter illumination
- Always store flares in a dry, accessible compartment within the kit
Safety Note: Handle chemical flares carefully and follow instructions to avoid burns or fire hazards.
Quality and Durability
The durability of your emergency kit components is essential for long-term reliability. The reflective triangle should be constructed from impact-resistant materials that can withstand harsh weather conditions like heavy rain, snow, or UV exposure. Similarly, any included flares should be made with heat-resistant casings and have a long shelf life.
- Check for waterproof or water-resistant construction
- Look for reinforced edges and bases on reflective triangles
- Verify expiration dates on flares if included
Expert Insight: Consider replacing older kits every few years, especially if exposed to extreme conditions.
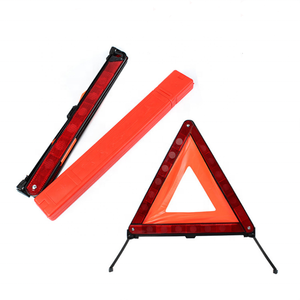
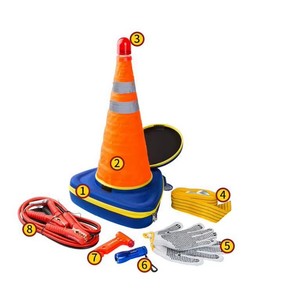
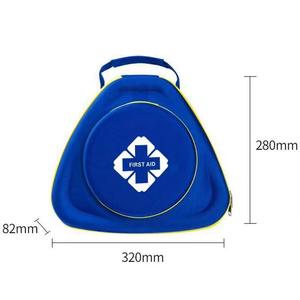
Portability and Storage
A good emergency kit should be easy to carry and store without taking up excessive space in your vehicle. Look for kits that come with a compact, sturdy carrying case or bag designed specifically for automotive use. Multiple compartments help keep items organized and readily accessible in stressful situations.
- Pick kits with handles or straps for easy transport
- Opt for lightweight designs that won’t weigh down your trunk
- Choose kits that fit neatly into glove compartments or under seats
Storage Suggestion: Store the kit in a dry area of your car and check its contents periodically.
Regulatory Reminder: Always verify the legal requirements for emergency equipment in your region before purchasing a kit. Some countries or states may require specific types or quantities of devices, and failing to comply could result in fines or liability in the event of an accident.
| Component | Recommended Features | Lifespan / Replacement Frequency | Safety Standards |
|---|---|---|---|
| Reflective Triangle | Durable plastic, reflective strips, stable base | 5–10 years depending on exposure | ECE R104, DOT, ISO 3863 |
| Chemical Flares | Waterproof casing, clear activation instructions | Replace every 3–5 years | DOT Class 1.4G, UN certified |
| LED Flares | Bright LEDs, rechargeable battery, magnetic base | 5+ years with proper care | Meets FMVSS No. 125 |
| Carrying Case | Water-resistant, multiple compartments, secure closure | As needed (replace if damaged) | N/A |
Final Advice: Your triangle car emergency kit should be tailored to your driving environment and frequency. Frequent highway drivers may benefit from including both reflective triangles and LED flares, while city commuters might prioritize portability and ease of access. Always perform a quick check of your kit before long trips to ensure all components are present and functional.
DIY Replacement Guide for Car Emergency Triangle Kits
A car emergency triangle kit is a critical safety device that every driver should have in their vehicle. It serves as a highly visible warning signal to other road users when your vehicle is stopped due to a breakdown, accident, or mechanical issue. Replacing an old or damaged emergency triangle kit is a simple and affordable task that can significantly enhance your roadside safety.
Safety Reminder: Always store your emergency triangle kit in an accessible location and ensure it remains clean, undamaged, and compliant with local traffic laws. Visibility and accessibility are key during emergencies.
Why Replace Your Emergency Triangle Kit?
Over time, the reflective surfaces of emergency triangles can fade, materials may crack due to exposure to weather, or the mounting hardware may rust. These issues reduce effectiveness and could lead to dangerous situations if the triangle fails when needed most. Regular replacement ensures you’re always prepared for unexpected roadside incidents.
Step-by-Step Replacement Process
- Evaluate and Dispose of the Old Kit Properly
- Inspect your current emergency triangle for signs of wear such as fading reflectors, broken hinges, or cracks.
- Before discarding, check local regulations on disposal—some components might be recyclable or require special handling.
- If the triangle contains metal parts or reflective tape, consider contacting a recycling center or automotive shop for proper disposal options.
- Select a Suitable Replacement Kit
- Ensure the new emergency triangle meets local legal requirements. For example, in many European countries, ISO 3844 compliance is mandatory.
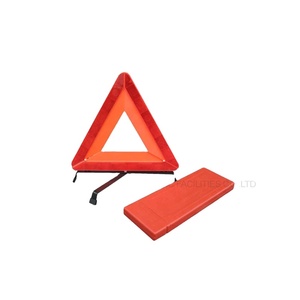
- Choose between folding or fixed designs based on storage space and ease of deployment.
- Opt for high-visibility features like enhanced retroreflective strips and bright orange frames for better visibility at night and in poor weather conditions.
- Determine the Ideal Mounting Location
- Look for a spot that allows quick access without compromising safety—common locations include under the dashboard, inside the trunk, or mounted on the rear window using suction cups or adhesive mounts.
- Ensure the triangle is not obstructed by cargo and remains upright when deployed.
- For permanent installation, choose a place that won’t interfere with regular vehicle operation but is still clearly visible from behind the vehicle.
- Install the New Emergency Triangle Kit
- Use the provided mounting hardware (adhesive pads, screws, or clips) to secure the triangle in place.
- For interior installations, avoid placing near airbags or any sensitive electronics where adhesives might leave residue.
- If using a portable version, keep it in a dedicated pouch or compartment so it’s always ready when needed.
| Stage | Key Considerations | Common Mistakes | Recommended Tools |
|---|---|---|---|
| Disposal | Check local environmental guidelines before discarding old kits. | Throwing away non-recyclable parts without proper processing. | Recycling bin, gloves, waste bag. |
| Purchase | Verify compliance standards and durability features. | Buying a non-compliant or low-quality model. | None required (research phase). |
| Mounting | Choose a visible and accessible location; use appropriate fasteners. | Improper securing leading to movement or detachment. | Screwdriver, adhesive remover, drill (if needed). |
| Maintenance | Regular checks for damage and cleanliness. | Neglecting periodic inspections until it's too late. | Clean cloth, mild detergent, flashlight. |
Pro Tip: Consider adding a second emergency triangle to your kit for dual placement—especially useful when stopping on multi-lane roads or highways. Also, keep gloves and a flashlight nearby to make nighttime setup safer and easier.
Maintenance and Long-Term Care
After installation, routine maintenance is essential to ensure reliability:
- Inspect the triangle every few months for dirt, fading, or physical damage.
- Wipe down the surface gently with a damp cloth and dry thoroughly to maintain reflectivity.
- Test the stability of the mount periodically, especially after long trips or rough driving conditions.
- Replace the triangle immediately if the reflective strips become dull or if structural integrity is compromised.
Conclusion
Replacing your emergency triangle kit is a small but crucial step toward maintaining vehicle safety and compliance. By following this guide, you’ll ensure that your emergency signaling equipment is always ready when you need it most. A well-maintained triangle can prevent accidents, save lives, and help you stay within legal driving requirements.
Emergency Triangle Usage Guide
The correct procedure for deploying an emergency triangle involves several important safety steps:
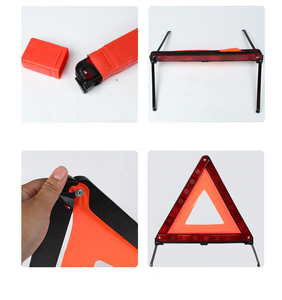
- Prepare the Triangle: Begin by unfolding the two reflective panels so that they form a triangular shape. These panels are typically connected with hinges or slots.
- Secure the Base: Locate the bottom leg of the triangle and insert it into the designated slot or tab at the base of the triangle structure to stabilize it.
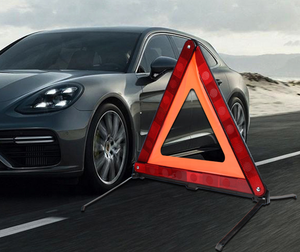
- Position Safely: Walk toward the road from your vehicle, carrying the triangle while staying as far off the roadway as possible to avoid oncoming traffic.
- Place at Appropriate Distance: Set the triangle on the ground at least 100 feet behind your vehicle. This distance allows approaching drivers ample time to react.
- Finalize Setup: Remove the leg from its temporary slot and insert it into the dedicated hole or support point on the base of the triangle to anchor it securely against wind or weather conditions.
This careful setup maximizes visibility and ensures the triangle remains upright in various weather conditions.
Proper placement is crucial for maximum visibility and safety. The recommended positioning guidelines are:
- Distance: Place the triangle between 100 to 200 feet behind your disabled vehicle. On highways or roads with higher speed limits, aim for the upper end of this range (closer to 200 feet) to give drivers sufficient reaction time.
- Visibility: Ensure the triangle is placed where it won't be obstructed by curves, hills, or roadside vegetation. It should be clearly visible from both directions of travel.
- Surface Stability: Choose a flat, stable surface to place the triangle. Avoid slopes or uneven terrain that could cause it to tip over.
- Weather Considerations: In foggy or rainy conditions, consider placing multiple triangles if available, spaced closer together to enhance visibility.
These practices help create a visible warning zone around your vehicle, reducing the risk of secondary collisions.
An emergency triangle should be deployed whenever your vehicle becomes a potential hazard to other road users. Specific scenarios include:
- Vehicular Breakdown: If your car stalls or breaks down on the side of the road, especially on highways or high-speed roads.
- Traffic Accidents: Immediately after any collision, regardless of severity, to alert other drivers and provide a visual warning.
- Temporary Stops: During brief stops in areas where visibility might be limited, such as near a curve or crest of a hill.
- Nighttime Emergencies: Particularly effective at night due to the reflective surfaces which enhance visibility under headlights.
Using the triangle promptly enhances your safety and helps prevent additional accidents by giving other drivers early warning of the situation ahead.
While legal requirements vary by jurisdiction, here's a general overview:
- European Union: Emergency triangles are required equipment in all vehicles, and their use is mandatory during breakdowns or emergencies.
- United States: Federal law doesn't mandate their use, but many states require them, particularly for commercial vehicles. Always check local motor vehicle regulations.
- Canada: Most provinces require emergency triangles or similar warning devices in operational vehicles.
- Global Perspective: Many countries outside North America and Europe also enforce mandatory use of warning triangles for roadside emergencies.
Even in locations where not legally required, using an emergency triangle is strongly advised as a best practice for personal and public safety. It significantly improves visibility and reduces accident risk.
Emergency triangles do not have a set expiration date like consumable items, but their effectiveness depends on condition. Here's a detailed maintenance guide:
| Component | Inspection Criteria | Maintenance Tips |
|---|---|---|
| Reflective Panels | Check for fading, cracks, or dirt buildup that reduces reflectivity | Clean with mild soap and water; replace if reflectivity diminishes |
| Hinges & Joints | Ensure smooth operation and secure locking mechanism | Lubricate moving parts periodically with silicone-based lubricant |
| Base Supports | Look for wear or bending that affects stability | Replace if legs no longer hold firmly in place |
| Storage Case | Verify case protects triangle from dust and damage | Use original case or protective bag when storing in vehicle |
We recommend inspecting your emergency triangle every six months and replacing it if any components show signs of wear or degradation. Proper care ensures readiness when needed most.