All categories
Featured selections
Trade Assurance
Buyer Central
Help Center
Get the app
Become a supplier
Alibaba
Vehicle Parts & Accessories
Wheels, Tires & Accessories
Wheel Parts & Accessories
Wheel Parts
Popular in your industry
Auto Body & Lighting for Mercedes
Auto Body & Lighting for Toyota
Auto Electrical & Engine for Honda
Motorcycle Engines
Marine Electronics
Jeep Modification
Previous slide
Next slide
Wheel bolt
(40267 products available)
Previous slide
Next slide
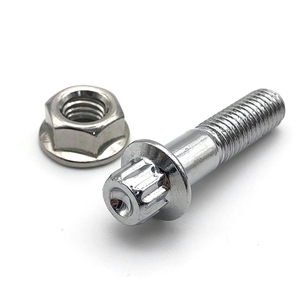
High Precision Custom Aluminum Titanium Car
Wheel
Lock Lug Nuts CNC Machining Car Spiked Lock Lug Nut
Wheel
Bolt
$
0
.60 - $
2
.66
Min. Order: 100 pieces
2 yrs
CN
Supplier
5.0/5.0
·
8 reviews
·
"excellent service"
Contact supplier
Chat now
Previous slide
Next slide
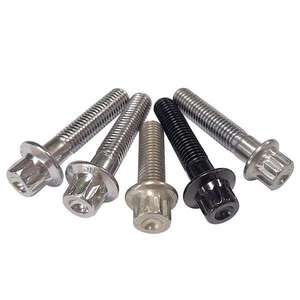
Flange
Bolt
Gr5 Titanium Hex Flange Nut 8mm M4 M6 M7 M7x32 Titanium
Bolt
M8 12 Point Flange
Bolt
And Nut
$
0
.07 - $
0
.10
Min. Order: 1000 pieces
16 yrs
CN
Supplier
4.9/5.0
·
4 reviews
·
"excellent customer service"
Contact supplier
Chat now
Previous slide
Next slide
High Quality Alloy Wobble
Wheel
Bolts
Wheel
Lock
Bolt
Nut Stainless Steel Pivot
Bolt
$
0
.90 - $
1
.50
Min. Order: 1000 pieces
1 yrs
CN
Supplier
5.0/5.0
·
4 reviews
·
"customer service"
Contact supplier
Chat now
Previous slide
Next slide
Factory Price Gr10.9 Gr12.9 HDG 20MnTib 40MnB 35cRMoA 45CrMoA
Wheel
Hub
Bolts
Nut
Bolt
For Motorcycle
$
0
.08 - $
0
.18
Min. Order: 10000 pieces
2 yrs
CN
Supplier
4.9/5.0
·
12 reviews
Contact supplier
Chat now
Previous slide
Next slide
OEM Precious Stainless Steel 303 304 CNC Machining Parts Customized Size For Hex Head
Bolt
Nuts
$
0
.02 - $
0
.15
Min. Order: 10 pieces
14 yrs
CN
Supplier
4.9/5.0
·
22 reviews
·
"good customer service"
Contact supplier
Chat now
Previous slide
Next slide
TItanium Alloy Gr.5 12 Point Flange Split Rim
Bolt
Wheel
Hub
Bolts
Screws For Motorcycles Car
Wheel
Tire
Ready to Ship
$
2
.20 - $
2
.50
Min. Order: 500 pieces
2 yrs
CN
Supplier
4.9/5.0
·
12 reviews
Contact supplier
Chat now
Previous slide
Next slide
Car Mount Hub
Wheel
bolt
Alloy 10.9 Grade Auto M7*32 M7*24 12 Point BBS 09.21.319 - Mounting
bolt
M6x26mm
$
0
.19 - $
0
.29
Min. Order: 100 pieces
8 yrs
CN
Supplier
4.9/5.0
·
49 reviews
·
"professional company"
Contact supplier
Chat now
Previous slide
Next slide
China supplier heavy truck
wheel
bolt
nut auto fastener car
wheel
bolt
high quality
wheel
bolt
and nut
$
0
.18 - $
0
.20
Min. Order: 5000 pieces
11 yrs
CN
Supplier
4.9/5.0
·
5 reviews
·
"prompt service"
Contact supplier
Chat now
1
2
3
4
5
More pages
100
1
/
100