All categories
Featured selections
Trade Assurance
Buyer Central
Help Center
Get the app
Become a supplier
Alibaba
Vehicle Parts & Accessories
Auto Body Systems
Car Fenders
Popular in your industry
Off-Road Modification
Auto Body & Lighting for Kia
Auto Body & Lighting for Toyota
Motorcycle Engines
Auto Electrical & Engine for Honda
F150 Modification
Previous slide
Next slide
Wheel liner
(6798 products available)
Previous slide
Next slide
3D Odorless Waterproof TPE Car Mats Car Floor
Liner
Lhd Rhd Car Carpet For Honda Civic 2012-2015 2016-2021 2022-2024
$
8
.99 - $
21
.69
Min. Order: 20 sets
8 yrs
CN
Supplier
4.3/5.0
·
32 reviews
·
"nice service"
Contact supplier
Chat now
Previous slide
Next slide
OEM 86811- Leaf Plate Lining Auto Body Parts Durable And Wear-resistantinner Fender
Liner
$
2
.50 - $
5
.50
Min. Order: 10 pieces
5 yrs
CN
Supplier
4.7/5.0
·
29 reviews
·
"good service"
Contact supplier
Chat now
Previous slide
Next slide
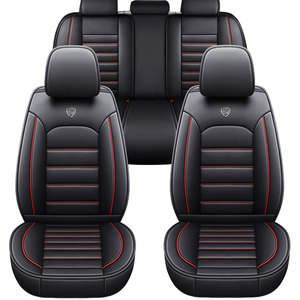
Black And Red Universal Fit Cheap Protective Pvc Full Set Waterproof Pu Leather Car Seat Cover For Toyota Corolla Camry
$
14
.00 - $
17
.00
Min. Order: 2 sets
Shipping per piece: $21.50
1 yrs
CN
Supplier
4.1/5.0
·
3 reviews
Contact supplier
Chat now
Previous slide
Next slide
Auto Factory OEM 86812- Leaf Plate Lining Auto Body Systems Inner Fender
Liner
For ACCENT RIO2
$
3
.20 - $
6
.00
Min. Order: 10 pieces
5 yrs
CN
Supplier
4.7/5.0
·
29 reviews
·
"good service"
Contact supplier
Chat now
Previous slide
Next slide
Custom Molded Vacuum Sealed Rubber Dust Cover For Automobiles Brake Pump Rubber Dust Cover
$
0
.50 - $
1
.00
Min. Order: 200 pieces
1 yrs
CN
Supplier
5.0/5.0
·
1 reviews
Contact supplier
Chat now
Previous slide
Next slide
High Quality Stripping
Wheels
Removing Rust Paint Cleaning Welds Quick Change Disc Blue Purple Black Orange Clean Strip It Disc
$
0
.10 - $
0
.50
Min. Order: 300 cartons
11 yrs
CN
Supplier
4.9/5.0
·
17 reviews
·
"good service"
Contact supplier
Chat now
Previous slide
Next slide
Made in china tesla Parts Fender
liner
1569756 1569757 for 2022 tesla model s plaid
wheel
liner
$
59
.00 - $
66
.00
Min. Order: 2 acres
1 yrs
CN
Supplier
5.0/5.0
·
7 reviews
·
"Awesome supplier"
Contact supplier
Chat now
Previous slide
Next slide
Mud Flaps Guard Auto Car Fender
Wheel
Mudflap For VIGO 2WD 2016-2019
wheel
well
liners
rally mud flaps
$
5
.34 - $
6
.96
Min. Order: 25 sets
3 yrs
CN
Supplier
4.7/5.0
·
38 reviews
·
"Good service"
Contact supplier
Chat now
1
2
3
4
5
More pages
100
1
/
100