
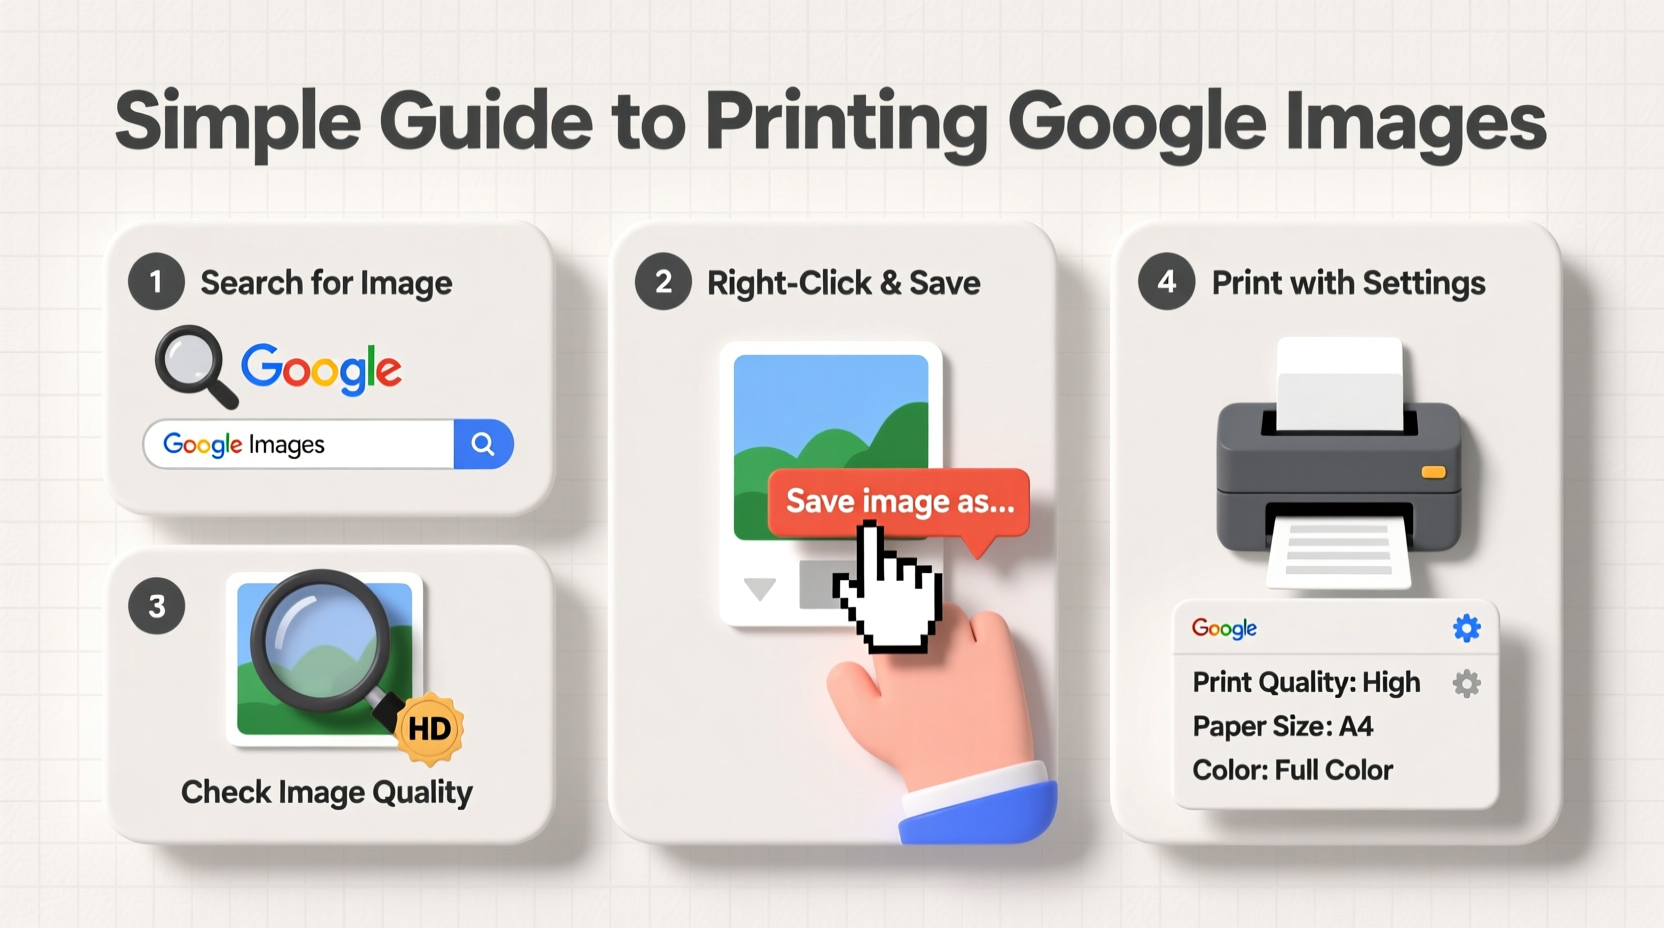
Printing images from Google can be a quick way to obtain visuals for personal projects, classroom materials, or home décor. However, many people end up with blurry, pixelated prints because they overlook key details about image resolution, file types, and printer settings. With the right approach, you can print sharp, vibrant images directly sourced from Google—without needing advanced design skills or expensive software.
The process combines smart searching, careful evaluation of image quality, and proper preparation before sending the file to your printer. This guide walks through each step clearly, so you can consistently achieve clean, high-quality printed images every time.
Understanding Image Resolution and Print Quality
Not all digital images are suitable for printing. The main factor determining print clarity is resolution, measured in DPI (dots per inch). For high-quality physical prints, a minimum of 300 DPI is recommended. Most screen-based images are only 72 DPI, which looks fine on monitors but appears fuzzy when enlarged on paper.
When sourcing from Google Images, resolution isn’t always visible upfront. However, you can estimate suitability by checking the image’s pixel dimensions. A good rule of thumb: an image should be at least 900 x 1200 pixels for a 3\" x 4\" print at 300 DPI. Larger prints require proportionally higher pixel counts.
“Print quality starts long before the paper comes out—it begins with selecting an image that has enough data to support physical reproduction.” — David Lin, Digital Imaging Specialist
Keep in mind that enlarging a low-resolution image doesn’t add detail; it only spreads existing pixels over more space, resulting in blurriness. Always aim to source the largest available version of any image.
How to Find High-Quality Images on Google
Google Images defaults to showing thumbnails optimized for web browsing, not printing. To find printable-quality visuals, use the search tools to filter results effectively.
- Enter your keyword into Google Images (e.g., “vintage bicycle”).
- Click on “Tools” beneath the search bar to reveal filtering options.
- Select “Size” and choose “Large” (typically 2MP or higher).
- Under “Type,” consider filtering for “Photograph” or “Clip art” depending on your need.
- Use “Color” filters if you’re printing in black and white or want specific tones.
Be cautious of watermarked or copyrighted images. Even if an image appears in search results, it may not be free to use or reproduce. For worry-free printing, consider pairing Google searches with public domain sources like Unsplash, Pixabay, or Wikimedia Commons.
Preparing the Image for Printing
Downloading and printing aren’t as straightforward as they seem. Simply right-clicking and printing often leads to poor scaling, incorrect sizing, or unwanted backgrounds. Follow these steps to prepare your image properly.
Step-by-Step: Preparing Your Downloaded Image
- Download the Full-Size Version: Click the image in Google, then click “Visit page” to go to the source. Locate and save the highest-resolution version available.
- Save in a Compatible Format: Choose JPEG or PNG formats—they’re widely supported and retain good quality.
- Resize if Necessary: Use free tools like Paint (Windows), Preview (Mac), or online editors such as Photopea to adjust dimensions without distorting proportions.
- Add Margins (Optional): If framing or matting the print, include white borders to avoid cutoff during trimming.
- Check Color Mode: Ensure the image is in RGB mode (standard for digital displays) unless your printer requires CMYK.
| Do | Don't |
|---|---|
| Download the largest available size | Assume the thumbnail size is sufficient |
| Verify the image dimensions before printing | Stretch a small image to fit a large paper size |
| Use matte or glossy photo paper for best results | Print high-resolution images on standard office paper |
| Preview print using “Print Preview” function | Skip preview and print directly from browser |
Printing Best Practices for Crisp Results
Even a high-resolution image can turn out poorly if printer settings aren’t adjusted correctly. Modern printers offer various quality modes, paper types, and scaling options—all of which affect the final output.
- Select the Right Paper: Use photo paper (glossy for vibrancy, matte for elegance) to match the image type.
- Set Print Quality to “High” or “Best”: This ensures maximum ink density and detail retention.
- Disable “Fit to Page” by Default: Instead, manually set the desired print size to maintain aspect ratio.
- Use Borderless Printing (if supported): Ideal for full-bleed photo prints without white edges.
If printing from a browser, bypass the default dialog by saving the image first and opening it in a dedicated program like Adobe Reader, Photos (Mac), or Windows Photo Viewer. These applications give you more control over layout, orientation, and scaling.
Real Example: Printing a Nature Scene for a Classroom Poster
Sarah, a middle school science teacher, wanted to print a large image of a coral reef for her marine biology unit. She searched “coral reef ecosystem” on Google Images, filtered by “Large” size, and found a vivid underwater photograph. After opening the source page, she discovered the image was 2400 x 1600 pixels—more than enough for an 8\" x 10\" print at 300 DPI.
She downloaded the JPEG, opened it in Preview on her Mac, and added a half-inch white border for framing. In the print menu, she selected premium glossy photo paper, set quality to “High,” and unchecked “Scale to Fit Media.” The result was a bright, detailed poster that students admired throughout the semester.
Sarah avoided common pitfalls: she didn’t print directly from the browser, didn’t assume the thumbnail was print-ready, and tested the colors on plain paper first. Her attention to detail made the difference between a mediocre handout and an engaging educational tool.
Frequently Asked Questions
Can I legally print any image from Google?
No. Google Images aggregates content from websites, but copyright usually remains with the original creator. Only print images labeled for reuse (look for usage rights filters) or those in the public domain. When in doubt, seek permission or use royalty-free platforms like Unsplash or Pexels.
Why does my printed image look blurry even though it looked sharp on screen?
This typically happens when the image lacks sufficient resolution for the print size. On-screen images appear clear at lower DPI because screens display pixels differently than printers lay down ink. Always verify pixel dimensions and scale appropriately—never enlarge a small image beyond its native size.
Is there a way to improve the quality of a low-resolution image before printing?
While you can’t add real detail to a low-res image, AI-powered tools like Let’s Enhance, Fotor, or Adobe Photoshop Super Resolution can intelligently upscale photos with moderate success. Results vary, so use this as a last resort and manage expectations.
Final Checklist Before You Print
- ✅ Source Selection:
- Used Google’s “Large” size filter to find high-resolution options.
- ✅ File Preparation:
- Downloaded the full-size image and saved it in JPEG or PNG format.
- ✅ Dimension Check:
- Verified pixel count meets 300 DPI requirement for intended print size.
- ✅ Software Setup:
- Opened image in a dedicated viewer—not printing directly from browser.
- ✅ Printer Settings:
- Selected correct paper type, quality level, and disabled automatic scaling.
- ✅ Test Print:
- Ran a draft on regular paper to confirm sizing and color accuracy.
Conclusion: Print Smarter, Not Harder
Printing Google images doesn’t have to be frustrating or result in subpar quality. By understanding resolution needs, refining your search strategy, and adjusting printer settings thoughtfully, you can produce professional-looking prints from everyday tools. Whether you're creating wall art, educational aids, or custom gifts, the key lies in preparation and precision.


 浙公网安备
33010002000092号
浙公网安备
33010002000092号 浙B2-20120091-4
Comments
No comments yet. Why don't you start the discussion?