
Every December, office desks across the world sprout tiny festive ornaments—plastic pines, LED-lit figurines, even miniature inflatable Santas. But what if your holiday accent didn’t just look good, but told a story? A story of renewal, resourcefulness, and quiet rebellion against e-waste? In 2023, over 61 million metric tons of electronic waste were generated globally—less than 22% of it formally recycled. Yet inside that discarded laptop motherboard, those bent USB connectors, and those forgotten resistor arrays lie unexpected geometry, texture, and light. This isn’t about upcycling as a craft trend. It’s about reclaiming intentionality: transforming obsolete tech into something warm, personal, and quietly joyful—without soldering irons, high-voltage tools, or prior electronics experience.
Why electronics—and why a desk tree?
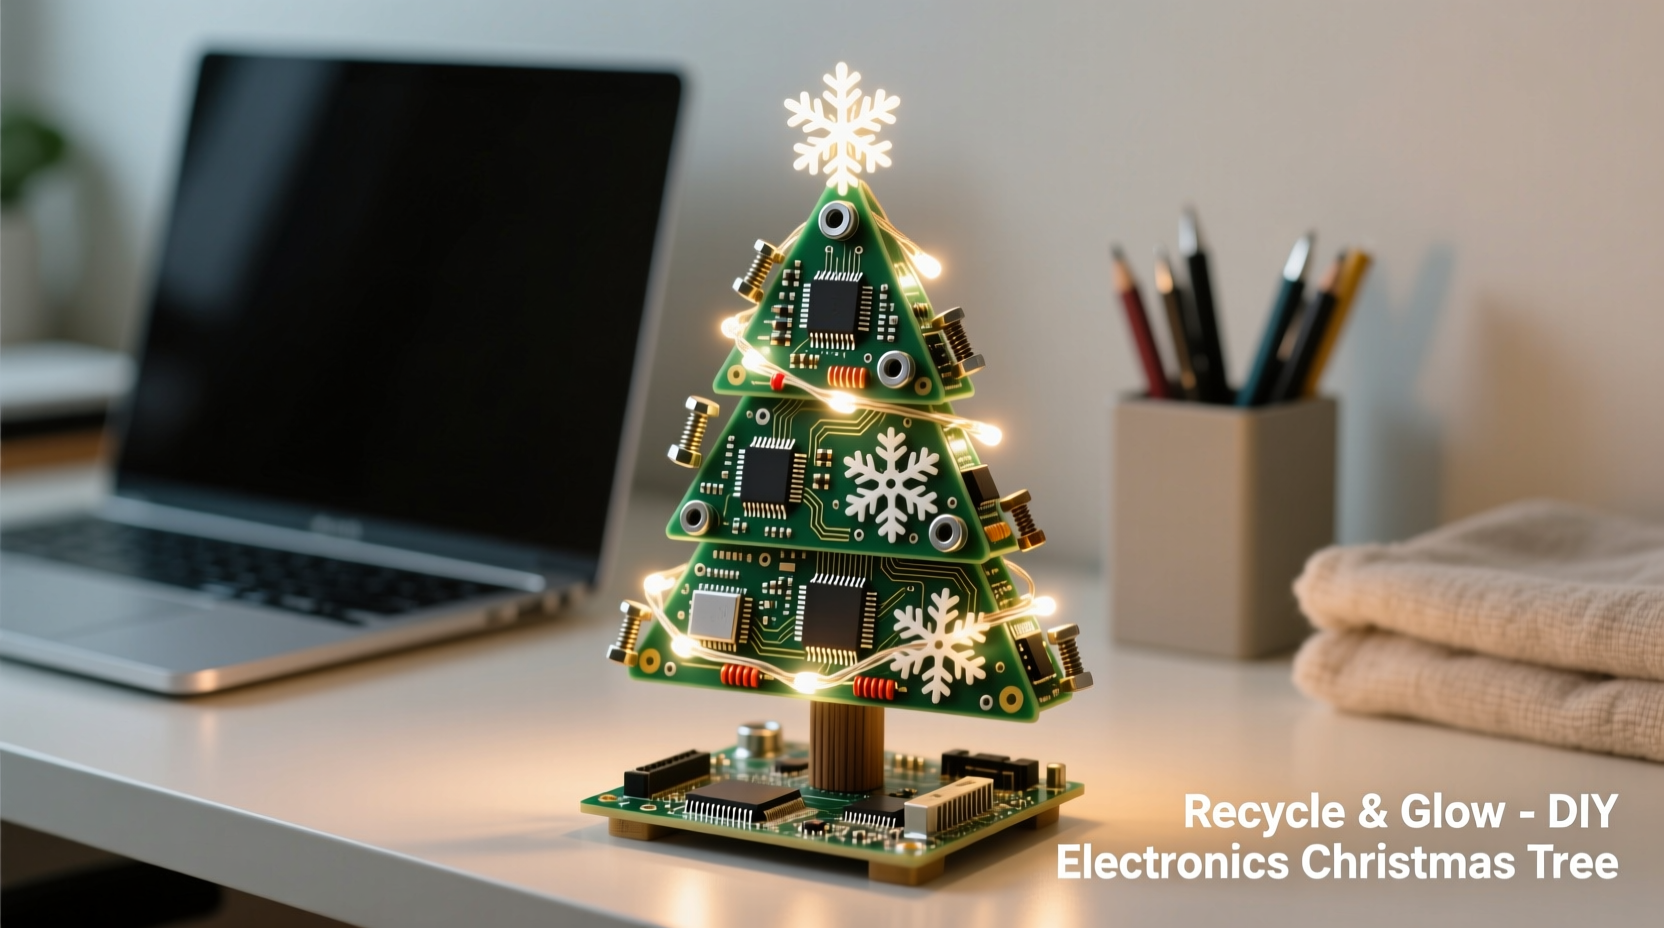
A desk tree occupies a unique emotional and physical space: small enough not to distract, meaningful enough to spark conversation, and personal enough to reflect its maker’s values. Electronics parts offer structural advantages few craft materials match. Circuit board traces form natural fractal branches. Heat sinks mimic pine boughs with their finned symmetry. Capacitors stand like polished pinecones; LEDs glow with the soft fidelity of vintage fairy lights. Unlike plastic kits or mass-produced decor, each component carries history—a retired keyboard key once typed a proposal, a fan blade cooled a student’s laptop during finals week. That provenance adds resonance.
Crucially, this project prioritizes safety and accessibility. No power supply is required for the base structure. No hot glue gun needed near delicate components. And no technical knowledge beyond recognizing common parts is assumed. As Dr. Lena Torres, industrial ecologist and co-author of Circuit & Conscience: Designing for Material Legacy, observes:
“Reusing electronics isn’t just about diverting waste—it’s about retraining our perception. When we see a capacitor not as scrap, but as a sculptural node with inherent rhythm and proportion, we begin to redesign our relationship with technology itself.” — Dr. Lena Torres, Industrial Ecologist, MIT Materials Sustainability Lab
Essential components and where to source them safely
You don’t need a junkyard or a hacker lab. Most parts can be gathered responsibly in under an hour from three everyday sources: your own drawer of “maybe someday” gadgets, local repair cafés (which often donate non-functional items), and municipal e-waste drop-off centers that allow component harvesting (call ahead—they frequently set aside clean, disassembled boards).
What to look for—and what to avoid:
| Component | Why It Works | Sourcing Tip | Avoid If… |
|---|---|---|---|
| Green or blue PCB fragments (1–4 cm) | Natural angularity mimics evergreen branching; copper traces catch ambient light like frost | Old routers, calculators, or broken game controllers—cut with tin snips (wear safety glasses) | Coated in thick conformal coating (glossy black resin) or visibly corroded |
| Ceramic capacitors (cylindrical, 3–8 mm tall) | Smooth, tapered shape resembles pinecones; available in warm beige, grey, and burnt orange | Power supplies, audio amplifiers, or desktop motherboards—twist gently to detach | Leaking electrolyte (oily residue) or cracked casing |
| Small heatsinks (aluminum, under 5 cm) | Fins create layered depth; brushed metal reflects light like snow-dusted boughs | Old CPUs or RAM modules—often secured with one screw | Bent, heavily oxidized, or covered in thermal paste you can’t fully clean |
| LEDs (5 mm round, diffused lens) | Low-voltage, cool-running, and inherently festive—no wiring needed for passive display | Discarded LED flashlights, old remotes, or indicator panels—test with a 3V coin cell before use | Clear (non-diffused) lens (too harsh) or physically damaged leads |
| USB-A or micro-USB connectors | Strong metallic sheen and symmetrical shape suggest sturdy trunks or decorative accents | Broken cables—cut 2–3 cm from the connector end; sand lightly for uniform finish | Plastic housing cracked or pins bent beyond alignment |
Your no-solder assembly toolkit
This project succeeds because it rejects complexity. You’ll use only five tools—none cost more than $12 total, and four are likely already in your home office:
- Flush-cut wire cutters – For cleanly removing components without damaging pads or neighboring parts
- Needle-nose pliers (with fine tips) – To gently bend leads, align fins, or grip tiny capacitors
- Low-temp glue gun (60W max) or strong double-sided tape – Hot glue melts at 120°C; low-temp guns stay under 180°C, safe for most plastics and ceramics
- Small foam brush + isopropyl alcohol (70%) – For gentle cleaning without residue
- Base material: 8-cm diameter wooden coaster or reclaimed cork disc (1.5 cm thick) – Provides stability, warmth, and grounding contrast to metal parts
What you don’t need: soldering iron, multimeter, power supply, epoxy resin, or a workshop. This is desk-scale making—designed for lunch breaks and quiet evenings, not engineering labs.
Step-by-step construction: From chaos to conifer
Build time: 65–90 minutes. Yield: One 18–22 cm tall, freestanding mini tree. No two will be identical—intentionally.
- Prepare and sort (10 min): Wipe all components with alcohol-dampened foam brush. Let air-dry. Group by type and approximate size. Discard anything brittle, cracked, or coated in unremovable grime.
- Create the trunk (8 min): Select 2–3 USB-A connectors. Glue them vertically, side-by-side, onto the center of your wooden coaster using low-temp glue—leave 1 cm of exposed metal above the base. Let set 3 minutes. This forms a stable, textured trunk with subtle taper.
- Build the first tier (branch layer 1 — 15 min): Choose 4–5 small heatsinks. Using pliers, gently bend one fin on each outward at a 45° angle to create asymmetry. Glue them radially around the trunk base, angled slightly upward. Space evenly—like lower boughs catching snow.
- Add mid-layer structure (12 min): Cut 3–4 irregular PCB fragments (2–3 cm). Sand edges lightly for smoothness. Glue them overlapping the heatsink fins—not flat, but tilted 20–30° upward, following the natural curve of a pine branch. Alternate green and blue boards for visual rhythm.
- Insert focal points (10 min): Glue ceramic capacitors vertically along PCB edges: one per fragment, spaced unevenly. Vary heights (some flush, some protruding 2 mm) to suggest organic growth. Add one small LED (anode lead up) centered on the tallest PCB piece—its soft glow becomes the tree’s quiet heart.
- Final tier & finishing (15 min): Use 2–3 smaller PCB shards or trimmed resistor arrays as uppermost “tips.” Angle sharply upward. Tuck one final LED near the apex—this one facing forward, so its light catches when viewed head-on. Let dry fully (30 min minimum) before moving.
Real-world example: Maya’s “Circuit Spruce” in Portland
Maya R., a UX researcher in Portland, built her first electronics tree after her laptop died irreparably. She kept its motherboard, a dead wireless card, and a stripped-down cooling fan. Her version used the fan’s central hub as the trunk base, with bent copper heat pipes radiating outward as dramatic, sweeping branches. She added red and green LEDs powered by a hidden AAA battery pack (optional upgrade—wired separately, never soldered to the tree structure). Colleagues began bringing in their own “e-waste donations”—a broken calculator keypad became her star topper; a salvaged piezo buzzer, glued sideways, hums faintly when tapped (a tactile Easter egg). Within three weeks, her desk tree had inspired four colleagues to build their own. “It stopped being decoration,” she told us, “and started being a conversation starter about what we discard—and what we might still hold dear.”
Maintenance, display, and responsible evolution
Your tree isn’t static. Like any living thing, it invites care—and change.
Display it away from direct sunlight (prevents yellowing of older PCB soldermask) and high humidity (protects metal finishes). If you later want illumination, use a USB-powered LED puck light placed *under* the coaster—not wired into components. That preserves integrity and avoids heat stress.
And when your tree evolves? Don’t discard it. Remove glue residue with rubbing alcohol and a toothbrush. Re-sort components. Reuse the trunk connectors in another build—or donate cleaned parts to a local makerspace. True sustainability lives in cycles, not endpoints.
FAQ
Can I use parts from smartphones or tablets?
Yes—but with caution. Prioritize glass-free elements: metal frames, camera lens rings (if intact), or speaker grilles. Avoid flex cables (too fragile), battery remnants (hazardous), or OLED screens (easily scratched). Smartphones yield elegant, compact pieces—but require finer motor skills during handling.
Is this safe for children or pets to be near?
Yes—if assembled as described. All components are securely glued, no sharp protrusions remain after sanding, and no electrical current flows through the structure. However, due to small parts (capacitors, resistors), keep it out of reach of toddlers or chewing pets. It’s art—not a toy.
What if I don’t have access to electronics waste?
Visit a local repair café or library tech lab—they often welcome volunteers to help sort donations and may gift you clean, usable parts. Alternatively, search “free electronics recycling near me” and call ahead: many facilities let you harvest from pre-separated bins. Never scavenge from curbside piles—safety and legality vary widely.
Conclusion: Your tree is already growing
You don’t need permission to begin. You don’t need perfection. You don’t even need a full set of parts—start with one circuit board fragment and a single capacitor. Hold them in your hand. Notice the weight, the texture, the way light catches a copper trace. That moment—of attention, of recognition—is where meaning begins. This mini Christmas tree isn’t about replicating tradition. It’s about interrupting it—gently, beautifully—with evidence that value persists long after utility ends. That a discarded motherboard holds more poetry than a plastic pine. That your desk, your workspace, your daily ritual can become a quiet act of ecological imagination.
So gather your fragments. Clean them with care. Arrange them without expectation. Glue with patience. And when you step back—when you see that small, shimmering, unmistakably alive structure rising from your coaster—you won’t just see a decoration. You’ll see resilience made visible. You’ll see what happens when we stop asking “What can this do?” and start asking, “What else can this be?”


 浙公网安备
33010002000092号
浙公网安备
33010002000092号 浙B2-20120091-4
Comments
No comments yet. Why don't you start the discussion?