
Christmas trees have long been canvases for personal expression—from heirloom glass baubles to minimalist Scandinavian palettes. But for gamers, collectors, and pop-culture enthusiasts, the traditional tree often feels disconnected from identity. A gaming-inspired Christmas tree bridges nostalgia, fandom, and craftsmanship: it’s not just decoration—it’s storytelling in evergreen form. This isn’t about slapping logos on tinsel. It’s about intentional design that honors gaming history while meeting real-world constraints: safety, structural integrity, visual cohesion, and longevity. Whether you’re curating your first tree or upgrading a decade-old setup, this guide delivers actionable, tested methods—not trends—to build a tree that sparks conversation, evokes memories, and withstands December’s chaos.
Why Gaming-Themed Trees Resonate Beyond Aesthetics
Gaming culture has matured from niche hobby to intergenerational language. According to the Entertainment Software Association’s 2023 report, 75% of U.S. households include at least one gamer—and the average age of a core gamer is now 35. That means many adults decorating trees grew up with Super Mario Bros., The Legend of Zelda, or Halo. These titles aren’t just software; they’re emotional landmarks tied to childhood bedrooms, holiday releases, and shared LAN parties. A gaming-themed tree taps into that resonance deliberately. It signals belonging—not just to a fandom, but to a generation that values narrative, interactivity, and tactile engagement. Unlike generic “nerdy” decor, a thoughtfully built gaming tree respects the medium’s evolution: honoring pixel art without reducing it to kitsch, celebrating physical media without ignoring digital shifts, and prioritizing safety over spectacle.
“Gaming decor works best when it reflects *how people actually play*—not just what games look like on screen. The disc, the controller, the pause button: those are the artifacts of lived experience.” — Dr. Lena Torres, Cultural Historian & Author of Play Space: Designing for Digital Rituals
Core Components: What You’ll Actually Need (and Why)
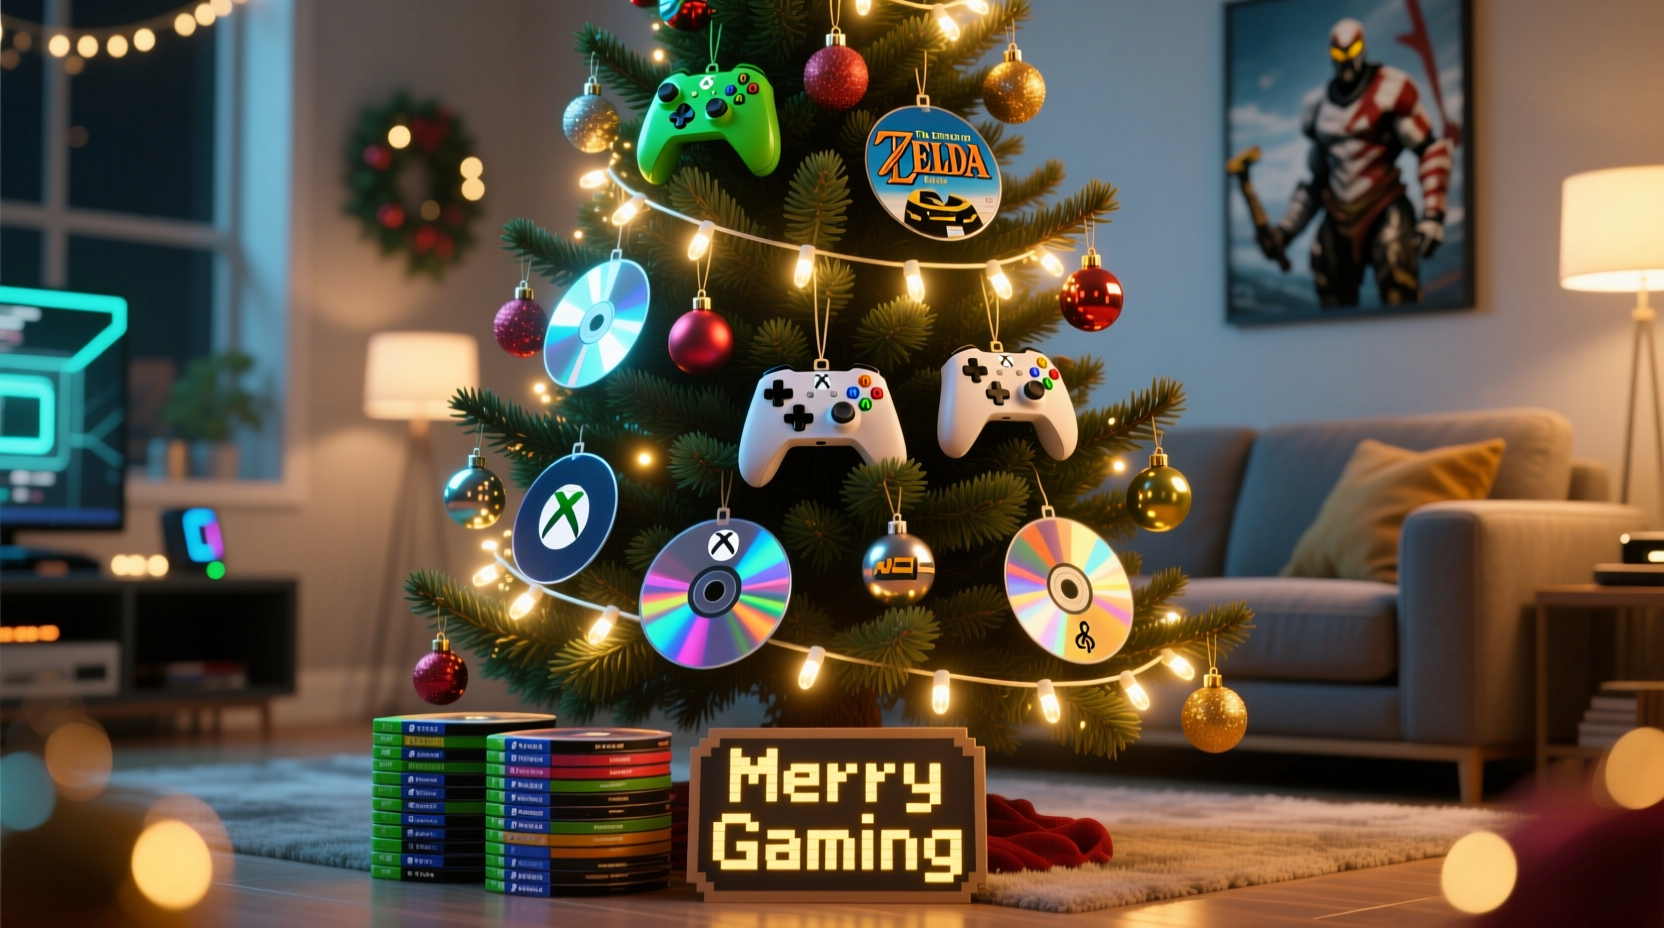
A successful gaming tree rests on three pillars: structure, illumination, and narrative layering. Each component must support the others—not compete. Skip the “gamer”-branded LED sets sold online; most use low-CRI LEDs that wash out colors and lack dimmability. Instead, build from proven, adaptable elements:
| Component | Recommended Type | Rationale & Notes |
|---|---|---|
| Tree Base | Pre-lit artificial tree (7–8 ft) with warm-white LED string lights *already embedded* | Eliminates wiring clutter and ensures even light distribution. Avoid trees with multicolor or flashing modes—they undermine visual cohesion. Look for UL-listed, flame-retardant models with tight branch density (≥900 tips). |
| Controller Lights | USB-powered, battery-operated LED strips with adhesive backing (e.g., Philips Hue Play Bars or Govee RGBIC strips) | Controllers need *focused*, directional light—not ambient glow. These strips mount cleanly behind controllers and offer precise color control via app or remote. Avoid plug-in strips near outlets: heat buildup risks damage to plastic casings. |
| Game Discs | Real, cleaned optical discs (DVD/Blu-ray) + UV-resistant acrylic display stands (1.5–2 inch height) | Discs add weight and reflectivity. Real discs provide authentic texture and holographic sheen. Never use scratched or warped discs—they catch light unevenly and may shatter under pressure. Acrylic stands prevent scratching and allow 360° visibility. |
| Ornament Anchors | Heavy-duty, clear fishing line (20–30 lb test) + micro-suction hooks (e.g., Command™ Clear Hooks) | Standard ornament hooks sag under disc weight. Fishing line distributes tension evenly; suction hooks adhere securely to smooth controller surfaces without residue. |
| Thematic Accents | Hand-painted resin tokens (e.g., “1UP”, “Continue”, “Pause”), retro cartridge replicas (non-functional), or miniature joystick ornaments | These provide narrative punctuation—small moments of recognition. Avoid mass-produced plastic versions; they feel cheap and break easily. Prioritize items with matte finishes to reduce glare competition with discs and LEDs. |
Step-by-Step Assembly: From Bare Tree to Immersive Display
Building this tree takes 3–4 hours, not counting prep time for cleaning discs or customizing controllers. Work in sequence—each step enables the next. Rushing compromises stability and visual rhythm.
- Prepare the tree base: Unbox and assemble your pre-lit tree in its final location. Let it settle for 24 hours before decorating. This allows branches to relax and fill gaps naturally. Test all lights—replace any faulty bulbs immediately.
- Clean and inspect discs: Wipe each disc with a microfiber cloth dampened with distilled water (never circular motions—use straight lines from center to edge). Hold up to light: discard any with deep scratches, cracks, or delamination. Set aside 12–18 discs for primary display; keep extras for rotation.
- Mount controller lights: Attach LED strips vertically along the back edge of each controller (Xbox, PlayStation, or NES-style replicas). Use included adhesive tape—press firmly for 60 seconds per section. Connect strips to a USB power bank (not wall outlet) for portability and safety. Test brightness: ideal setting is 40–50% intensity—bright enough to glow, soft enough to avoid washing out disc reflections.
- Arrange disc displays: Place acrylic stands on sturdy, horizontal branches (avoid thin, flexible tips). Position discs at slight angles (15–25°) to maximize light reflection toward viewers. Alternate disc types: e.g., PS2 DVD → SNES cartridge replica → Xbox Blu-ray → “Continue” token. Maintain 8–10 inch spacing between disc clusters.
- Secure controllers: Mount controllers using micro-suction hooks on upper-mid branches (6–7 ft height). Orient them as if held mid-game: left analog stick slightly tilted, buttons facing outward. Hang one controller per 2–3 disc clusters to avoid visual overload.
- Add thematic accents: Weave hand-painted tokens into lower branches using fishing line. Suspend joystick ornaments from inner branches where light catches their metal pivots. Avoid placing accents directly adjacent to LED strips—they’ll cast distracting shadows.
- Final lighting calibration: At dusk, observe the tree. Adjust LED strip colors to complement disc hues: cool white for Blu-rays, amber for older DVDs, soft green for Nintendo-branded discs. Dim main tree lights to 60% to let controller and disc highlights dominate.
Real-World Application: How Maya Built Her “Zelda Tree” in Austin
Maya R., a 32-year-old UX designer and lifelong Zelda fan, transformed her 2022 tree into a tribute to Hyrule’s lore—not through licensed merch, but material storytelling. She sourced original copies of Ocarina of Time (N64), Twilight Princess (Wii), and Tears of the Kingdom (Switch) discs, then etched subtle Triforce motifs onto their reflective layers using a fine-tipped UV pen (invisible under normal light, glowing faintly under controller LEDs). Her controllers? Two modified Wii Remotes painted in Twilight Princess’ twilight blue, with LED strips synced to pulse gently—mimicking the game’s heartbeat mechanic. She arranged discs in descending order of release year, forming a spiral “timeline” down the tree’s right side. At the base, she placed a ceramic Sheikah Slate replica holding a small battery-powered candle. Neighbors reported kids recognizing the pattern before spotting the brand names. “It’s not about showing off my collection,” Maya says. “It’s about letting people *feel* the journey—how the music changed, how the worlds expanded, how the controls evolved. The tree holds space for that.”
What to Avoid: Safety, Aesthetics, and Longevity Pitfalls
Many gaming trees fail not from lack of creativity, but from overlooked practicalities. Here’s what experienced builders consistently flag:
- Don’t daisy-chain power sources: Connecting multiple LED strips to one USB adapter risks voltage drop, flickering, and overheating. Use individual power banks or a powered USB hub rated for 2.4A per port.
- Don’t hang discs on live electrical wires: Even low-voltage tree lights generate heat. Discs act as lenses—focusing light and heat onto nearby wires, accelerating insulation degradation. Keep discs ≥3 inches from any cord.
- Don’t use glue or tape on disc surfaces: Adhesives leave permanent residue and attract dust. Acrylic stands exist for a reason—use them.
- Don’t ignore controller ergonomics: Mounting a controller upside-down or sideways breaks visual continuity. Viewers subconsciously expect the D-pad to face upward, triggers to point forward. Align with natural grip orientation.
- Don’t overcrowd the trunk: The tree’s center should remain partially visible. Overloading inner branches creates a “blobby” silhouette and blocks light diffusion. Reserve the trunk for subtle accents only—e.g., a single “Game Over” ribbon tied in a bow.
Frequently Asked Questions
Can I use real game cartridges instead of discs?
Yes—but with caveats. Original NES or SNES cartridges contain batteries (for save data) that can leak and corrode contacts. Remove batteries before display and seal cartridge slots with archival-quality tape. Prefer reproduction cartridges designed for decor (no batteries, reinforced plastic). Never hang by the cartridge slot—use micro-hooks on the casing edges.
How do I protect discs from fading or yellowing?
UV exposure is the primary culprit. Keep the tree away from south-facing windows. If unavoidable, apply a thin coat of UV-blocking acrylic spray (e.g., Krylon UV-Resistant Clear) to disc non-label sides *before* mounting. Reapply every 2 years. Store discs in opaque cases when not in use.
Are there fire-safe alternatives to LED strips for controllers?
Absolutely. Fiber optic strands (3mm diameter) with a single LED light source at the base produce zero heat and offer soft, even glow. They’re more labor-intensive to install but eliminate all electrical risk near plastic. Look for “cold light” fiber optic kits designed for museum displays.
Conclusion: Your Tree Is a Living Archive—Start Building Today
A gaming-inspired Christmas tree is more than seasonal decor. It’s a curated archive of personal milestones—first console unboxed, midnight releases waited for in line, co-op victories celebrated with friends, solo journeys through imagined worlds. Every disc tells a story of time invested, every controller light echoes hours of focused presence. This guide provides the framework, but the meaning comes from your choices: which games shaped your holidays? Which controllers hold fingerprints from years past? Which colors make your heart skip—not because they’re “on brand,” but because they’re *yours*? Don’t wait for perfection. Start with one disc, one controller, one strand of light. Document your process. Share what works—and what doesn’t—with fellow builders. Because the best gaming trees aren’t found in catalogs. They’re grown, branch by branch, memory by memory, in living rooms across the world.


 浙公网安备
33010002000092号
浙公网安备
33010002000092号 浙B2-20120091-4
Comments
No comments yet. Why don't you start the discussion?