
A running toilet isn’t just annoying—it can waste up to 200 gallons of water per day, driving up your utility bill and contributing to unnecessary water consumption. The good news? In most cases, you don’t need a professional to fix it. With basic tools and a bit of understanding of how your toilet works, you can diagnose and resolve the issue in under an hour. This guide walks you through the most common causes of a running toilet and provides clear, actionable steps to stop the constant flow for good.
Understanding How a Toilet Works
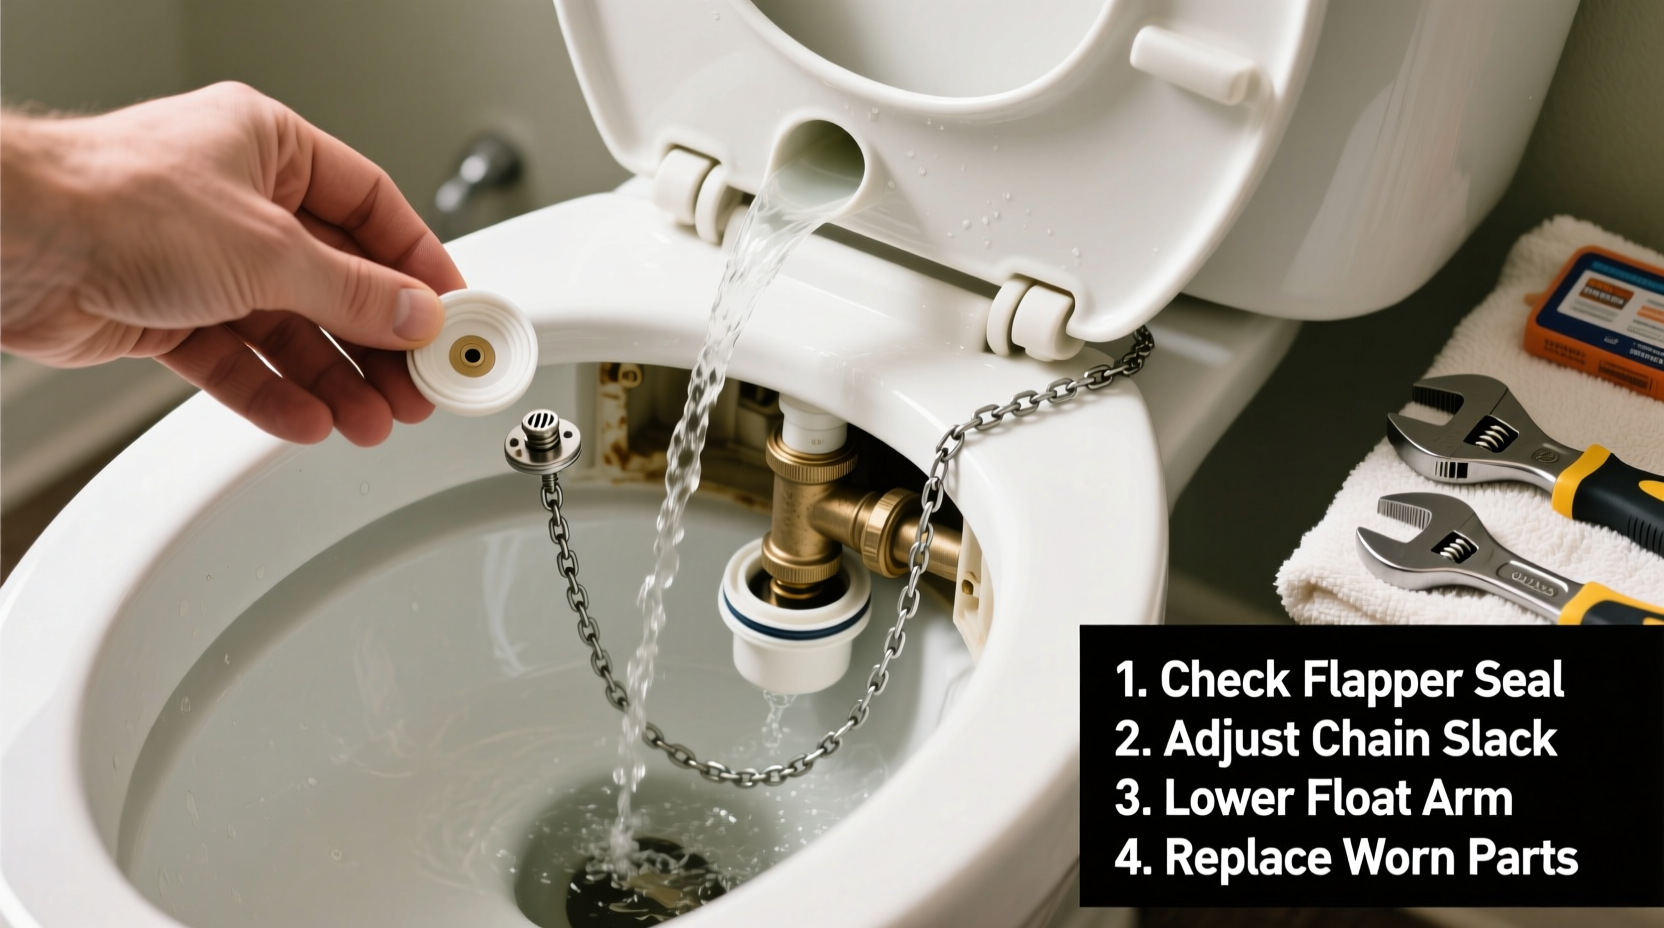
To effectively troubleshoot a running toilet, it helps to understand its internal components and how they work together. A standard gravity-flush toilet has two main systems: the tank (the back section) and the bowl. Inside the tank, several parts regulate water flow:
- Fill valve: Refills the tank after each flush.
- Flush valve: Releases water from the tank into the bowl when you press the handle.
- Flapper: A rubber seal that opens the flush valve when lifted and closes to allow the tank to refill.
- Overflow tube: Prevents flooding by directing excess water into the bowl if the fill valve fails.
- Float: Controls the water level by shutting off the fill valve when the tank reaches capacity.
When any of these components fail—due to wear, misalignment, or mineral buildup—the toilet may continue running after flushing. Identifying which part is faulty is the first step toward fixing it.
Common Causes of a Running Toilet
Before grabbing tools, listen carefully to your toilet. Is it making a constant hissing sound? Does the water seem to run intermittently? These clues point to different issues:
- Worn or warped flapper: The most frequent culprit. Over time, the flapper degrades and no longer forms a tight seal over the flush valve, allowing water to leak into the bowl.
- Improper float height: If the float is set too high, water spills into the overflow tube continuously.
- Malfunctioning fill valve: A failing fill valve may not shut off completely, causing a steady trickle of water.
- Chain too tight or too loose: The chain connecting the flush lever to the flapper can prevent the flapper from sealing properly if it’s adjusted incorrectly.
- Mineral deposits: Hard water buildup on the flapper seat or valve can prevent a proper seal.
Each of these problems has a straightforward solution—and none require advanced plumbing skills.
Step-by-Step Guide to Fixing a Running Toilet
Follow this systematic approach to identify and correct the problem efficiently.
Step 1: Remove the Tank Lid and Inspect
Carefully lift the lid off the toilet tank and set it aside on a soft surface to avoid cracking. Look inside while the toilet is running. Observe whether water is flowing into the overflow tube or leaking around the flapper.
Step 2: Check the Flapper
Examine the flapper for cracks, warping, or signs of deterioration. Feel the sealing edge—if it’s stiff or uneven, it likely needs replacement. Also, ensure the flapper is seated correctly over the flush valve opening.
If the flapper appears worn, replace it. Most flappers are universal and cost less than $10. Turn off the water, flush to empty the tank, disconnect the old flapper from the chain and mounting pins, then attach the new one following the manufacturer’s instructions.
Step 3: Adjust the Chain Length
The chain should have about 1/4 inch of slack. If it’s too tight, it will hold the flapper open; if too loose, it may not lift the flapper fully. Adjust the link attachment on the flush lever to achieve optimal tension.
Step 4: Set the Correct Water Level
The water level should be about 1 inch below the top of the overflow tube. If it’s higher, adjust the float. For ball-style floats, bend the brass arm downward slightly. For newer cylinder floats, pinch the clip and slide the float down.
Turn the water back on and watch the tank refill. The flow should stop cleanly once the water reaches the correct level.
Step 5: Clean Mineral Buildup
If the flapper and float are in good condition but the toilet still runs, calcium and lime deposits may be interfering with the seal. Turn off the water and drain the tank. Use a soft cloth dampened with white vinegar to wipe the flapper seat and flush valve opening. Let the vinegar sit for 10 minutes to dissolve deposits, then rinse thoroughly.
Step 6: Test the Fill Valve
If water continues to run into the overflow tube despite correct float height, the fill valve itself may be failing. Listen for a hissing sound even after the tank appears full. Replacing a fill valve is simple: turn off the water, drain the tank, unscrew the supply line, remove the old valve, and install a new one according to the kit instructions. Modern fill valves like Fluidmaster 400 come with detailed guides and fit most toilets.
“Over 80% of running toilet issues stem from either a bad flapper or improper water level. These are easy fixes homeowners can do in 20 minutes.” — James Rivera, Master Plumber with 25 years of residential experience
Troubleshooting Checklist
Use this checklist to methodically address a running toilet:
- ✅ Turn off water supply at the shutoff valve
- ✅ Remove tank lid and observe internal operation
- ✅ Inspect flapper for wear or warping
- ✅ Replace flapper if damaged
- ✅ Adjust chain length for proper movement
- ✅ Verify water level is 1 inch below overflow tube
- ✅ Adjust float height as needed
- ✅ Clean flapper seat and valve with vinegar
- ✅ Test fill valve function; replace if necessary
- ✅ Turn water back on and monitor for leaks or continuous flow
Do’s and Don’ts When Fixing a Running Toilet
| Do’s | Don’ts |
|---|---|
| Turn off the water before starting | Ignore small leaks—they worsen over time |
| Use vinegar to clean mineral deposits | Force connections or overtighten fittings |
| Test the flush after each adjustment | Use abrasive pads on plastic or rubber parts |
| Replace parts with compatible models | Assume all flappers are the same—check size and design |
| Keep spare flappers and washers on hand | Flush the toilet during repairs without checking alignment |
Real-Life Example: A Weekend Fix That Saved $150
Sarah, a homeowner in Portland, noticed her guest bathroom toilet was running constantly. She heard the sound every few minutes and saw her water bill jump by $45 that month. Instead of scheduling a plumber, she decided to investigate.
After turning off the water and removing the tank lid, she saw water trickling into the overflow tube. She adjusted the float down, but the problem persisted. Next, she inspected the flapper and found it had become brittle and misshapen. She purchased a replacement flapper for $7.99 at a local hardware store, installed it in 15 minutes, and restored normal function. Her water usage returned to baseline, and she avoided a service call fee of over $150.
This scenario is common. Many people assume plumbing issues require professionals, but simple component failures like this are designed for DIY repair.
Frequently Asked Questions
How do I know if my flapper needs replacing?
If your toilet runs intermittently—starting and stopping every few minutes—the flapper is likely not sealing properly. You can also add a few drops of food coloring to the tank. Wait 20–30 minutes without flushing. If color appears in the bowl, the flapper is leaking and should be replaced.
Can I use any flapper in my toilet?
Most modern flappers are universal, but some older or high-efficiency toilets require specific models. Check your toilet brand and model number, usually stamped inside the tank, and match it to the flapper packaging. When in doubt, bring the old flapper to the store for comparison.
Why does my toilet keep running after I flush?
Post-flush running is usually due to the fill valve not shutting off. This could be caused by a defective valve, incorrect float height, or debris preventing the valve from closing. Adjust the float first. If that doesn’t help, consider replacing the fill valve.
Final Tips for Long-Term Prevention
Preventing future issues starts with regular maintenance. Every six months, inspect the tank components for wear. Flush the system occasionally by adding a cup of white vinegar to the tank and letting it sit for an hour before flushing—this helps prevent mineral buildup.
Consider upgrading to a high-quality flapper made from silicone instead of rubber. Silicone resists degradation from chlorine and lasts significantly longer. Similarly, modern fill valves are more reliable and easier to adjust than older models.
Conclusion: Take Control of Your Home Maintenance
Fixing a running toilet is a practical skill that saves money, conserves water, and builds confidence in handling household repairs. Armed with basic knowledge and a few inexpensive parts, you can resolve most issues without ever picking up the phone. The next time you hear that persistent trickling sound, don’t ignore it—address it promptly using the steps outlined here. Small actions today prevent bigger problems tomorrow.


 浙公网安备
33010002000092号
浙公网安备
33010002000092号 浙B2-20120091-4
Comments
No comments yet. Why don't you start the discussion?