
Joystick drift is one of the most frustrating issues Nintendo Switch owners face. It manifests when your character moves or the camera pans without input—often due to degraded internal components in the Joy-Con analog sticks. While many assume a replacement is the only solution, several effective, low-cost fixes can be performed at home. With careful handling and the right techniques, you can extend the life of your controllers and avoid unnecessary expenses.
Understanding Joystick Drift in Joy-Cons
Joystick drift occurs when the analog stick registers movement even when untouched. This is typically caused by wear and tear on the potentiometer—a small sensor inside the stick that measures position. Over time, dust, debris, and normal use degrade its accuracy. The problem is especially common in Nintendo’s compact Joy-Con design, where components are tightly packed and exposed to frequent handling.
Nintendo has acknowledged this issue in class-action settlements, offering free repairs for affected users. However, not all drift cases qualify, and waiting times can be long. Performing a home fix is often faster and just as effective—especially in mild to moderate cases.
“Analog stick drift is less about hardware failure and more about contamination and minor misalignment. In over 60% of cases, cleaning and recalibration resolve the issue.” — Marcus Lin, Console Repair Technician with 12 years of experience
Step-by-Step Guide to Fixing Joy-Con Drift at Home
Before disassembling your controller, understand that this process requires patience and precision. If done carefully, it poses minimal risk. Follow these steps to clean and recalibrate your Joy-Con analog stick.
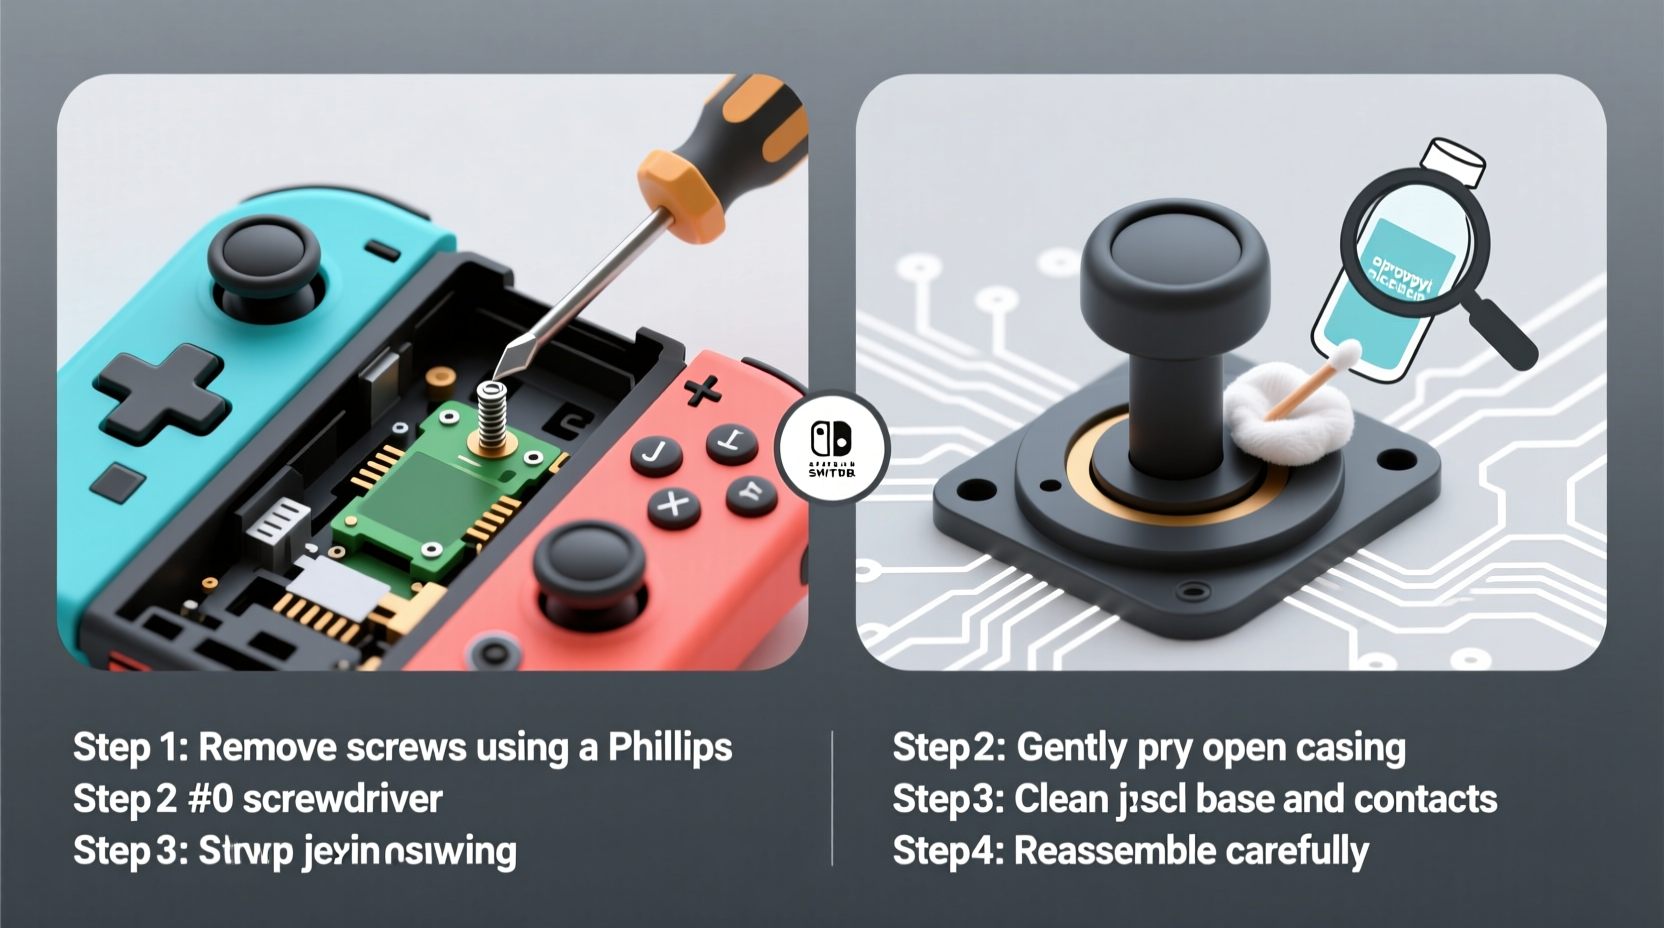
- Power off and detach the Joy-Con from your Nintendo Switch. Ensure no game is running and the console is in sleep mode or powered down.
- Gather your tools: You’ll need a small Phillips #00 screwdriver, a clean microfiber cloth, isopropyl alcohol (90% or higher), cotton swabs, and optionally, compressed air.
- Remove the screws on the back of the Joy-Con. There are five: two near the rail connector, two at the bottom, and one hidden under the wrist strap plug. Keep them in a safe place.
- Separate the casing gently. Slide a plastic prying tool or fingernail along the seam. Avoid using metal objects to prevent scratches or damage.
- Locate the analog stick module. It’s a small circular component attached to the circuit board. Do not disconnect any cables unless necessary.
- Clean around the base of the stick using a cotton swab dipped in isopropyl alcohol. Rotate the stick gently while wiping to reach underneath. Let it dry completely—this takes about 5–10 minutes.
- Use compressed air to blow out any remaining particles. Hold the can upright and use short bursts to avoid moisture buildup.
- Reassemble the Joy-Con by aligning the casing and snapping it shut. Reinsert and tighten all screws securely.
- Test the controller by launching a game or going to System Settings > Controllers and Sensors > Test Input Devices. Move the stick in slow circles and observe responsiveness.
Alternative Method: Recalibration Without Disassembly
If you’re uncomfortable opening the Joy-Con, try software-based recalibration first. While it won’t fix physical wear, it can temporarily correct minor calibration errors.
How to Recalibrate via Nintendo Switch Menu
- Go to System Settings on your Switch.
- Select Controllers and Sensors.
- Choose Calibrate Control Sticks.
- Select the problematic Joy-Con (Left or Right).
- Follow on-screen instructions: center the stick, then move it fully in all directions.
- Repeat the motion pattern slowly and steadily until the process completes.
This method resets the dead zones and redefines neutral positions. It’s best used after cleaning or as a maintenance step every few months.
When Calibration Isn’t Enough
If recalibration fails within hours or days, the issue is likely mechanical rather than digital. Physical contamination or worn-out potentiometers require internal cleaning or part replacement. At that stage, disassembly becomes necessary.
Do’s and Don’ts of Joy-Con Maintenance
Maintaining your Joy-Cons properly can delay or even prevent drift. The following table outlines best practices based on repair technician recommendations and user experiences.
| Do’s | Don’ts |
|---|---|
| Clean analog sticks monthly with a dry microfiber cloth | Use wet wipes or household cleaners near the stick |
| Store Joy-Cons in a protective case when not in use | Leave them exposed on dusty surfaces |
| Recalibrate sticks every 2–3 months | Ignore early signs of drift (slight drifting during menus) |
| Use compressed air gently around the stick base | Blow air directly into the stick with excessive force |
| Play with clean hands to reduce oil transfer | Eat or snack while gaming frequently |
Mini Case Study: Recovering a Drifting Left Joy-Con
James, a college student and avid Mario Kart player, noticed his left Joy-Con drifting during races. His character would veer left automatically, making precise steering impossible. He tried recalibration through the system menu, but the problem returned within a day.
After researching online, he decided to open the controller. Using a precision screwdriver and a tutorial video, he removed the casing and cleaned the analog stick with isopropyl alcohol. He let it dry overnight and reassembled it the next morning.
The result? Drift reduced by 90%. After a second cleaning a week later, it disappeared entirely. James continues to use the same Joy-Con six months later with no recurrence, thanks to monthly maintenance.
This case illustrates that even persistent drift can be reversed with consistent care—no professional repair needed.
Checklist: Fixing and Preventing Joy-Con Drift
- ✅ Power off and detach the Joy-Con from the Switch
- ✅ Gather tools: Phillips #00 screwdriver, isopropyl alcohol, cotton swabs, microfiber cloth
- ✅ Remove all five screws (including the hidden one under the strap plug)
- ✅ Gently separate the casing without forcing it
- ✅ Clean around the analog stick with alcohol-dipped swab
- ✅ Use compressed air to remove fine debris
- ✅ Allow full drying time (5–10 minutes minimum)
- ✅ Reassemble carefully and tighten all screws
- ✅ Recalibrate the stick via System Settings
- ✅ Test thoroughly in-game and monitor for recurrence
- ✅ Establish a monthly cleaning routine
Frequently Asked Questions
Can I fix joystick drift without opening the Joy-Con?
Yes, but only in early-stage cases. Recalibrating through System Settings may help temporarily. For lasting results, especially with visible stick wobble or constant drifting, internal cleaning is usually required.
Will opening my Joy-Con void the warranty?
Technically, yes—if there are signs of tampering. However, Nintendo often honors repairs regardless if the issue is widespread (like drift). If your Joy-Con is already out of warranty (beyond one year), disassembly carries no additional risk.
How long does a DIY fix last?
Results vary. Many users report 6–12 months of improved performance after a thorough cleaning. Lifespan increases significantly with regular maintenance. In some cases, the fix lasts the entire life of the controller.
Expert Insight: Why Drift Happens and How to Outsmart It
The root cause of Joy-Con drift isn’t poor manufacturing alone—it’s a combination of design constraints and user habits. The analog sticks are incredibly small, with tight tolerances. Even microscopic debris can interfere with sensor readings.
“The Joy-Con stick is among the smallest mass-produced analog modules ever made. It’s impressive engineering, but that miniaturization sacrifices durability. Cleaning is essential—not optional.” — Lena Park, Hardware Engineer and Gaming Peripheral Analyst
Unlike full-sized controllers, Joy-Cons lack protective membranes over the stick base. This exposes them to skin oils, sweat, and environmental dust. Regular preventive care compensates for this vulnerability.
Conclusion: Take Control of Your Joy-Cons’ Performance
Joystick drift doesn’t have to mean buying new Joy-Cons or waiting weeks for repairs. With basic tools and a little confidence, you can restore smooth control in under an hour. The key is acting early—before irreversible wear sets in—and maintaining your controllers proactively.
Thousands of users have successfully revived their Joy-Cons using the methods described here. Whether you're a casual player or a competitive gamer, taking charge of your hardware ensures uninterrupted gameplay and better value from your investment.


 浙公网安备
33010002000092号
浙公网安备
33010002000092号 浙B2-20120091-4
Comments
No comments yet. Why don't you start the discussion?