
Every year, thousands of bakers face the same quiet heartbreak: a beautifully cut gingerbread house assembled with care—only to watch its delicate icing seams soften, slump, or dissolve into sticky rivulets as the room warms. Royal icing isn’t inherently unstable—but it *is* exquisitely sensitive to temperature, humidity, and technique. Melting isn’t a sign of failure; it’s feedback. The good news? With precise control over ingredients, environment, and execution, you can build a structurally sound, visually stunning gingerbread house where every piped line stays crisp, every corner holds true, and the icing behaves exactly as intended—firm, glossy, and unyielding.
Why Royal Icing Melts (and Why It’s Not Your Fault)
Royal icing is deceptively simple: powdered sugar, egg whites (or meringue powder), and water. But its stability hinges on three interdependent variables: sugar concentration, protein structure, and ambient conditions. When humidity exceeds 60%, moisture in the air rehydrates the sugar matrix, softening the surface. Temperatures above 72°F (22°C) accelerate this process—and even body heat from holding a piping bag too long can warm the icing just enough to trigger flow. Overmixed icing introduces excess air, creating fragile bubbles that collapse under gravity. And using outdated meringue powder—or substituting liquid egg whites without adjusting ratios—can compromise drying time and structural integrity.
Crucially, “melting” is often misdiagnosed. What appears to be melting may actually be weeping (sugar syrup separating from the mix), slumping (insufficient viscosity), or sweating (condensation forming on chilled icing placed in a warm room). Understanding the distinction guides the fix.
The Four-Pillar Framework for Stable Icing
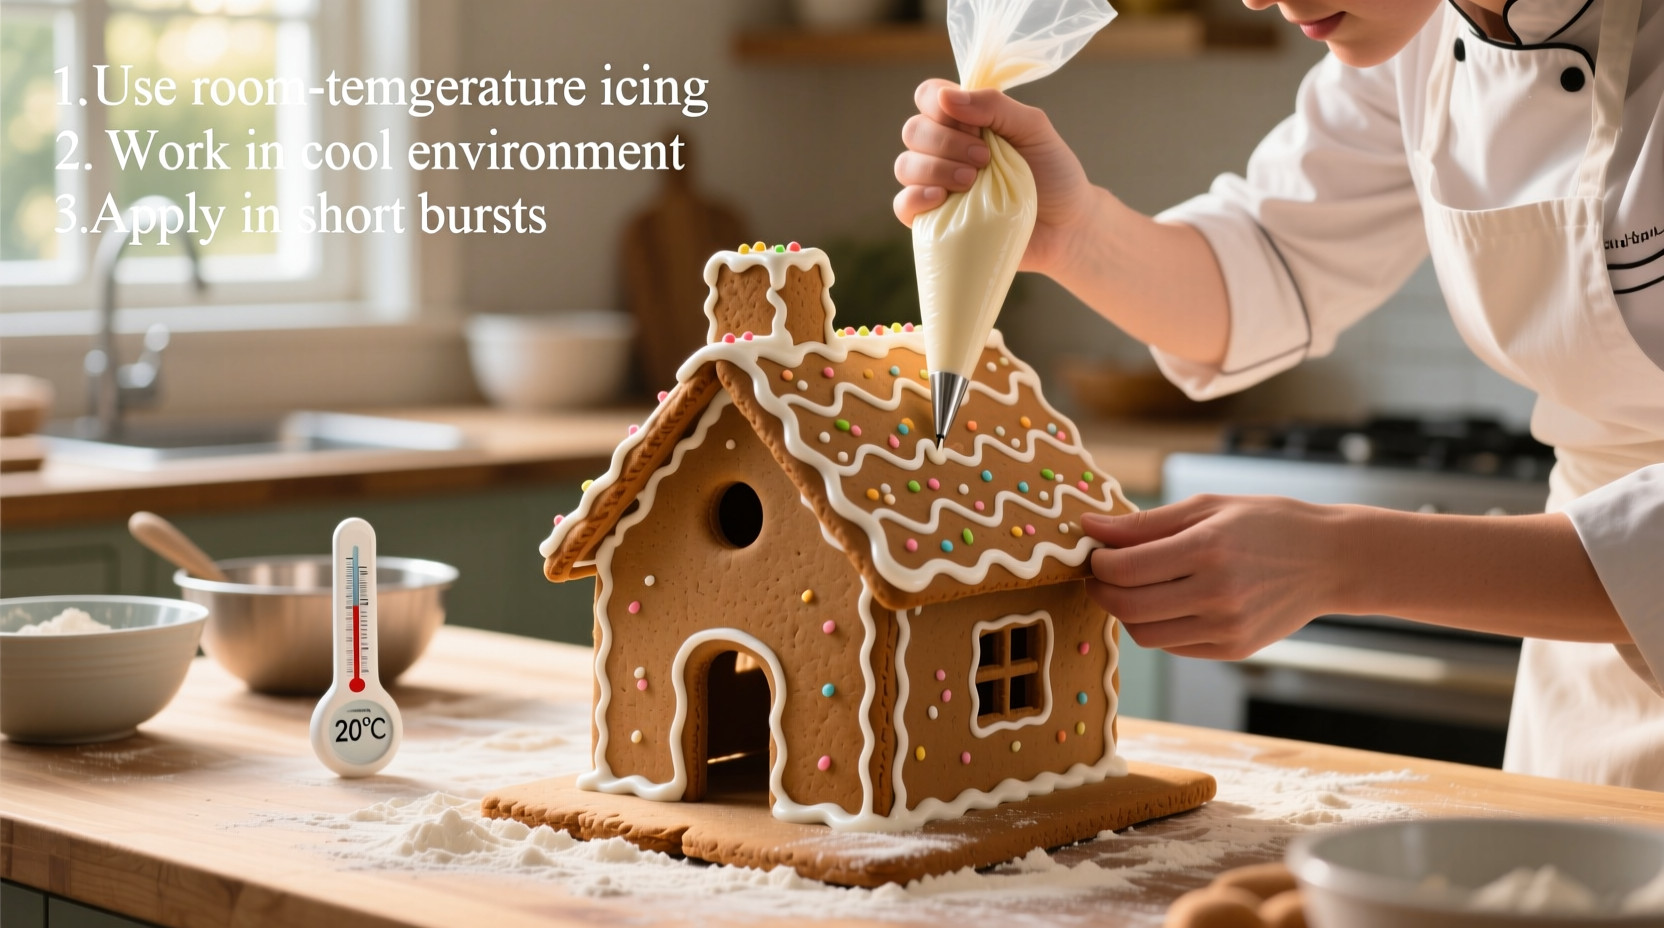
Success begins not at the piping bag—but with preparation grounded in four non-negotiable pillars: ingredient precision, environmental control, mixing discipline, and strategic timing. Deviate from any one, and stability suffers.
1. Ingredient Precision: Measure Like a Chemist
Powdered sugar varies in density by brand and age. Sifting isn’t optional—it removes lumps and aerates the sugar, ensuring uniform hydration. Use weight measurements whenever possible: 1 cup (120g) sifted powdered sugar + 1 tablespoon (10g) meringue powder + 2 tablespoons (30g) room-temperature water yields reliable results. Never substitute corn syrup or lemon juice for water unless explicitly testing a stabilized variant—the acidity or invert sugars alter drying chemistry.
2. Environmental Control: Master Your Microclimate
Your kitchen isn’t neutral—it’s an active participant. Ideal assembly conditions: 65–70°F (18–21°C) and 45–55% relative humidity. Use a hygrometer ($12–$25 online) to verify. If humidity exceeds 60%, run a dehumidifier or air conditioner for 2 hours before starting. Avoid kitchens near dishwashers, stoves, or steamy showers. In winter, counteract dry heat with a small bowl of water on the counter—not near your work surface—to prevent cracking, but never so close it raises local humidity.
3. Mixing Discipline: Less Is More
Overmixing denatures egg-white proteins, weakening the network that traps sugar crystals. Mix on low speed for 5 minutes, then scrape the bowl thoroughly. Let the mixture rest, covered with a damp cloth, for 15 minutes—this allows undissolved sugar to hydrate fully. Then mix again on low for 60 seconds only. The result should be smooth, glossy, and thick enough to hold stiff peaks without drooping.
4. Strategic Timing: Work in Phases, Not One Marathon
Assemble walls first, let them set fully (minimum 90 minutes), then add roof panels. Only after the roof is secure—another 90 minutes—should you begin decorative piping. Rushing stages transfers heat and pressure, destabilizing earlier layers. This phased approach reduces total handling time per section and lets each layer cure under optimal conditions.
Step-by-Step: Building Without Slump
- Prep the Base (Day Before): Cut a rigid, non-porous base (¼-inch plywood or foam board) and cover it with white craft paper glued down smoothly. Let dry overnight. A warped or absorbent base draws moisture from icing.
- Chill Components (1 Hour Before): Place baked, cooled gingerbread pieces on wire racks in the refrigerator for 60 minutes. Cold gingerbread absorbs less moisture from fresh icing and provides thermal inertia against ambient warmth.
- Mix & Rest Icing (30 Minutes Before Assembly): Prepare icing using weight-based ratios. Rest covered. Stir gently once before loading into piping bags.
- Assemble Walls (First 30 Minutes): Pipe a generous, continuous bead along the bottom edge of each wall piece. Press firmly onto the base, holding for 10 seconds. Reinforce interior corners with extra icing. Let stand untouched for 90 minutes.
- Add Roof (Next 30 Minutes): Pipe thick beads along top edges of side walls and front/back. Carefully position roof panels, pressing down evenly. Support with rolled-up paper towels beneath overhangs until set (90 minutes).
- Decorate (Final Phase): Only after full roof cure, pipe decorations. Use tip #2 for outlines, #1 for flooding, and #00 for fine lines. Keep unused icing covered with plastic wrap pressed directly onto the surface.
Do’s and Don’ts: A Practical Comparison Table
| Action | Do | Don’t |
|---|---|---|
| Storing Icing | Cover tightly with plastic wrap touching the surface; refrigerate up to 3 days. | Leave uncovered—even for 10 minutes. Surface dries and crusts, causing clogs and inconsistent flow. |
| Piping Technique | Hold bag vertically at 90°, apply steady pressure, lift straight up to finish a line. | Drag the tip sideways or tilt the bag—creates thin, weak lines prone to breaking. |
| Humidity Management | Run AC/dehumidifier 2 hours pre-assembly; use a digital hygrometer. | Assume “it’s fine” based on how the room feels—human skin senses temperature, not humidity. |
| Gingerbread Prep | Cool completely, then chill 60 minutes before assembly. | Assemble while still warm or at room temp—heat migrates into icing instantly. |
| Tool Hygiene | Rinse tips in cool water immediately after use; dry thoroughly before reuse. | Let dried icing harden in tips—re-soaking rarely restores full bore size. |
Real Example: The Community Center Gingerbread Build
In December 2023, the Oakwood Community Center hosted its annual gingerbread house competition. Twelve teams—including three high school culinary classes—were given identical kits: pre-baked gingerbread, commercial meringue powder, and standard piping supplies. All teams worked in the same sunlit, 74°F gymnasium with 68% humidity. Ten teams reported severe icing slumping within 45 minutes. Two succeeded.
The winning team, led by instructor Maya Ruiz, implemented three key deviations: First, they used a portable dehumidifier borrowed from facilities management, lowering humidity to 52% in their 6x6-foot work zone. Second, they chilled all gingerbread in a walk-in cooler for 90 minutes—not just 30—and assembled on marble slabs kept at 62°F. Third, they mixed icing in ½-cup batches, discarding any unused portion after 20 minutes rather than re-stirring old batches. Their house stood upright, with sharp gables and intricate lattice work, while others sagged at the eaves and dripped at the corners. As Ruiz noted afterward: “It wasn’t about talent—it was about treating icing like a perishable lab specimen, not a pantry staple.”
Expert Insight: The Science Behind Stability
“Royal icing isn’t glue—it’s a crystalline scaffold held together by dried egg proteins. Heat doesn’t ‘melt’ it like ice; it re-plasticizes the sugar matrix by reintroducing moisture. That’s why climate control matters more than ‘stiffer’ icing: if the air is saturated, even perfect consistency will weep. Control humidity first, temperature second, recipe third.” — Dr. Lena Cho, Food Scientist, Cornell University Department of Food Science
FAQ: Troubleshooting Real Problems
What if my icing starts to soften while I’m piping?
Stop immediately. Transfer the bag to the refrigerator for 10 minutes. Meanwhile, wipe the tip clean with a cool, damp cloth—not warm or hot water. If softening persists, your kitchen is too warm or humid: pause assembly, adjust environment, and restart with a fresh, smaller batch.
Can I use buttercream instead of royal icing for structure?
No. Buttercream lacks tensile strength and melts far below room temperature. Even “stiff” buttercream will slump under the weight of gingerbread walls. Royal icing is the only widely accessible, food-safe adhesive with sufficient compressive strength (up to 200 psi when fully cured) to support vertical loads.
My icing dried too fast and cracked—what went wrong?
This signals low humidity (<40%) or excessive air exposure. Next time, cover your work surface with a lightly dampened (not wet) linen cloth nearby—not touching the house—to raise micro-humidity. Also, avoid fans or HVAC vents blowing directly on the assembly area. Add ¼ teaspoon glycerin per cup of icing to improve flexibility without sacrificing set time.
Advanced Stabilization: When Conditions Are Unavoidable
For holiday markets, classrooms, or warm-weather regions, consider these proven upgrades:
- Albumin Powder Boost: Replace 10% of meringue powder with pasteurized dried egg albumin (not whole egg powder). Albumin forms stronger, more heat-resistant protein bonds.
- Agar-Agar Sealer: After full curing (24 hours), lightly brush exterior seams with a solution of ¼ tsp agar-agar boiled in 2 tbsp water, cooled to 120°F. Creates a moisture-resistant barrier without altering appearance.
- Isomalt Base Coat: For display-only houses, dip base edges in melted isomalt (hard candy sugar) before assembly. Provides a hydrophobic foundation that repels ambient moisture.
None of these replace foundational controls—but they add resilience when perfection isn’t feasible.
Conclusion: Confidence, Not Compromise
Making a gingerbread house without melting icing isn’t about luck or inherited talent. It’s about applying repeatable, evidence-based practices—measuring by weight, monitoring humidity, chilling components, respecting curing time, and understanding that royal icing behaves like a living system, not a static paste. Every baker who’s ever watched a turret lean or a roof slide has been one variable away from success. You don’t need a professional kitchen—just intentionality, a $15 hygrometer, and the willingness to treat your icing with the same respect you’d give a temperamental soufflé or a finicky sourdough starter.
This year, build something that stands tall—not because the weather cooperated, but because you did. Make your house. Photograph it in sharp focus. Share the moment—not just the result. And when someone asks how you kept it perfect, tell them the truth: you measured, you chilled, you waited, and you refused to rush what needed time to set.


 浙公网安备
33010002000092号
浙公网安备
33010002000092号 浙B2-20120091-4
Comments
No comments yet. Why don't you start the discussion?