
Fermenting garlic transforms one of the kitchen’s most essential aromatics into a complex, umami-rich ingredient with deep savory notes and a mellow, almost sweet finish. Unlike raw garlic, which can be sharp and pungent, fermented garlic loses much of its bite while gaining depth, making it a prized condiment in artisanal kitchens and health-conscious households alike. The process requires nothing more than fresh garlic, non-iodized salt, and time—but the results are extraordinary. This guide walks through every step of home fermentation, explains the science behind the transformation, and demonstrates how to use the final product in everyday cooking.
Definition & Overview
Fermented garlic is raw garlic that has undergone lacto-fermentation—a natural preservation method driven by beneficial bacteria, primarily Lactobacillus species. These microbes convert sugars in the garlic into lactic acid, lowering the pH and creating an environment inhospitable to harmful pathogens while enhancing flavor and digestibility. The process does not involve heat, vinegar, or artificial preservatives. Instead, it relies on anaerobic conditions and proper salinity to encourage microbial activity over several weeks.
This type of fermentation has roots in traditional food preservation practices across Asia, Eastern Europe, and parts of Africa, where garlic was stored in brine or buried in salted mediums to extend shelf life and improve nutritional value. Today, fermented garlic is celebrated not only for its longevity but also for its enhanced bioactive compounds, including increased levels of allicin derivatives and antioxidant activity post-fermentation.
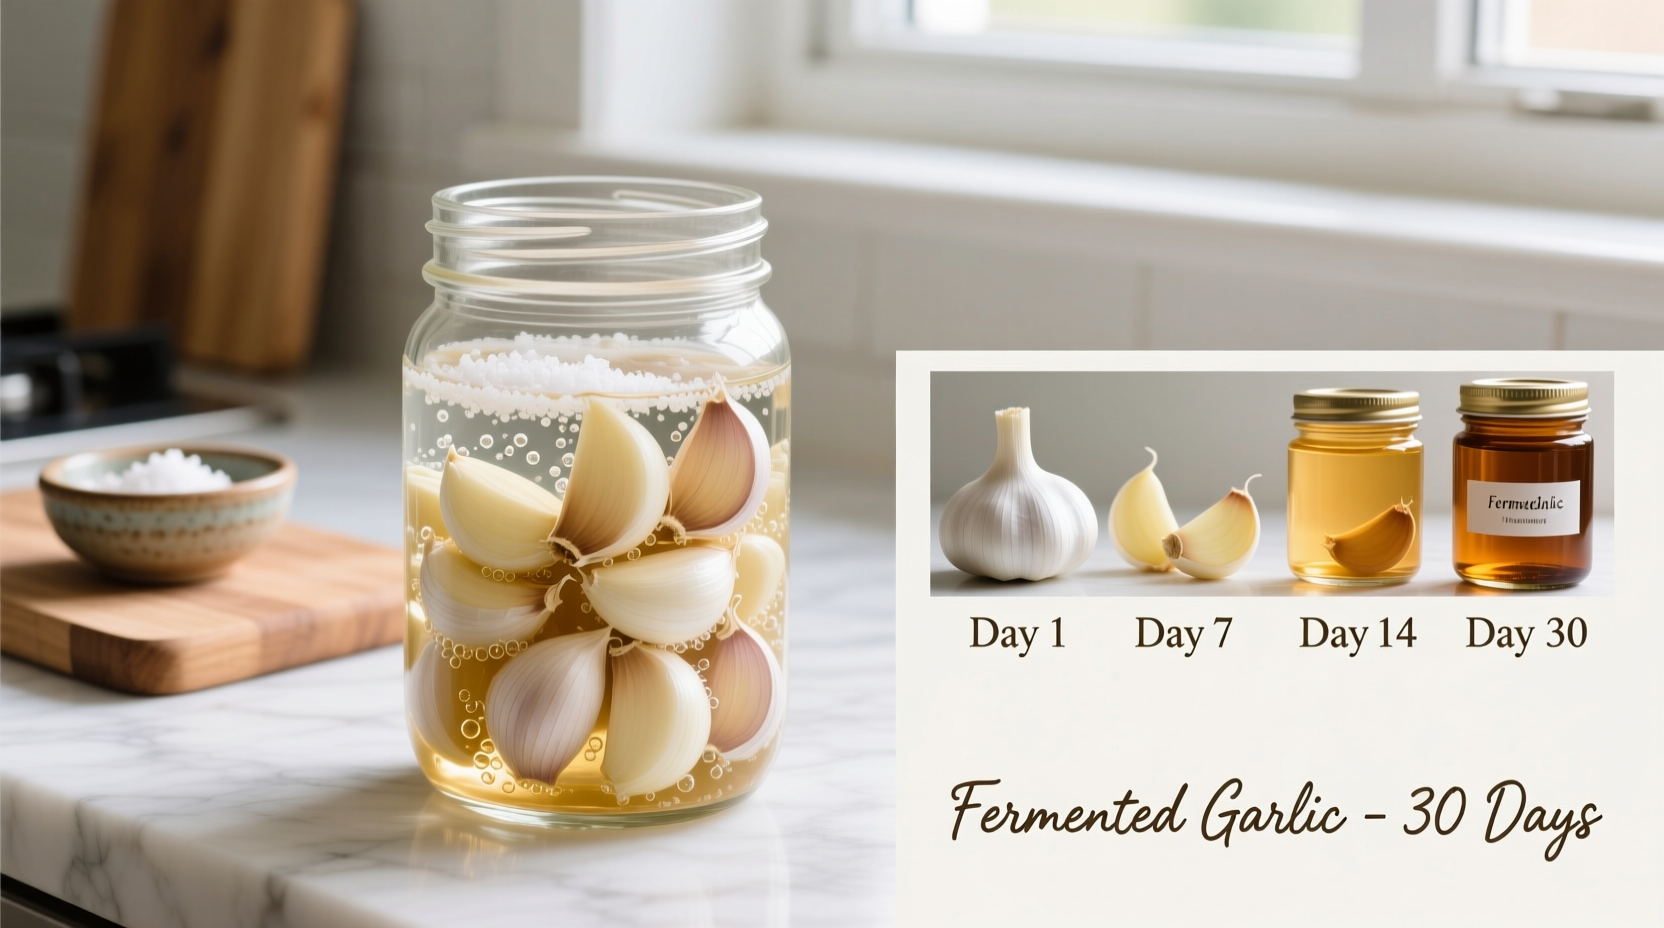
The end result is soft, spreadable cloves with a deep amber to black hue (depending on duration), a tangy aroma, and a flavor profile reminiscent of aged balsamic, roasted garlic, and miso—all without cooking. It is distinct from black garlic, which is produced through enzymatic aging under controlled heat and humidity rather than bacterial fermentation.
Key Characteristics
| Attribute | Description |
|---|---|
| Flavor | Mellow, umami-rich, slightly tangy; lacks the harshness of raw garlic. Develops nutty, molasses-like notes over time. |
| Aroma | Earthy and fermented, with sourdough-like undertones. Minimal pungency compared to fresh garlic. |
| Color | Starts white, shifts to pale yellow, then golden brown after 4–6 weeks. Can darken further with extended fermentation. |
| Texture | Soft, tender, and spreadable when fully fermented. Not slimy if properly handled. |
| Heat Level | Negligible. Alliinase activity diminishes during fermentation, reducing spiciness. |
| Culinary Function | Flavor enhancer, condiment, digestive aid, base for sauces and spreads. |
| Shelf Life | 6 months to 1 year when refrigerated in brine. Flavor continues to evolve slowly. |
Practical Usage: How to Use Fermented Garlic in Cooking
Fermented garlic functions as both a seasoning and a standalone ingredient. Its versatility lies in its ability to add depth without overpowering—a quality rare among alliums. Because it lacks the volatile sulfur compounds that cause irritation in raw garlic, it integrates seamlessly into dishes where subtlety matters.
In professional kitchens, chefs incorporate fermented garlic into vinaigrettes, aiolis, compound butters, and emulsified sauces. Its smooth texture eliminates the need for mincing or blending, allowing it to dissolve into warm liquids effortlessly. At home, it can replace raw garlic entirely in applications where heat sensitivity or digestive discomfort is a concern.
Everyday Applications
- Spread on toast: Mash with olive oil and flaky salt for a refined alternative to garlic bread.
- Blended into dressings: Whisk into mustard vinaigrette or tahini-based dips for a creamy, tangy backbone.
- Stirred into grains: Fold into risotto, farro, or quinoa just before serving to infuse earthy richness.
- Added to soups and stews: Stir in during the last 5 minutes to preserve probiotic content and layered flavor.
- Infused into oils: Gently warm with extra virgin olive oil (then refrigerate) to create aromatic finishing oil.
Professional Techniques
High-end restaurants often purée fermented garlic into demi-glace reductions or fold it into butter for seared scallops and foie gras. Some chefs dehydrate it and grind it into powder for seasoning blends. Due to its low acidity post-fermentation, it pairs exceptionally well with acidic ingredients like lemon juice or verjus, balancing brightness with savoriness.
Tip: Always reserve the brine. It contains active cultures and dissolved garlic essence, ideal for jump-starting other ferments or deglazing pans.
Pairing Suggestions and Ratios
Use fermented garlic more liberally than raw due to its milder profile. A general guideline:
- For 1 clove of raw garlic → substitute 1½ to 2 fermented cloves.
- In sauces: 1 teaspoon mashed per cup of liquid base.
- As a garnish: Thinly slice or fan over roasted vegetables, grilled fish, or hummus.
It complements ingredients such as mushrooms, anchovies, smoked paprika, Parmesan, and dark leafy greens. Avoid pairing with delicate seafood unless used sparingly, as its intensity may dominate.
Variants & Types of Fermented Garlic
While the basic method remains consistent—salt, water, time—variations arise from preparation technique, vessel type, and added flavorings. Understanding these helps tailor the ferment to specific culinary goals.
1. Plain Salt-Brine Fermented Garlic
The simplest form: peeled cloves submerged in a 3–5% saltwater solution. This yields clean, pure garlic flavor with subtle sourness. Ideal for those seeking probiotic benefits without interference from spices.
2. Spiced Fermented Garlic
Enhanced with whole peppercorns, bay leaves, coriander seeds, or chili flakes. These additions introduce complexity and antimicrobial support (e.g., mustard seed inhibits mold). Best for bold dishes like braises or charcuterie boards.
3. Honey-Fermented Garlic
Uses raw honey instead of salt brine. Note: this is not true lacto-fermentation but rather an osmotic preservation method. Honey draws out moisture and creates an inhospitable environment for pathogens. The result is sweeter, syrup-infused garlic, often used medicinally. However, it lacks the probiotic diversity of salt-brine versions and should be consumed promptly.
4. Wild vs. Cultured Fermentation
Wild fermentation relies on ambient microbes present on the garlic skin and in the environment. It's traditional and cost-effective but less predictable.
Cultured fermentation involves inoculating the jar with a starter culture (such as whey from yogurt or commercial vegetable ferment starter). This accelerates the process and increases consistency, especially in cooler climates.
| Type | Salt % | Timeframe | Best For |
|---|---|---|---|
| Plain Brine | 3–5% | 3–6 weeks | Daily use, health-focused diets |
| Spiced | 4–5% | 4–8 weeks | Gifting, robust recipes |
| Honey-Soaked | N/A (sweetener) | 2–4 weeks | Immune tonics, desserts |
| Cultured Start | 3% | 2–4 weeks | Cold environments, faster results |
Comparison with Similar Ingredients
Fermented garlic is often confused with other preserved garlic products. While they share shelf-stability, their production methods, textures, and culinary roles differ significantly.
| Ingredient | Process | Flavor Profile | Probiotics? | Best Used In |
|---|---|---|---|---|
| Fermented Garlic | Lacto-fermentation in salt brine | Tangy, umami, mellow | Yes | Sauces, spreads, raw applications |
| Black Garlic | Enzymatic aging at 60–90°C, high humidity | Sweet, balsamic, prune-like | No (heat-treated) | Garnishes, fine dining, glazes |
| Pickled Garlic (Vinegar) | Submerged in vinegar + spices | Sharp, acidic, crisp | No | Antipasti, sandwiches, cocktails |
| Roasted Garlic | Baked at 180–200°C until soft | Sweet, caramelized, buttery | No | Mashes, soups, pizza toppings |
“Fermented garlic offers a dimension of flavor you simply can’t achieve through roasting or pickling. It’s alive, evolving, and deeply integrated into the dish.” — Chef Elena Torres, Modern Fermentations Journal
Step-by-Step Guide: Making Fermented Garlic at Home
Follow this detailed method to produce high-quality fermented garlic safely and effectively.
- Gather materials: Glass jar (quart/1L size), fermentation weight or small glass ramekin, airlock lid or breathable cloth, non-iodized salt (sea salt, Himalayan pink, or kosher), filtered or spring water, fresh garlic bulbs.
- Peel the garlic: Select large, firm cloves. Peel carefully to minimize bruising. Smaller cloves ferment faster but yield less flesh.
- Prepare brine: Dissolve 30g non-iodized salt in 1 liter of water (3% salinity). For stronger preservation, increase to 5%. Do not use table salt with anti-caking agents or iodine.
- Pack the jar: Place peeled cloves into the jar. Add optional spices (e.g., 1 tsp black peppercorns, 1 dried chili). Pour brine over cloves, leaving 1 inch (2.5 cm) headspace.
- Ensure submersion: Insert a fermentation weight to keep cloves below the brine. Exposure leads to mold.
- Seal and store: Cover with airlock lid or secure cloth with a rubber band. Store at room temperature (18–24°C / 65–75°F), away from direct sunlight.
- Monitor daily: Check for scum or mold. Skim surface impurities gently. Bubbles indicate active fermentation—expected after 3–7 days.
- Ferment 3–6 weeks: Taste after 21 days. Optimal flavor develops between week 4 and 6. Longer fermentation increases tanginess and color depth.
- Refrigerate: Once desired flavor is reached, seal with a regular lid and move to refrigerator. This slows microbial activity and preserves texture.
Pro Tip: To speed up fermentation in winter, place the jar in a slightly warmed oven (turned off) with the light on, or near a radiator (not touching).
Practical Tips & FAQs
Q: Can I use tap water?
A: Not recommended. Chlorine and chloramines in municipal water inhibit beneficial bacteria. Use filtered or boiled-and-cooled water instead.
Q: What if I see white film or bubbles?
A: Bubbles are normal—signs of CO₂ production. A thin white layer may be kahm yeast, which is harmless but affects taste. Skim it off. If mold (fuzzy, colored growth) appears, discard the batch.
Q: Is fermented garlic safe for pregnant women or children?
A: Yes, when prepared hygienically. However, introduce gradually due to high sodium content and active cultures. Consult a healthcare provider if immunocompromised.
Q: Can I reuse the brine?
A: Yes. Use within two weeks as a starter for new ferments (e.g., sauerkraut, carrots) or as a gut-health tonic (1 tbsp diluted in water daily).
Q: Why did my garlic turn blue or green?
A: Harmless reaction between sulfur compounds and trace minerals (especially in hard water or reactive containers). Color change does not indicate spoilage. Avoid aluminum or copper vessels.
Q: How do I know when it’s done?
A: Taste regularly after three weeks. Finished garlic will be soft, tangy, and lack raw bite. Cloves should compress easily when pressed.
Q: Can I ferment unpeeled garlic?
A: Possible, but inefficient. Skin acts as a barrier, slowing brine penetration. Peeled cloves ferment more evenly and quickly.
Q: Does it lose nutritional value?
A: No—fermentation enhances bioavailability. Studies show increased antioxidant capacity and sustained allicin potential in properly fermented garlic.
Success Checklist
- Used non-iodized salt ✅
- Cloves fully submerged ✅
- Container sterilized (boiled or dishwasher-sanitized) ✅
- Stored at stable room temperature ✅
- No visible mold after 3 weeks ✅
- Taste test confirms mellow, tangy profile ✅
Storage & Shelf Life
Once fermentation is complete, store the jar in the refrigerator. Properly fermented garlic in brine lasts 6 to 12 months. Over time, flavor intensifies and texture softens further. Always use clean utensils when removing cloves to prevent contamination.
Do not freeze—this destroys cell structure and diminishes probiotic viability. If you wish to preserve beyond one year, consider dehydrating fermented cloves and grinding into powder for long-term spice storage.
Summary & Key Takeaways
Fermenting garlic at home is a simple yet transformative process that elevates a common pantry staple into a gourmet, functional food. By harnessing natural bacteria, salt, and time, cooks can produce a probiotic-rich ingredient with nuanced flavor and superior digestibility.
- Fermented garlic is made through lacto-fermentation using salt brine—no vinegar or heat required.
- It develops a mellow, umami-rich taste, losing the harshness of raw garlic while gaining complexity.
- Ready in 3–6 weeks and lasts up to a year refrigerated.
- Use in sauces, spreads, grains, and soups for deep, savory enhancement.
- Distinguish it from black garlic (heat-aged) and pickled garlic (vinegar-preserved), which differ in process and function.
- Always keep cloves submerged, use non-chlorinated water, and monitor for signs of spoilage.
Mastering fermented garlic opens the door to broader fermentation practices—from kimchi to kombucha—and empowers home cooks to create living foods that nourish both body and palate. With minimal equipment and attention to detail, anyone can cultivate this ancient craft in their own kitchen.


 浙公网安备
33010002000092号
浙公网安备
33010002000092号 浙B2-20120091-4
Comments
No comments yet. Why don't you start the discussion?