
Making plant-based milk at home doesn’t require expensive equipment or high-speed blenders. With just a few basic kitchen tools and some patience, you can create creamy, flavorful milks from nuts, seeds, oats, and legumes—right from your countertop. Whether you're avoiding dairy for health, environmental, or ethical reasons, homemade plant milk offers freshness, control over ingredients, and zero waste from packaging. The best part? You don’t need a $400 blender to do it.
This guide walks you through practical methods, ingredient options, and clever techniques that work with hand grinders, food mills, sieves, or even a simple potato masher. You’ll learn how to extract smooth, rich milk using accessible tools, avoid common pitfalls, and customize flavors to suit your taste.
Why Skip the High-Speed Blender?
While high-performance blenders like Vitamix or Blendtec are often recommended for making silky-smooth plant milk, they come with a steep price tag and take up valuable counter space. Many people rely on hand-cranked appliances, immersion blenders, or no blending device at all—and still achieve excellent results.
The key isn't power; it's technique. Traditional cultures have made nut and seed milks for centuries using stone grinders, mortars and pestles, and cloth straining. Modern low-tech adaptations of these methods are not only effective but also more sustainable and budget-friendly.
“Homemade plant milk made without high-powered equipment often has a cozier, more authentic texture. It connects you to food in a way pre-packaged cartons never can.” — Dr. Lena Torres, Food Anthropologist & Sustainable Nutrition Researcher
Essential Tools You Can Use Instead of a Fancy Blender
You don’t need advanced machinery. Most kitchens already have—or can easily acquire—the tools needed for DIY plant milk. Here’s what works well as an alternative:
- Nut milk bag or cheesecloth – Essential for straining pulp from liquid.
- Hand grinder (coffee or spice) – Useful for grinding soaked nuts into fine meal.
- Immersion blender – Affordable and compact; great for breaking down softened ingredients in a bowl or pitcher.
- Food mill – Originally designed for tomatoes, but excellent for pressing soft mixtures through a sieve.
- Wire mesh strainer + spoon – Combine with mashing for coarse filtration.
- Mortar and pestle – Ideal for small batches of sesame or almonds.
These tools may require a bit more effort than a super-blender, but they give you greater control over texture and yield minimal cleanup.
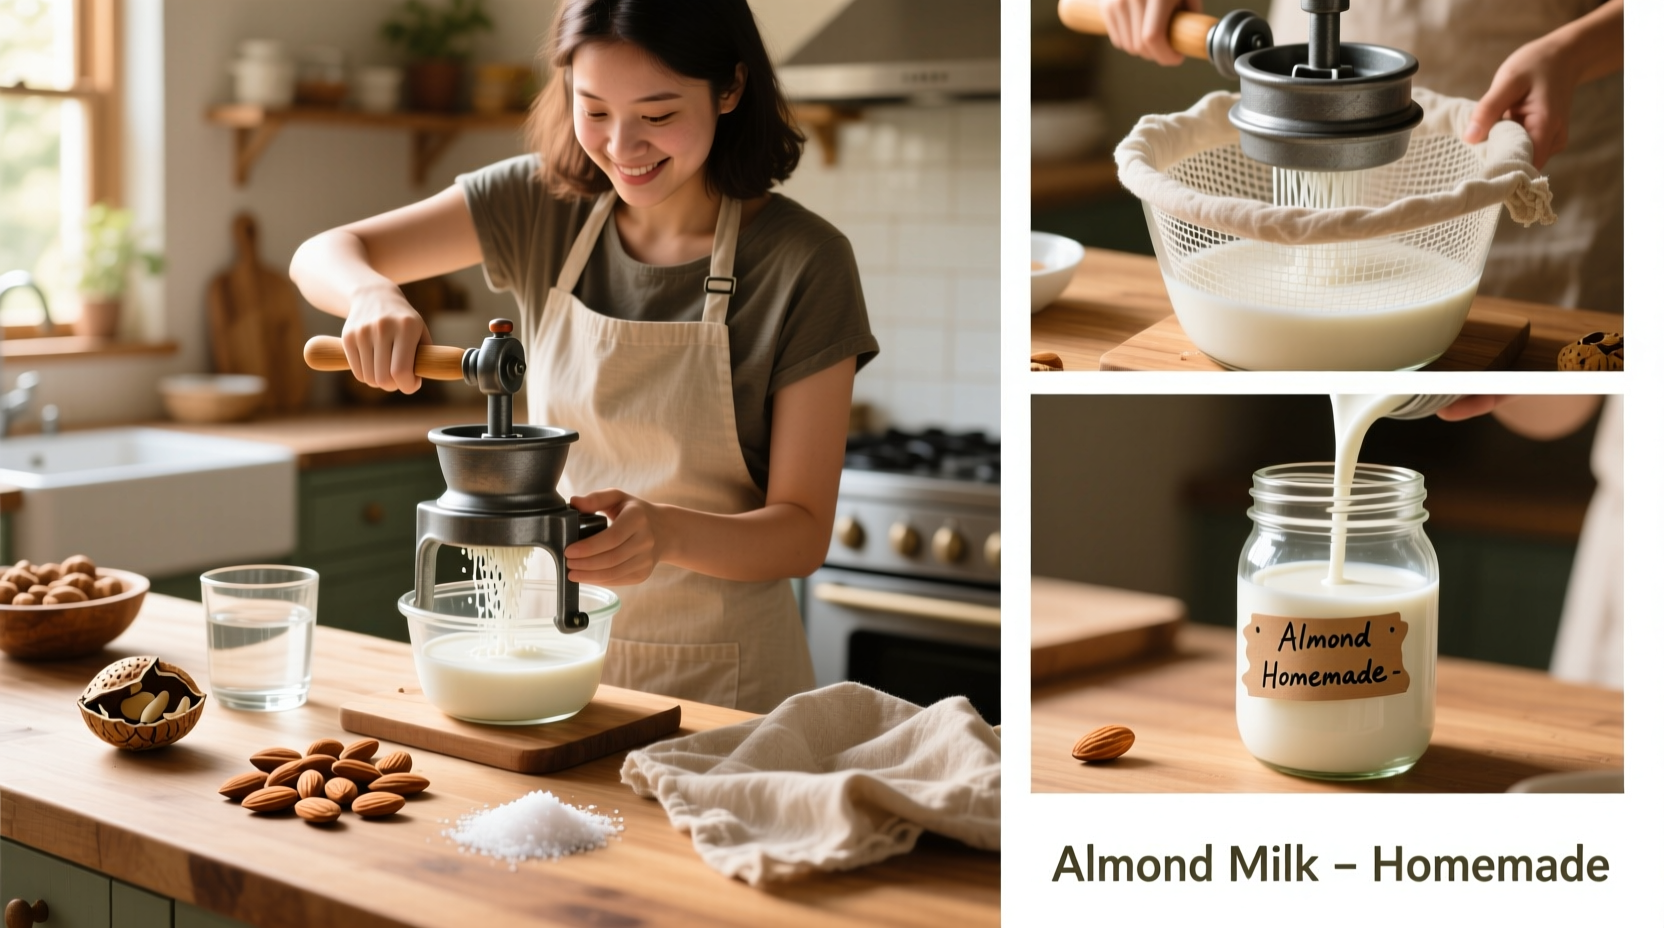
Step-by-Step Guide: Making Almond Milk Without a High-Speed Blender
Almond milk is one of the most popular plant-based options and surprisingly easy to make manually. Follow this timeline for best results:
- Soak 1 cup raw almonds in filtered water for 8–12 hours. This softens them and improves digestibility.
- Drain and rinse thoroughly. Discard soaking water.
- Grind the soaked almonds using a hand-cranked coffee grinder (clean and dedicated to food use). Pulse until a fine meal forms. If unavailable, chop finely with a knife and mash with a fork or potato masher.
- Transfer ground almonds to a large bowl. Add 3–4 cups hot (not boiling) water. Stir well to combine.
- Let sit for 5–10 minutes to allow oils and flavor to infuse.
- Pour mixture into a nut milk bag or double-layered cheesecloth suspended over a large bowl.
- Squeeze firmly with both hands to extract as much liquid as possible. This takes 1–2 minutes of steady pressure.
- Optional: Sweeten with 1–2 pitted dates, a pinch of sea salt, or vanilla extract during infusion (add before squeezing).
- Store finished milk in a sealed glass jar in the refrigerator for up to 4 days. Shake before use.
Variations: Other Plant Bases That Work Well Without Blending
Not all plant milks require intense blending. Some bases break down easily with heat, soaking, and agitation. Try these alternatives:
Oat Milk
Oats release their starches when soaked and agitated. No blending required beyond stirring.
- Soak 1/2 cup rolled oats in 4 cups water for 15–20 minutes.
- Swirl vigorously by hand or with a whisk for 30 seconds.
- Strain immediately through a fine-mesh sieve lined with cheesecloth. Do not over-soak or blend too long, or it becomes slimy.
- Add a date or cinnamon stick during soaking for flavor.
Sesame Milk
Tahini-based milk is rich in calcium and makes a luxurious drink.
- Soak 1/2 cup white sesame seeds for 4 hours.
- Grind into a paste using a mortar and pestle or small grinder.
- Mix paste with 3 cups warm water and stir until emulsified.
- Strain through a nut milk bag for smoothness.
- Add a touch of honey or rice syrup if desired.
Rice Milk
Naturally thin and sweet, rice milk is one of the easiest to make without any mechanical blending.
- Cook 1/3 cup white rice until very soft.
- Mash completely with a fork or potato masher.
- Add 3 cups hot water and stir well.
- Strain through a fine sieve or cloth.
- Cool before refrigerating.
| Base Ingredient | Best Tool Alternative | Texture Result | Shelf Life (fridge) |
|---|---|---|---|
| Almonds | Hand grinder + nut milk bag | Creamy, slightly grainy | 4 days |
| Oats | Whisk + cheesecloth | Light, slightly sweet | 3–4 days |
| Sesame Seeds | Mortar and pestle | Rich, velvety | 5 days |
| White Rice | Spork or masher | Thin, smooth | 3 days |
| Hemp Seeds | Immersion blender | Smooth, nutty | 5–6 days |
Common Mistakes and How to Avoid Them
Even with simple tools, things can go wrong. Here’s what to watch out for:
- Over-blending oats: Leads to gummy, slimy texture. Use minimal agitation and short soak times.
- Under-straining: Leaves behind gritty particles. Always use a fine nut milk bag or layered cheesecloth.
- Using tap water with chlorine: Can affect flavor and shelf life. Opt for filtered or spring water.
- Storing in plastic containers: May absorb odors and degrade faster. Glass jars are ideal.
- Skipping the soak: Makes grinding harder and reduces nutrient availability. Always pre-soak nuts and seeds.
“Many commercial plant milks contain stabilizers, gums, and preservatives because they’re engineered for long shelf life. Homemade versions are fresher but perishable—treat them like fresh juice.” — Maya Chen, Holistic Nutritionist
Mini Case Study: Maria’s Kitchen Experiment
Maria, a teacher living in a small apartment in Portland, wanted to switch to plant-based milk but couldn’t justify buying a high-end blender. She tried store-bought almond milk but disliked the additives. One weekend, she experimented using only a hand grinder she used for spices and a reusable tea strainer.
She soaked almonds overnight, ground them coarsely, mixed with warm water, and strained through a cotton napkin. The result wasn’t perfectly smooth, but it was creamy, fresh, and free of weird aftertastes. Over time, she upgraded to a proper nut milk bag and began adding cinnamon and dates. Her kids loved it in oatmeal and smoothies.
Now, Maria makes a batch every three days and uses the leftover pulp in banana bread. “It takes ten minutes,” she says, “and I feel good knowing exactly what’s in my milk.”
Frequently Asked Questions
Can I make soy milk without a blender?
Yes, but it requires more steps. Soak dried soybeans for 12 hours, boil for 1–2 hours until very soft, then mash thoroughly with a potato masher. Strain through a tight cloth. Note: Raw soybeans contain trypsin inhibitors, so thorough cooking is essential.
How do I prevent separation in homemade milk?
Separation is natural and harmless. Simply shake the bottle before each use. For better emulsion, add a tiny pinch of sunflower lecithin (optional) or swirl in a teaspoon of neutral oil like safflower during mixing.
Is homemade plant milk cheaper than store-bought?
Yes, significantly. A cup of raw almonds costs around $0.75 and yields about 3–4 cups of milk. Compare that to $4–$6 per carton of organic almond milk. Even factoring in energy and water, DIY is far more economical in the long run.
Checklist: Make Your First Batch Today
- ☐ Choose your base: almonds, oats, sesame, or rice
- ☐ Soak ingredients according to type (nuts/seeds: 8+ hrs; oats: 15–20 min)
- ☐ Gather tools: grinder, masher, sieve, nut milk bag, bowl
- ☐ Grind or mash softened ingredients
- ☐ Mix with warm water and stir to infuse
- ☐ Strain using cloth or bag with firm pressure
- ☐ Flavor naturally (dates, vanilla, cinnamon)
- ☐ Store in glass jar, label, and refrigerate
- ☐ Use within 3–5 days; shake before pouring
- ☐ Repurpose pulp in recipes
Final Thoughts: Simplicity Is Strength
Homemade plant-based milk isn’t about replicating the ultra-smooth consistency of commercial brands. It’s about reclaiming simplicity, reducing waste, and reconnecting with how food is made. You don’t need a gadget-filled kitchen to enjoy clean, additive-free milk. With a little time and the right method, anyone can do it—regardless of budget or appliance access.
Start small. Try a single batch of oat or almond milk this week. Taste the difference. Notice how it smells fresher, tastes cleaner, and integrates better into your morning routine. Each time you make it, you gain confidence and refine your process.


 浙公网安备
33010002000092号
浙公网安备
33010002000092号 浙B2-20120091-4
Comments
No comments yet. Why don't you start the discussion?