
A cluttered gaming station isn’t just unsightly—it can slow you down, cause frustration during intense sessions, and even damage your equipment over time. Tangled power cords, loose HDMI cables, and dangling USB wires are common problems, but the solution doesn’t have to cost a thing. You don’t need expensive cable ties, Velcro wraps, or branded management boxes. With a bit of creativity and some commonly found household items, you can achieve a clean, professional-looking setup that stays functional and organized.
The key is not buying more gear, but rethinking what you already have. From repurposed toilet paper rolls to binder clips and old shoelaces, everyday objects can serve as effective cable organizers. This guide walks through practical, no-cost strategies to streamline your gaming area, reduce visual noise, and improve airflow—all while keeping your devices connected and accessible.
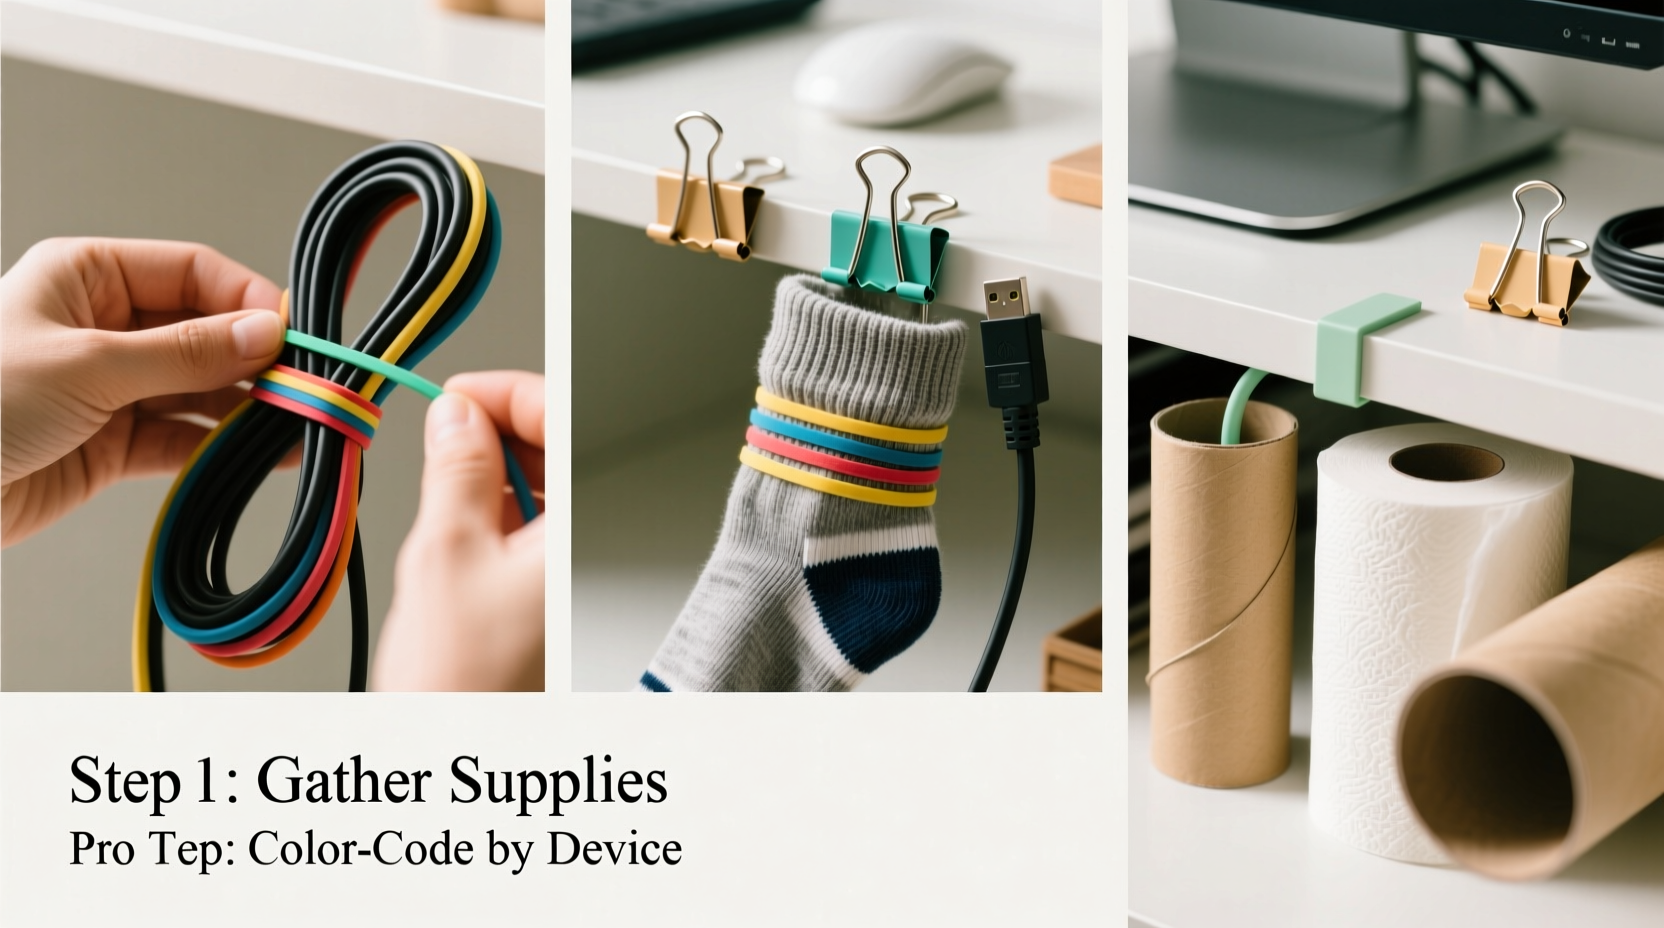
Assess Your Cable Layout First
Before making any changes, take a moment to evaluate your current setup. Unplug your system safely and examine every cable in use: power supplies, monitor connections, console cords, headset jacks, router links, and peripheral attachments like keyboards and mice. Group them by function and length, noting which ones tend to tangle or get stepped on.
Ask yourself:
- Which cables move frequently?
- Where do tangles most often occur?
- Are there redundant or unused cables still plugged in?
- Can any wireless alternatives replace wired connections?
This audit helps identify problem zones and unnecessary clutter. Removing unused cords—like an old phone charger or broken controller cable—is the first step toward simplicity. Fewer cables mean easier management.
Use Household Items as DIY Cable Organizers
You likely already own tools that double as excellent cable managers. The trick is adapting them creatively. Below are several zero-cost solutions using common household materials.
Cardboard Rolls for Cord Coiling
Toilet paper or paper towel tubes make perfect spools for coiling excess wire. Cut a toilet paper roll in half crosswise, then wrap a cable around one half. Secure the ends with a rubber band or a small notch cut into the cardboard edge. Store these rolls vertically in a drawer or horizontally behind your desk.
For thicker cables like power bricks, use the full tube. These also prevent kinks and protect insulation from wear.
Binder Clips for Desk Edge Management
Large metal binder clips are ideal for securing cables along the edge of a desk. Clip them onto the back of your workstation and thread cables through the metal arms. This keeps cords off the floor and prevents monitors or consoles from being pulled forward by tension.
Arrange multiple clips side by side to separate different types of cables—HDMI on one, USB on another—making future troubleshooting easier.
Shoelaces or Fabric Strips as Reusable Ties
Old shoelaces, fabric scraps, or strips from worn-out clothing can replace zip ties. Cut them to size and tie them around grouped cables. Unlike plastic ties, fabric loops are gentle on insulation and reusable. Use a simple overhand knot or bow for quick release.
Pro tip: Braid three fabric strips together for a sturdier, decorative cable wrap.
Paper Clips for Quick Fixes
Standard metal paper clips can act as temporary anchors. Straighten one end slightly and hook it into a ventilation hole on your PC case or console to hold a nearby cable in place. While not a permanent fix, this stops cables from slipping out of reach.
Mailing Envelopes as Wall Pouches
An empty manila envelope can become a hidden cable pouch. Tape it flat against the wall behind your desk and feed excess cords inside. Fold the flap closed or secure it with a paperclip. It hides mess while allowing airflow and access.
“Improvisation is at the heart of effective home organization. The best systems aren’t bought—they’re adapted.” — Jordan Lee, Sustainable Tech Organizer
Step-by-Step Guide: Organize Your Gaming Station in 30 Minutes
Follow this timeline to transform your chaotic setup into a streamlined workspace using only free tools.
- (0–5 min) Power Down & Clear Space: Turn off all devices and unplug them. Move chairs and peripherals aside if needed.
- (5–10 min) Sort & Remove: Identify and discard dead, duplicate, or unused cables. Recycle damaged ones responsibly.
- (10–15 min) Group by Function: Bundle similar cables—monitor, audio, power, data—using fabric strips or rubber bands.
- (15–20 min) Route Along Surfaces: Use binder clips on desk edges to guide bundles downward or sideways, avoiding foot traffic zones.
- (20–25 min) Coil Excess Neatly: Wrap spare lengths around cardboard tubes or form figure-eights tied with shoelaces.
- (25–30 min) Anchor & Test: Secure final positions with tape (masking or painter’s tape to avoid residue), then plug everything back in and test functionality.
This method takes under half an hour and requires nothing you don’t already own. Repeat monthly to maintain order.
Do’s and Don’ts of No-Cost Cable Management
| Do | Don’t |
|---|---|
| Use soft fabric to bind cables and prevent insulation damage | Use duct tape directly on cords—it can degrade plastic sheathing over time |
| Label cables with masking tape and pen for easy identification | Leave heavy cables hanging freely—they can strain ports |
| Coil cords loosely in figure-eight patterns to avoid internal wire stress | Tight-wrap cables around sharp corners or furniture legs |
| Leverage gravity: let bundles drop straight down behind desks instead of snaking across floors | Ignore airflow—don’t bury cables under rugs or pile them near heat sources |
| Repurpose old containers (yogurt cups, jars) to store small adapters or dongles | Forget safety—keep power strips unplugged while organizing and never overload outlets |
Real Example: Transforming a Cluttered Dorm Setup
Consider Mark, a college student living in a shared dorm room. His gaming rig sat on a narrow desk, surrounded by tangled cords stretching from his laptop, monitor, speaker set, and Xbox controller charger. Cables ran across the floor, creating tripping hazards and drawing complaints from his roommate.
With zero budget for accessories, Mark used what he had: a shoebox, two binder clips, three old shoelaces, and several toilet paper rolls. He labeled each cord with tape, grouped them by device, and coiled excess lengths around the cardboard tubes. He clipped the binder clips to the back of his desk to route HDMI and power cords downward into the shoebox, which acted as a concealed base. Shoelaces secured the bundles gently.
The result? A tidy, stable setup that stayed out of the walkway. His roommate noticed the improvement immediately, and Mark found it easier to troubleshoot connection issues because everything was visible and labeled.
Maximize Vertical and Hidden Spaces
Floor-level clutter disappears when you go vertical. Walls, desk undersides, and furniture backs offer untapped real estate for routing cables out of sight.
Tape cardboard tubes or envelopes to the back of your desk to create channels for specific wires. Run HDMI up the wall beside your monitor and secure it with rolled-up sticky tack (reusable and residue-free). If you have baseboards, run low-profile cords along their edges, held by folded paper clips or small pieces of masking tape.
Under-desk space is prime territory. Hang a reused grocery bag or cloth pouch underneath using string or clothespins to store extra controllers, dongles, or coiled charging cables. This keeps essentials close but invisible.
Checklist: Free Cable Organization Toolkit
Before you begin, gather these commonly available items:
- ✅ Toilet paper or paper towel rolls
- ✅ Binder clips (large or medium)
- ✅ Shoelaces, ribbon, or fabric strips
- ✅ Rubber bands or hair ties
- ✅ Masking or painter’s tape
- ✅ Empty envelopes or small cardboard boxes
- ✅ Paper clips (standard or jumbo)
- ✅ Scissors (for cutting tape or fabric)
- ✅ Small labels or masking tape + pen
Having these ready streamlines the process and ensures you won’t need to stop mid-task.
FAQ
Can I use tape on cables without damaging them?
Yes, but choose low-adhesion tapes like masking or painter’s tape. Avoid duct or electrical tape for long-term use, as they can leave residue or degrade insulation. Always test on a small section first and never wrap tightly.
How do I prevent cables from coming loose over time?
Anchor them at multiple points using friction-based holders like binder clips or cloth loops. Gravity works in your favor—route cables straight down and minimize horizontal runs. Check your setup every few weeks and re-secure any slack.
What if I don’t have any household items to use?
Even bare minimum resources work. Simply coil cables into loose loops and tuck them behind furniture. Use knots in the cords themselves (not too tight) to shorten excess length. Prioritize safety and airflow over perfection.
Final Thoughts
Organizing gaming cables doesn’t require a single dollar. What it does require is attention, patience, and a willingness to rethink the ordinary. Everyday items—from cardboard tubes to binder clips—are powerful allies in the fight against digital clutter. By applying thoughtful placement, smart bundling, and creative reuse, you can build a system that’s both functional and sustainable.
A clean setup enhances focus, reduces stress, and extends the life of your gear. More importantly, it reflects care and intention in how you engage with your hobby. Whether you're streaming, competing, or playing casually, a well-managed station supports better performance and peace of mind.


 浙公网安备
33010002000092号
浙公网安备
33010002000092号 浙B2-20120091-4
Comments
No comments yet. Why don't you start the discussion?