
Tying shoelaces is a milestone in a child’s development, combining fine motor skills, hand-eye coordination, and cognitive sequencing. For many children, the abstract nature of looping laces into a bow can be confusing and frustrating. This is where visual aids become invaluable. By transforming an invisible process into something concrete and observable, parents and educators can dramatically improve comprehension and retention. When paired with patience and repetition, visual tools turn a challenging task into an achievable skill.
Children learn in different ways—some through auditory instruction, others through physical practice, but many thrive when they can see what they’re supposed to do. Visual learners especially benefit from diagrams, color-coded systems, and sequential illustrations. Teaching shoelace tying with these supports not only accelerates learning but also builds confidence. The key lies in breaking down the process into manageable steps and reinforcing each stage with clear, engaging visuals.
Why Visual Aids Work for Shoelace Learning
Visual learning plays a critical role in early childhood education. According to research from the University of New South Wales, children aged 4 to 7 rely heavily on visual cues to interpret instructions. When teaching complex tasks like tying shoelaces, verbal directions alone—such as “make a loop” or “pull it through”—can be ambiguous. Without a reference point, children may struggle to understand spatial relationships or the sequence of actions.
Visual aids bridge this gap by providing a consistent model. Whether it's a printed diagram, a laminated step card, or a simple rhyme with accompanying pictures, these tools anchor the learner’s attention. They allow children to pause, replay, and internalize each movement before attempting it physically. Moreover, visual sequences reduce cognitive load by chunking information into digestible parts, making the entire process less overwhelming.
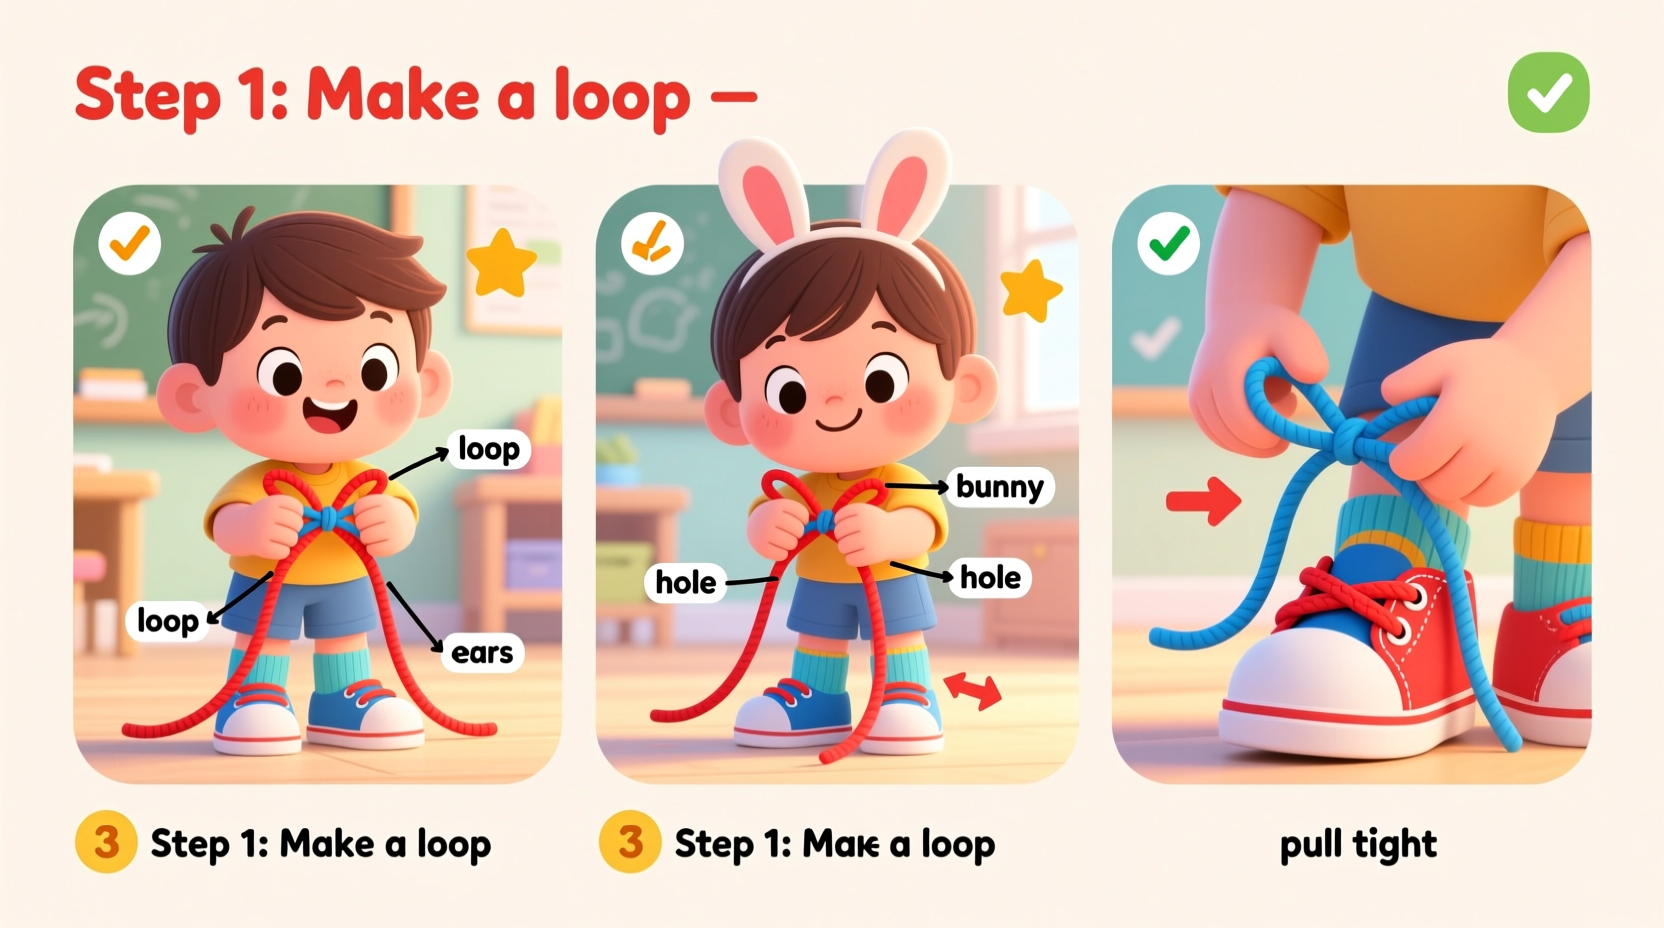
Step-by-Step Guide Using Visual Sequencing
The most widely used method for teaching shoelace tying is the \"bunny ears\" technique. It’s intuitive, story-based, and highly compatible with visual support. Below is a detailed breakdown enhanced with visual aid integration:
- Prepare the Laces: Lay the shoes flat. Cross the laces to form an “X,” then pull them through to make a basic knot. This is the foundation. A visual card showing this first knot helps prevent confusion later.
- Create the First Loop (Bunny Ear): Take one lace and fold it into a loop. Hold it between thumb and forefinger. The image should show a hand forming this loop clearly, perhaps with a cartoon bunny ear beside it.
- Wrap the Second Lace Around: Use the other lace to wrap around the base of the first loop. The visual here should include directional arrows indicating clockwise wrapping.
- Pull Through to Form Second Loop: While holding the first loop, use the free end to push through the bottom of the wrap and pull up into a second loop. A side-view diagram is essential here to show depth and direction.
- Final Pull and Tighten: Gently tug both loops until the bow is secure. Include a close-up image of the finished bow with labels for “left loop” and “right loop.”
Each of these steps should be represented on a separate index card or page, ideally laminated for durability. Place them in order on a table or wall so the child can follow along at their own pace. Encourage them to point to each image as they perform the action—a dual-coding strategy that strengthens memory.
Types of Visual Aids That Deliver Results
Not all visual tools are equally effective. The best ones are simple, durable, and interactive. Here are several types proven to work in home and classroom settings:
- Printed Step Cards: Colorful, numbered cards with minimal text and large illustrations. Ideal for placing on a magnetic board or stringing together with a binder ring.
- Shoe Boards: Wooden or foam boards with real shoelaces attached. Teachers often draw arrows or faces on the laces to personify the “bunny ears.” These provide tactile + visual reinforcement.
- YouTube Videos with Slow Motion: Short clips that pause after each step. Choose videos without background music to avoid distraction.
- Comic Strip Charts: A series of panels depicting a character tying shoes. Kids relate to narratives, and comic formats naturally guide the eye from left to right.
- Interactive Apps: Digital tools like “Tying Shoes Made Easy” animate each motion and allow touch interaction. Best used in moderation alongside physical practice.
“Children retain motor sequences 40% faster when visual models are paired with hands-on repetition.” — Dr. Linda Chen, Early Childhood Motor Development Specialist
Do’s and Don’ts When Using Visual Aids
| Do’s | Don’ts |
|---|---|
| Use consistent terminology (e.g., always call it a 'loop' not sometimes a 'bunny ear' and other times a 'circle') | Switch between multiple tying methods (e.g., starting with 'bunny ears' and switching to 'magic fingers') |
| Practice with oversized laces or ropes for easier handling | Rush the child through steps before mastery of the previous one |
| Place visuals at the child’s eye level for easy reference | Use cluttered images with too much text or background detail |
| Reinforce success with praise, not rewards like candy | Correct every mistake immediately—allow trial and error |
| Review the visual chart daily, even after mastery, for 3–5 days | Assume one lesson is enough—spaced repetition is crucial |
Real Example: Teaching Emma, Age 5
Emma, a kindergartener with mild sensory processing differences, struggled for months to tie her shoes. Her teacher noticed she avoided activities requiring fine motor precision and often relied on velcro backups. To help, her parents and educator created a personalized visual aid kit. They laminated six large photo-based cards showing each stage of the bunny ears method. Each card featured a real child’s hands—not cartoons—to increase relatability.
They introduced one card per day during circle time, pairing it with a short rhyme: “Cross the laces, pull them tight / Make an ear, wrap it right / Poke through the hole, pull it clean / Now you’ve made a bunny’s dream!” Emma practiced with a giant shoe board during playtime. After two weeks of 10-minute daily sessions, she tied her first independent bow. Within a month, she was confidently doing it every morning. The visual consistency gave her the predictability she needed to succeed.
Checklist: Setting Up Your Visual Teaching System
Before beginning instruction, ensure you have the right tools in place. Use this checklist to prepare an effective learning environment:
- ✅ Choose one shoelace method (e.g., bunny ears) and stick to it
- ✅ Print or create clear, large-format visual step cards (at least 5x7 inches)
- ✅ Use real photos or simple line drawings—avoid abstract art
- ✅ Laminate cards for durability and wipe-clean surfaces
- ✅ Attach cards in sequence using rings, magnets, or tape
- ✅ Provide a practice shoe or board with extra-long, colorful laces
- ✅ Schedule short (5–10 minute), consistent practice times daily
- ✅ Celebrate small wins verbally: “You made a perfect loop today!”
Frequently Asked Questions
At what age should a child learn to tie shoelaces?
Most children develop the necessary fine motor control between ages 5 and 7. However, readiness varies. Signs of readiness include being able to copy shapes like squares, use scissors with precision, and dress independently. If a child shows frustration, wait a few weeks and try again with simplified visuals.
What if my child keeps forgetting the steps?
Forgetting is normal. Reinforce learning with spaced repetition—review the visual chart every other day for two weeks after mastery. You can also create a mini-booklet the child can flip through like a story. Consistency over time matters more than speed of initial learning.
Are there alternatives to the bunny ears method?
Yes, though bunny ears are the most visual-friendly. Other methods like “the magic fingers” involve threading laces through imaginary holes, which can be harder to illustrate. Some children respond well to the “two loops” method, where both sides become loops simultaneously. Choose the one that aligns best with your visual resources and the child’s dexterity.
Conclusion: Empower Through Clarity
Teaching a child to tie shoelaces is more than a practical skill—it’s a lesson in perseverance, focus, and self-reliance. Visual aids transform what might seem like a confusing tangle of strings into a logical, satisfying sequence. By investing time in creating clear, accessible tools, caregivers lay the foundation not just for independent dressing, but for lifelong problem-solving confidence.
The process doesn’t need to be perfect. Loops may be uneven, bows may come undone, and progress may stall. But with patient repetition and the right visual scaffolding, every child can reach that moment of pride when they say, “I did it myself.” Start simple, stay consistent, and let the visuals do half the teaching.


 浙公网安备
33010002000092号
浙公网安备
33010002000092号 浙B2-20120091-4
Comments
No comments yet. Why don't you start the discussion?