
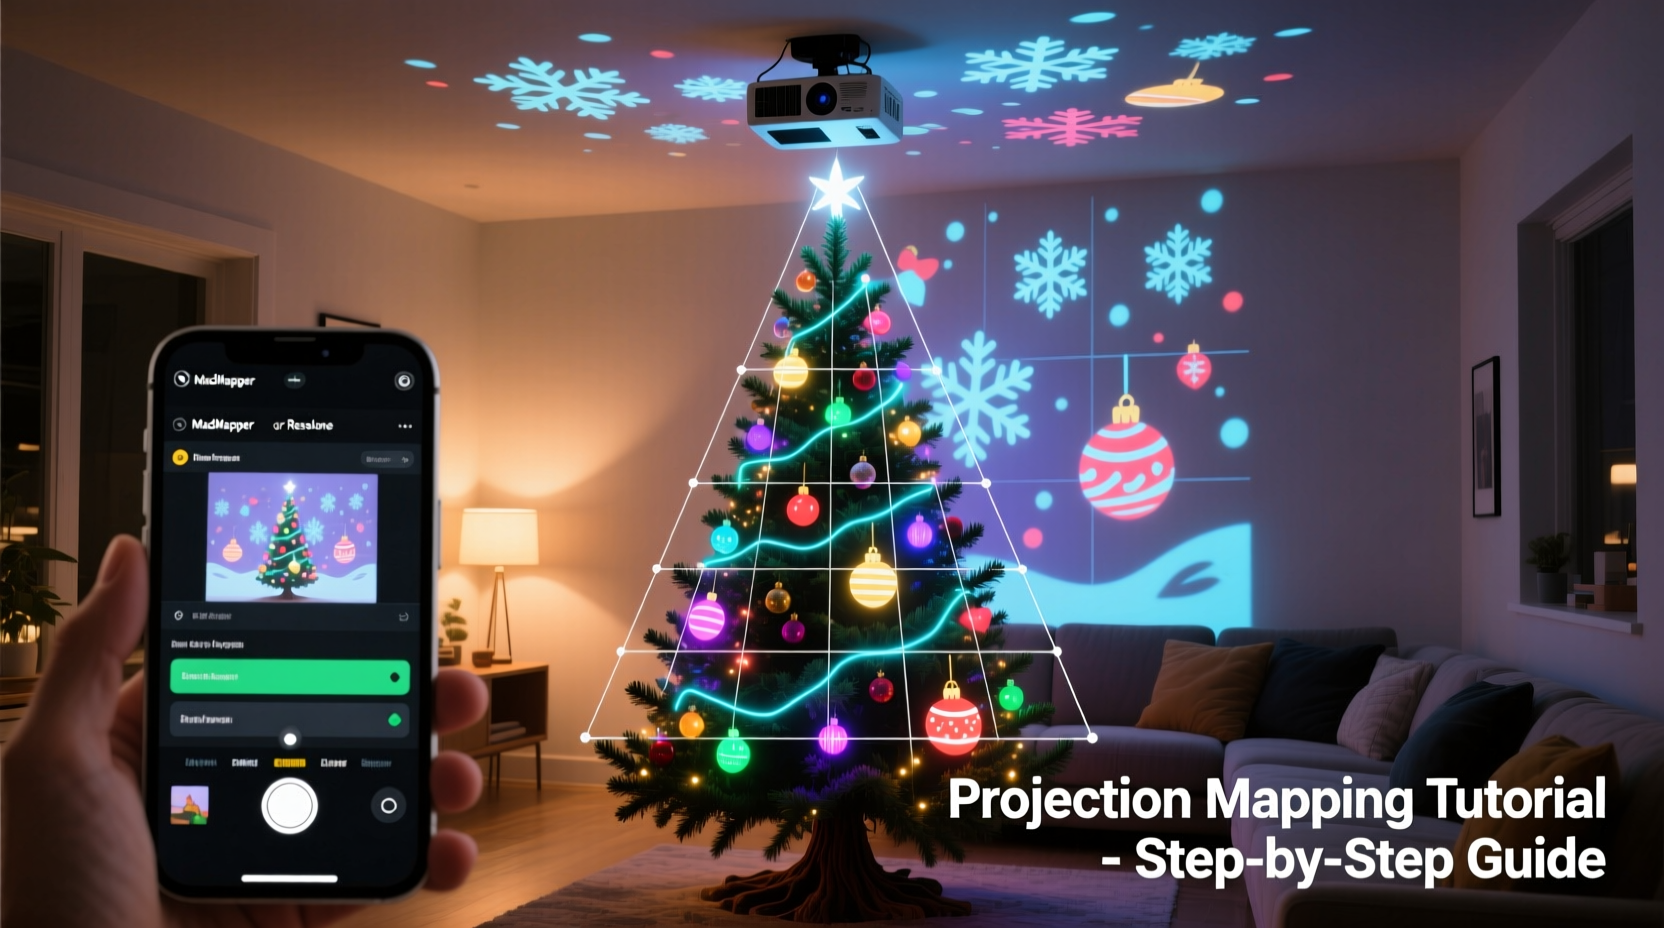
Projection mapping transforms a traditional Christmas tree into a dynamic, immersive centerpiece—shifting colors with music, animating falling snow, or cycling through seasonal scenes—all without tinsel, lights, or physical ornaments. Unlike standard holiday projectors that cast generic patterns, true projection mapping uses spatial calibration to wrap visuals precisely around the tree’s conical shape, accounting for branch density, height, and surface texture. This technique is no longer exclusive to commercial installations: with accessible hardware, intuitive software, and careful planning, homeowners can achieve professional-grade results in living rooms, foyers, or even studio apartments. The key lies not in technical wizardry but in methodical preparation, realistic expectations, and attention to environmental constraints unique to indoor spaces.
Why Indoor Tree Mapping Differs from Outdoor or Stage Use
Indoor projection mapping on a Christmas tree presents distinct challenges—and advantages—compared to outdoor displays or theatrical setups. Ambient light is the most immediate factor: ceiling fixtures, lamps, and reflective surfaces (glass tables, mirrors, white walls) scatter projected light, washing out contrast and dimming saturation. At the same time, indoor environments offer stable temperature control, zero wind interference, and consistent mounting points—unlike patios or balconies where vibration and weather degrade alignment. Crucially, indoor trees are rarely symmetrical. Real-world firs, spruces, or artificial pines have irregular branch spacing, gaps near the trunk, and variable density from base to tip—meaning flat video files won’t “fit” without geometric correction. Successful indoor mapping requires treating the tree as a 3D object—not a screen—and adjusting both content and hardware accordingly.
Essential Gear: What You Really Need (and What You Can Skip)
High-end mapping rigs involve motion sensors, multi-projector arrays, and custom-built frames—but for a single indoor tree, simplicity yields better results. Focus on three core components: projector, computer, and mounting hardware. Everything else is optional or situational.
| Component | Minimum Requirement | Recommended Upgrade | Avoid |
|---|---|---|---|
| Projector | 3,000 lumens, native 1080p, 1.2:1 throw ratio | 4,500+ lumens, HDR support, lens shift, vertical keystone correction | Portable “pico” projectors (<2,000 lumens), models without manual focus or HDMI 2.0 |
| Computer | Intel i5-8400 / AMD Ryzen 5 2600, 16GB RAM, integrated graphics | i7-11800H / Ryzen 7 5800H, 32GB RAM, dedicated GPU (RTX 3050 or higher) | Chromebooks, tablets, or laptops with only USB-C output (no HDMI) |
| Mounting | Sturdy tripod + adjustable projector mount (e.g., Manfrotto 128RC) | Wall-mounted projector bracket with micro-adjustment knobs | Shelf-based setups without vibration dampening, or ceiling mounts requiring structural drilling |
A critical but often overlooked element is the projection surface itself. Real trees absorb light; dense artificial trees reflect it unevenly. To compensate, choose a tree with medium-density PVC or PE branches—not ultra-thin “feathery” tips or sparse metal-frame varieties. If using a real tree, ensure it’s freshly watered: dry needles scatter light and create hotspots. For best fidelity, position the tree at least 6 feet from side walls and 8 feet from the projector—this allows sufficient throw distance for edge blending and minimizes keystoning.
Step-by-Step Setup: From Power-On to First Animation
- Measure and map the space. Use a tape measure to record: floor-to-ceiling height, distance from wall to tree base, projector placement point (measured from floor and centerline), and tree height/width at base and mid-section. Sketch a simple floor plan with these dimensions.
- Position the projector. Place it centered on the tree’s vertical axis, at a distance equal to 1.5× the tree’s height. Elevate it so the lens aligns with the tree’s midpoint (not the top). Use books or a small platform if needed—never tilt the projector upward.
- Install and calibrate software. Install MadMapper (macOS/Windows, industry standard for beginners) or Resolume Arena (for audio-reactive shows). Launch the software, select your projector as output, and enable “Geometry Correction” mode.
- Create a tree mesh. Using MadMapper’s camera-assisted mesh tool: point a smartphone or webcam at the tree, capture still frames from front, left, and right angles, then let the software generate a 3D wireframe. Manually adjust vertices to match branch contours—especially along the trunk line and outer canopy.
- Import and warp content. Load a 1920×1080 MP4 file (e.g., animated snowfall, slow color gradients, or rotating ornaments). Drag it onto the mesh. Use the “Warp” tool to stretch pixels vertically along the trunk and compress them radially toward the tip—mimicking how light naturally falls across a cone.
- Refine and test. Dim all room lights. Play content at 30fps minimum. Observe for brightness drop-off at the top (add gamma boost) or pixelation in dense zones (reduce resolution locally via masking). Save the mapped composition as a preset.
Real-World Example: The Thompson Apartment Installation
In December 2023, Maya Thompson transformed her 650-square-foot downtown Chicago apartment using a $499 Epson Home Cinema 2250 projector, a refurbished MacBook Pro, and a $22 folding tripod. Her 6.5-foot artificial Nordmann fir had uneven branch distribution—sparse near the base, dense at the shoulders. Initial tests showed heavy vignetting and a “halo” effect around the trunk where light bled onto the wall behind. Rather than repositioning the projector (space was too tight), she used MadMapper’s “Mask Layer” feature to paint black opacity over non-tree areas—including a 3-inch margin around the trunk and the lower 18 inches of the base—eliminating spill and sharpening focus. She also created three short 15-second loops (a warm gold pulse, slow-motion pinecone rotation, and gentle aurora ripple) and cycled them using Resolume’s timeline scheduler. Guests consistently mistook the effect for embedded LED lighting—proof that precision mapping, not raw power, creates believability.
“People assume projection mapping needs expensive gear. In reality, 80% of success comes from understanding how light interacts with organic shapes—and accepting that ‘perfect’ coverage is less important than intentional emphasis.” — Javier Ruiz, Projection Designer, Lumina Studios (12+ years residential mapping experience)
Content Creation & Optimization Tips
Off-the-shelf holiday videos rarely work “as-is” for tree mapping. They’re designed for flat screens, not conical geometry. Instead, build content with projection in mind:
- Design vertically. Most tree mappings benefit from top-to-bottom motion (falling snow, ascending sparkles) rather than horizontal pans. Create animations in After Effects or DaVinci Resolve with a 9:16 aspect ratio, then scale to fit your mesh.
- Embrace transparency. Use PNG sequences with alpha channels for floating ornaments or glowing stars. This prevents harsh edges where branches interrupt the graphic.
- Control brightness intentionally. Set peak white at 85–90% IRE—not 100%. Trees absorb light; pushing full white causes bloom and washes out detail in mid-tones.
- Use audio triggers sparingly. Syncing to music works best with simple, repeating motifs (e.g., a bass thump triggering a radial pulse). Complex songs overwhelm the visual rhythm. Start with a 60bpm loop and adjust tempo later.
- Test with real ornaments. If you plan to keep physical decorations, place them *before* final mapping. Their shadows and reflections become part of the canvas—map around them, don’t ignore them.
Safety, Maintenance & Common Pitfalls
Projectors generate heat—and running one continuously near flammable materials demands vigilance. Follow these non-negotiable practices:
- Never place the projector within 3 feet of curtains, upholstered furniture, or paper decorations.
- Ensure at least 4 inches of clearance around all projector vents. Use a small USB desk fan directed at the exhaust port during extended operation.
- Turn off the projector when unattended for more than 30 minutes—even if the tree animation continues.
- Wipe the lens weekly with a microfiber cloth and lens-safe solution; dust buildup scatters light and reduces contrast.
- Re-calibrate the mesh after any physical disturbance: moving the tree, adjusting ornaments, or bumping the projector.
Common failures stem from misaligned expectations—not faulty gear. The most frequent complaint (“It looks blurry at the top!”) is usually due to insufficient throw distance or incorrect gamma settings, not projector quality. Another recurring issue is “flickering ornaments”: this occurs when high-frequency animations (e.g., rapid twinkling) exceed the projector’s refresh rate. Solution? Cap animation speed at 24fps and use motion blur in post-production instead of frame-rate tricks.
FAQ
Can I use my existing smart TV or streaming stick for projection mapping?
No. Smart TVs and streaming devices lack low-level GPU access, real-time geometry correction, and the ability to output custom resolutions required for mapping. You need a laptop or desktop running dedicated software like MadMapper, Resolume, or HeavyM.
Do I need a dark room for good results?
Not completely dark—but controlled ambient light is essential. Turn off overhead lights and cover windows with blackout curtains during display hours. Table lamps with warm-toned bulbs (2700K) placed *behind* the viewer (not beside the tree) preserve mood without washing out projections.
What’s the lifespan of a projector used daily for holiday mapping?
Modern home projectors rated for 15,000+ hours of LED/laser life will easily last 5–7 holiday seasons with 4–6 hours of daily use. The limiting factor is usually filter clogging or accidental lens scratches—not lamp degradation.
Conclusion
Projection mapping on an indoor Christmas tree isn’t about replicating a department store spectacle—it’s about crafting a personal, evolving moment of wonder. It invites intentionality: choosing a color palette that complements your room’s textiles, selecting animations that echo your family’s traditions, or syncing light pulses to a favorite carol played softly in the background. The technology serves the feeling, not the other way around. You don’t need a studio budget or engineering degree. You need a reliable projector, 90 focused minutes to set up the mesh, and willingness to treat your tree not as decoration, but as a living canvas. This year, skip the tangled lights and blinking LEDs. Let light move with purpose. Let color breathe with rhythm. Let your tree tell a story only your home could hold.


 浙公网安备
33010002000092号
浙公网安备
33010002000092号 浙B2-20120091-4
Comments
No comments yet. Why don't you start the discussion?