
When defining architectural lines—whether it’s the clean edge of a patio roof, the graceful curve of a pergola, the crisp perimeter of a deck railing, or the silhouette of a holiday window—the right lighting choice isn’t just about aesthetics. It’s about precision, durability, control, and long-term reliability. Two popular contenders dominate this niche: LED rope lights and mini string lights. Yet despite their visual similarity at first glance, they differ fundamentally in construction, optical behavior, mounting practicality, and environmental resilience. Choosing incorrectly can mean uneven illumination, premature failure, frustrating installation, or an outline that looks more like a dotted line than a continuous glow. This comparison cuts past marketing claims to examine how each performs where it matters most: on the edge.
Core Construction Differences That Shape Performance
Understanding what’s inside each product explains why they behave so differently when applied to linear outlines.
LED rope lights consist of individual LEDs embedded inside a flexible, transparent or translucent PVC or silicone sleeve—often with a diffuser layer. The LEDs are mounted on a narrow PCB strip, spaced closely (typically 1–3 cm apart), and fully encapsulated. This creates a sealed, continuous light source with no visible gaps between emitters. Most commercial-grade rope lights use SMD 3528 or 5050 chips and operate at 12V or 24V DC, requiring a transformer for standard AC outlets.
Mini string lights, by contrast, are discrete bulbs—usually 2–5 mm wide—strung along insulated copper wire with visible spacing (commonly 6–12 inches between bulbs). Even “dense” versions rarely place bulbs closer than 3 inches apart. Each bulb is typically an incandescent filament or low-power LED housed in a plastic or glass dome. They operate directly on 120V AC (in North America) or via plug-in adapters, eliminating the need for external transformers—but also limiting dimming compatibility and safety near moisture.
The structural divergence leads directly to functional trade-offs: rope lights deliver uniform luminance and seamless continuity; mini strings offer modularity and plug-and-play simplicity—but sacrifice optical cohesion.
Performance Comparison: Five Critical Outline Criteria
| Criterion | LED Rope Lights | Mini String Lights |
|---|---|---|
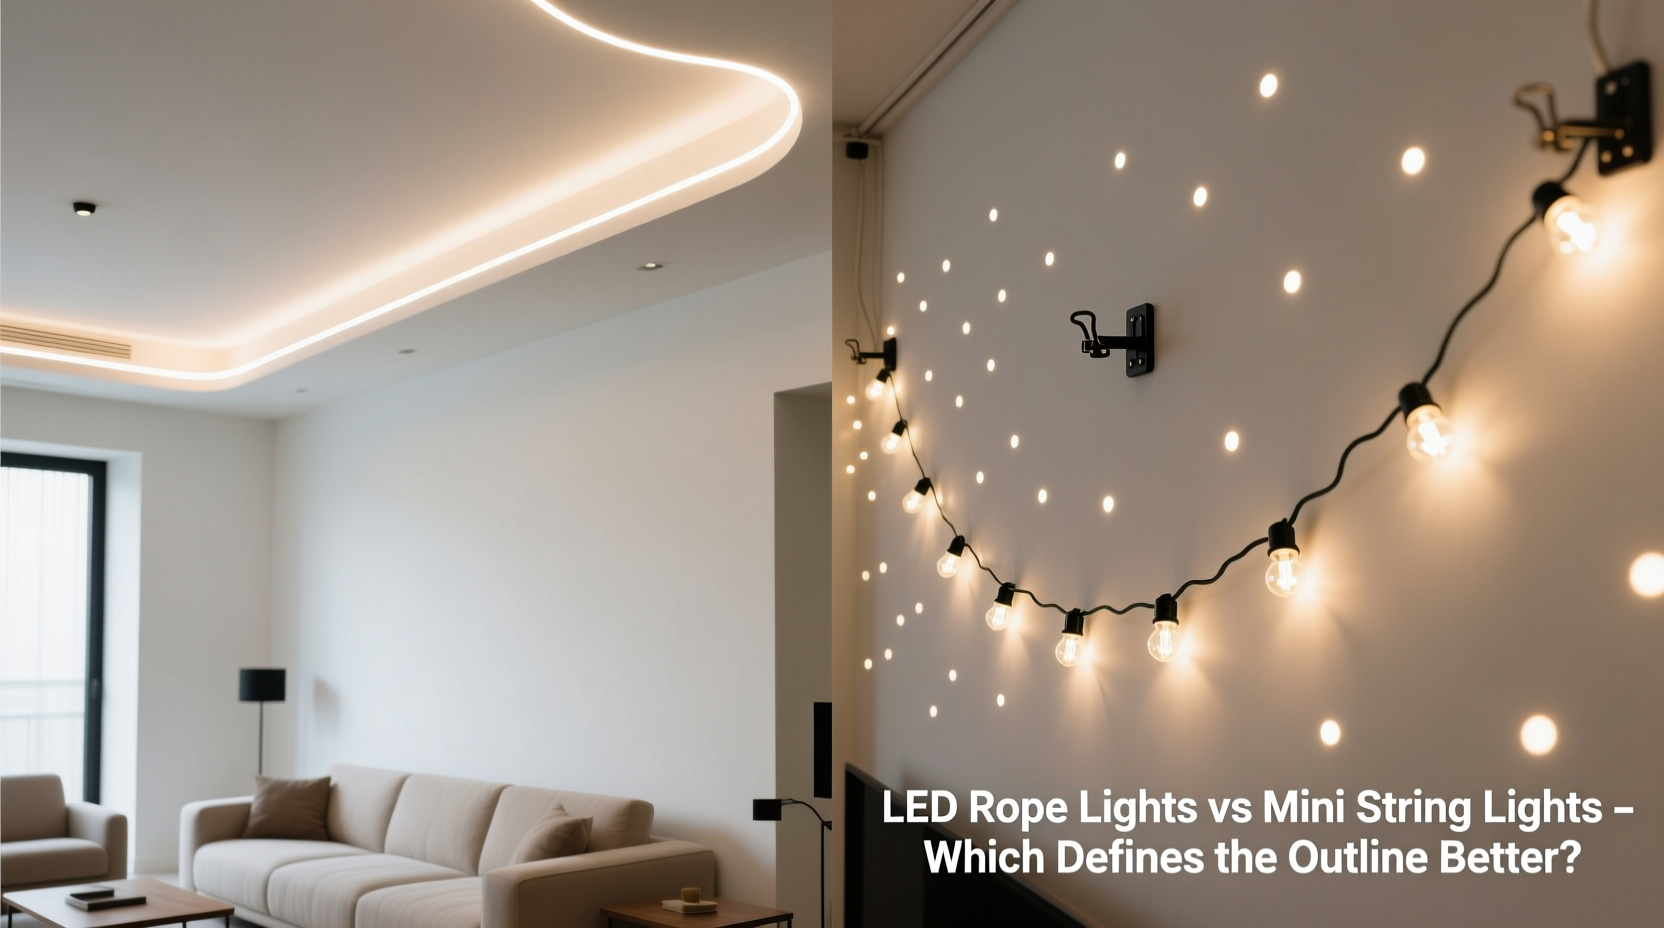
| Light Continuity & Edge Definition | ✅ Seamless, unbroken line. Ideal for sharp architectural edges where any gap breaks visual flow. Diffused output eliminates hot spots. | ❌ Noticeable dark gaps between bulbs—even at 3\" spacing. Creates a “dotted outline” effect, especially on close-up or elevated views. Bulb domes cast directional shadows. |
| Bending & Conformity | ✅ Flexible down to 1.5–2 inch radius (silicone models). Holds curves without kinking or separation. Maintains consistent light output across bends. | ❌ Rigid bulb bases resist tight turns. Wires twist under stress; bulbs often pivot outward on curves, pointing away from the intended surface. Corners require careful pinning or multiple short runs. |
| Weather & UV Resistance | ✅ IP65–IP68 rated options widely available. Silicone-jacketed versions withstand freeze-thaw cycles, salt air, and prolonged UV exposure with minimal yellowing or brittleness. | ❌ Most consumer-grade strings are only IP44 rated (splash resistant). Plastic housings degrade in UV; wire insulation cracks after 1–2 seasons outdoors. Incandescent variants overheat in enclosed fixtures. |
| Mounting Stability & Cleanliness | ✅ Flat-back adhesive tape or integrated channel clips allow flush, invisible mounting. No protruding hardware. One continuous run means fewer connection points. | ❌ Requires individual clips, staples, or zip ties per bulb or every 2–3 bulbs. Bulbs project 0.5–1 inch from surface, catching debris and creating visual clutter. Multiple connection points increase failure risk. |
| Long-Term Reliability | ✅ Rated for 30,000–50,000 hours. Sealed design prevents moisture ingress into electronics. Consistent voltage distribution avoids “domino failure” (one bulb out = whole strand dead). | ❌ Typically rated 5,000–15,000 hours. Open wiring and exposed solder joints corrode. Series-wired incandescent or basic LED strings fail entirely if one bulb burns out or connection loosens. |
Real-World Application: A Patio Roof Outline Project
Consider Maria, a landscape designer in Portland, Oregon, tasked with outlining a 42-foot cedar pergola for a high-end residential client. The structure features gently arched rafters, angled support beams, and an open underside exposed to rain, wind, and seasonal fog.
Maria initially installed 50-ft mini string lights (warm white, 120V LED) using stainless steel clip mounts. Within six weeks, three bulbs had darkened due to moisture condensation inside housings. At the apex of the arch, bulbs pointed skyward instead of downward—casting light onto the ceiling rather than defining the rafter edge. During a November rainstorm, two sections flickered and went dark; inspection revealed corroded connections at splice points. Replacing failed bulbs required disassembling half the run.
She replaced them with 45-ft, 12V silicone rope lights (IP67, 5050 SMD, 3000K warm white) mounted with 3M VHB tape along the rafter undersides. The rope conformed smoothly to the 18-inch-radius curve without tension or bulging. Light emitted evenly downward, highlighting wood grain while maintaining crisp definition. After 14 months—including two winters with sub-freezing temps and heavy precipitation—the lights remain fully operational, with zero color shift or dimming.
“The difference wasn’t just ‘better’—it was professional versus provisional,” Maria notes. “Clients don’t see ‘lights.’ They see the shape of their space. Rope lights preserve that shape. Strings interrupt it.”
Actionable Installation Checklist for Outline Projects
Whether you choose rope or string lights, these steps prevent common failures:
- Measure twice, order once: Add 10% extra length for routing around corners, securing ends, and future adjustments.
- Verify voltage compatibility: Match transformer output (for rope lights) or outlet circuit capacity (for strings) to total wattage load. Overloading causes overheating and early failure.
- Test before mounting: Power up the full run on the ground to confirm uniform brightness and identify defects.
- Seal all connections: Use heat-shrink tubing or waterproof gel-filled wire nuts—not electrical tape—for outdoor splices.
- Anchor at stress points: Secure rope lights every 12–18 inches on horizontal runs; every 6 inches on vertical or curved sections. For strings, use UV-stable clips—not staples—at every third bulb.
- Plan for service access: Leave 6–12 inches of slack near transformers or plugs. Avoid embedding connections inside walls or behind trim.
Expert Insight: Why Continuity Matters More Than You Think
“The human eye perceives outline lighting as a single, cohesive line—not a sequence of points. When gaps exceed 2.5 degrees of visual angle at typical viewing distances, the brain stops integrating them into a contour. That’s why even 6-inch spacing fails on structures taller than 10 feet or viewed from more than 15 feet away. Rope lights succeed because they meet the perceptual threshold for ‘edge definition’—not just engineering specs.” — Dr. Lena Torres, Human Factors Lighting Researcher, Illuminating Engineering Society (IES)
This principle explains why rope lights consistently outperform strings in architectural applications: they align with how vision actually works. A window frame lit with rope light reads instantly as a defined boundary. The same frame lit with mini strings reads as decoration—interesting, but not structurally clarifying.
Step-by-Step: Converting a Problematic Mini String Outline to Rope Light
- Evaluate existing infrastructure: Note locations of outlets, transformers (if present), and mounting surfaces. Photograph all connection points.
- Remove strings safely: Unplug power. Carefully detach clips/staples. Inspect wire for nicks or corrosion—discard if compromised.
- Select rope light spec: Choose silicone-jacketed, IP67+ rated rope with built-in adhesive backing. Opt for 12V DC (more stable dimming, safer handling) and warm white (2700K–3000K) for architectural warmth.
- Prepare surface: Clean with alcohol wipe. Sand glossy paint lightly. Let dry completely.
- Route and test: Lay rope loosely along outline. Trim excess with wire cutters at marked points (only at designated cut marks). Connect to transformer and verify full brightness.
- Secure permanently: Starting at one end, peel adhesive backing and press firmly while smoothing toward the other end. Apply gentle pressure for 30 seconds per foot.
- Protect connections: Slide heat-shrink tubing over all splice points and transformer leads. Use a heat gun (or hair dryer on high) to seal tightly.
FAQ: Practical Questions Answered
Can I cut rope lights to fit odd-length outlines?
Yes—but only at marked cut points (usually every 1–3 inches, indicated by scissor icons or copper pads). Cutting elsewhere breaks circuits. Always verify polarity (+/−) when reconnecting cut ends, and seal with heat-shrink tubing or silicone caulk.
Do mini string lights work for indoor outlines, like crown molding?
They can—especially low-voltage, battery-operated LED versions—but only if spacing is ≤3 inches and bulbs have wide-beam angles (≥120°). Even then, rope lights provide superior uniformity and eliminate visible wires behind the molding. For premium interior results, rope remains the professional standard.
Why do some rope lights develop dark spots after a year?
Almost always due to voltage drop in long runs (>33 ft on 12V systems) or poor-quality transformers delivering inconsistent current. Solution: Use 24V rope lights for runs >25 ft, or inject power at both ends (“loop feed”) for runs >50 ft. Never daisy-chain more than the manufacturer’s specified max length.
Conclusion: Choose the Tool That Respects the Line
Outlining isn’t decorative embellishment—it’s spatial communication. It tells the eye where one plane ends and another begins. It frames memory, guides movement, and elevates design intention. LED rope lights and mini string lights serve different purposes: one honors the integrity of the line; the other punctuates it. If your goal is crisp, enduring, architecturally faithful definition—especially outdoors, on curves, or in professional installations—rope lights aren’t merely “better.” They’re the only tool engineered for the task. Mini strings have their place—in festive garlands, draped accents, or temporary indoor displays—but they compromise continuity, resilience, and precision the moment you ask them to define an edge.
Don’t settle for an outline that winks instead of glows. Measure your perimeter, assess your environment, and invest in light that behaves like a line—not a series of dots. Your architecture deserves that clarity.


 浙公网安备
33010002000092号
浙公网安备
33010002000092号 浙B2-20120091-4
Comments
No comments yet. Why don't you start the discussion?