
Balayage highlights have redefined modern hair color—offering soft, sun-kissed dimension that grows out gracefully and requires minimal maintenance. Once reserved for high-end salons, this hand-painted technique is now accessible to those who want to recreate the look at home. With the right preparation, tools, and attention to detail, you can achieve natural-looking, salon-quality results without stepping into a salon. This guide walks you through every phase of the process, from selecting products to post-color care, ensuring your DIY balayage enhances your features and lasts beautifully.
Understanding Balayage: Why It’s Different
Unlike traditional foil highlights that create uniform, linear strands, balayage (French for “to sweep”) involves freehand painting of lightener onto select sections of hair. The result is a gradient effect—lighter at the ends, subtly blended toward the roots—that mimics how hair naturally lightens in the sun. Because it’s less structured, balayage offers more flexibility and a softer appearance, making it ideal for low-maintenance styling.
The key advantage of balayage for at-home application is its forgiving nature. Mistakes are less noticeable due to the organic placement, and regrowth lines are virtually invisible. However, success depends on understanding your hair’s porosity, starting level, and choosing the correct developer volume to avoid over-processing.
“Balayage isn’t about perfection—it’s about artistry. The beauty lies in the asymmetry and movement.” — Lila Torres, Celebrity Colorist
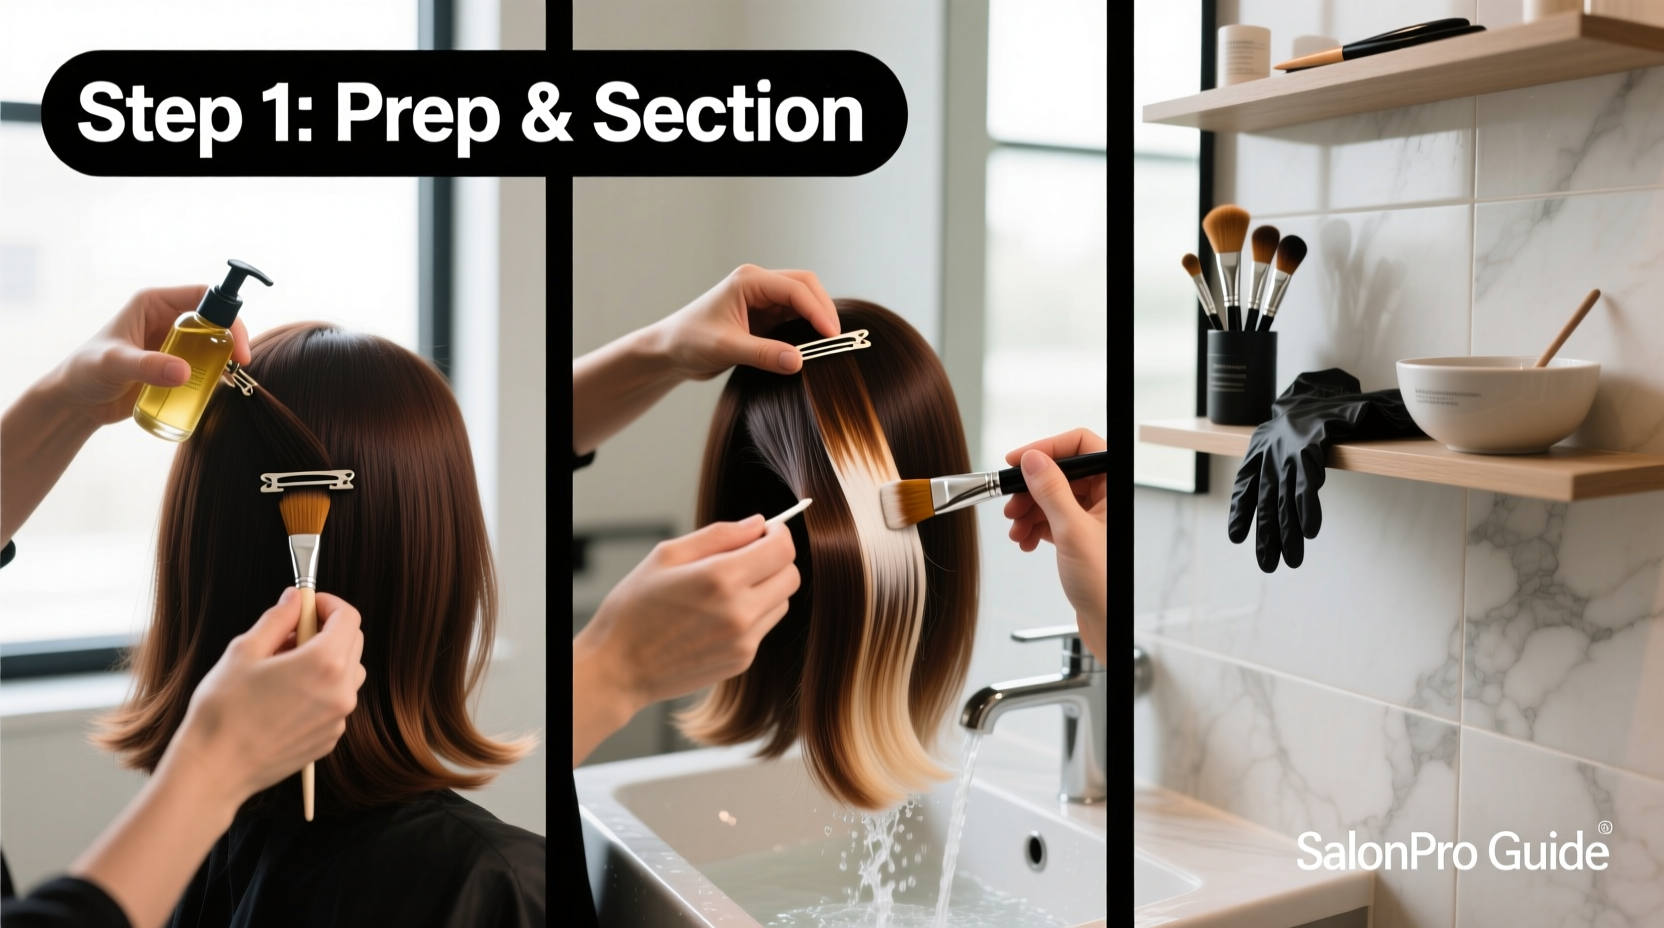
Essential Tools and Products Checklist
Before beginning, gather all necessary supplies. Using professional-grade tools increases precision and reduces the risk of damage.
- High-lift or bleach powder (choose based on desired lift)
- Cream developer (10, 20, or 30 volume—20 is safest for beginners)
- Tint brush or fine-point applicator bottle
- Plastic mixing bowl and gloves (nitrile recommended)
- Sectioning clips and tail comb
- Old towel or cape to protect clothing
- Toning shampoo or purple shampoo (for neutralizing brassiness)
- Deep conditioning mask
Step-by-Step Guide to At-Home Balayage
Follow this timeline-based method to ensure even application and minimize damage.
- Prep Your Hair (Day Before): Avoid washing 24–48 hours prior. Natural oils protect the scalp during processing.
- Section Strategically: Divide dry hair into four quadrants using a tail comb. Clip each section securely.
- Mix Lightener: Combine bleach powder and developer in a 1:1 ratio. Aim for a creamy consistency—not too runny.
- Begin Painting: Starting at the back, take thin subsections (about 1/2 inch wide). Use the brush to paint the lightener from mid-length to ends, sweeping upward in a “C” shape for soft blending.
- Focus on Natural Sun Exposure Zones: Concentrate product on areas most exposed to sunlight—crown, around the face, and lower layers.
- Monitor Processing Time: Check every 10 minutes. Most hair reaches desired lift in 30–45 minutes. Fine hair processes faster; coarse hair may need up to 60 minutes.
- Rinse Thoroughly: Wash out with cool water until water runs clear. Apply a sulfate-free shampoo followed by a deep conditioner.
- Tone (Optional but Recommended): If hair appears brassy, use a toning glaze or purple shampoo to cool tones. Leave on for 3–5 minutes.
Do’s and Don’ts: Avoiding Common Mistakes
| Do’s | Don’ts |
|---|---|
| Work in thin sections for even saturation | Apply bleach too close to the scalp without protection |
| Use a lower-volume developer (20) if unsure | Overlap bleached hair with new applications |
| Keep hair dry during application | Leave bleach on longer than 60 minutes |
| Condition deeply after rinsing | Use hot tools immediately after coloring |
| Re-evaluate tone after 24 hours | Expect identical results to a professional on first try |
Real Example: Sarah’s First Balayage Attempt
Sarah, a 32-year-old with shoulder-length brown hair, wanted to add brightness without obvious roots. She used a 20-volume developer with a salon-grade bleach powder, focusing on the underside layers and ends. After 35 minutes, she rinsed and applied a violet-based toner. The initial result had slight warmth, but after two uses of purple shampoo, her hair achieved a warm honey-blonde finish. She reported minimal breakage thanks to pre-treatment oil and deep conditioning. While not perfectly symmetrical, the overall effect was natural and received compliments at work.
Her biggest takeaway? “I went too heavy near the front initially. Next time, I’ll start lighter and build up. But I saved $200 and learned exactly how my hair reacts.”
Frequently Asked Questions
Can I do balayage on previously colored hair?
Yes, but proceed with caution. Permanent dye alters hair porosity, which can lead to uneven lift. If your hair is dark or has been frequently dyed, consider doing a strand test and using a lower-volume developer to prevent over-processing.
How often can I repeat balayage at home?
Wait at least 8–10 weeks between sessions. Overlapping bleach on already-lightened hair increases the risk of dryness and breakage. Focus only on new growth or shadowed areas during touch-ups.
Why does my balayage look brassy?
Brassiness occurs when underlying pigments (red and orange) are exposed during lightening. To correct it, use a blue or purple toning shampoo weekly. For severe warmth, apply a demi-permanent ash toner following package instructions.
Maintaining Your Balayage Results
Long-lasting balayage relies on proper aftercare. Bleaching opens the hair cuticle, making it more vulnerable to environmental stressors. Protect your investment with these habits:
- Wash hair 2–3 times per week with a sulfate-free shampoo.
- Use a heat protectant before styling with hot tools.
- Incorporate a weekly reconstructing mask with keratin or bond-building ingredients.
- Limit chlorine and saltwater exposure, or rinse immediately after swimming.
- Sleep on a silk pillowcase to reduce friction and frizz.
Final Thoughts: Confidence Through Preparation
Achieving salon-quality balayage at home is within reach—if you respect the process. It’s not just about applying bleach; it’s about understanding your hair’s behavior, working methodically, and prioritizing health over speed. Even experienced stylists refine their technique over time. Your first attempt may not be flawless, but each session builds intuition and skill.
With the right tools, patience, and attention to detail, you’re not just saving money—you’re gaining confidence in your ability to transform your look on your own terms. Whether you're enhancing natural depth or transitioning to blonde, mastering balayage empowers you to become your own best stylist.


 浙公网安备
33010002000092号
浙公网安备
33010002000092号 浙B2-20120091-4
Comments
No comments yet. Why don't you start the discussion?