
Crafting perfect croissants at home is often seen as a daunting task reserved for seasoned bakers. But the truth is, with patience, precision, and a deep understanding of laminated dough, anyone can produce golden, buttery, flaky croissants that rival those from Parisian patisseries. At the heart of this iconic pastry lies handmade puff pastry—a labor of love built on layers, temperature control, and technique. This guide breaks down every stage of the process, from mixing the détrempe to shaping and baking, ensuring success even for ambitious beginners.
The Science Behind Flaky Layers
Flakiness in croissants comes not from luck but from structure. When you make puff pastry from scratch, you're creating hundreds of alternating layers of dough and butter. During baking, water in the butter turns to steam, lifting each layer apart. Simultaneously, the proteins in flour form gluten, giving the structure needed to hold these layers without collapsing.
The key is balance: too much gluten development makes the croissant tough; too little, and it won’t hold its shape. The cold butter must remain intact during lamination—melting too early leads to greasy, dense results. That’s why temperature management is non-negotiable throughout the process.
“Croissants are 70% technique, 20% ingredients, and 10% timing. Master the rhythm of folds and rests, and you’ve already won.” — Jacques Moreau, Artisan Baker & Instructor, École Lenôtre
Essential Ingredients and Equipment
Using high-quality ingredients makes a visible difference. Opt for European-style butter with at least 82% fat content—it rolls better and creates cleaner layers. All-purpose or bread flour works best due to their balanced protein levels (11–12.5%).
Core Ingredients
- 500g all-purpose or bread flour
- 60g unsalted butter (for détrempe)
- 10g fine sea salt
- 50g granulated sugar
- 10g instant yeast
- 250ml cold whole milk
- 280g high-fat unsalted butter (for lamination)
Equipment Checklist
- Stand mixer with dough hook (optional but helpful)
- Rolling pin (preferably marble or heavy-duty wood)
- Bench scraper
- Parchment paper
- Baking sheets
- Dough docker (optional)
- Pastry brush
- Thermometer (to check milk temp)
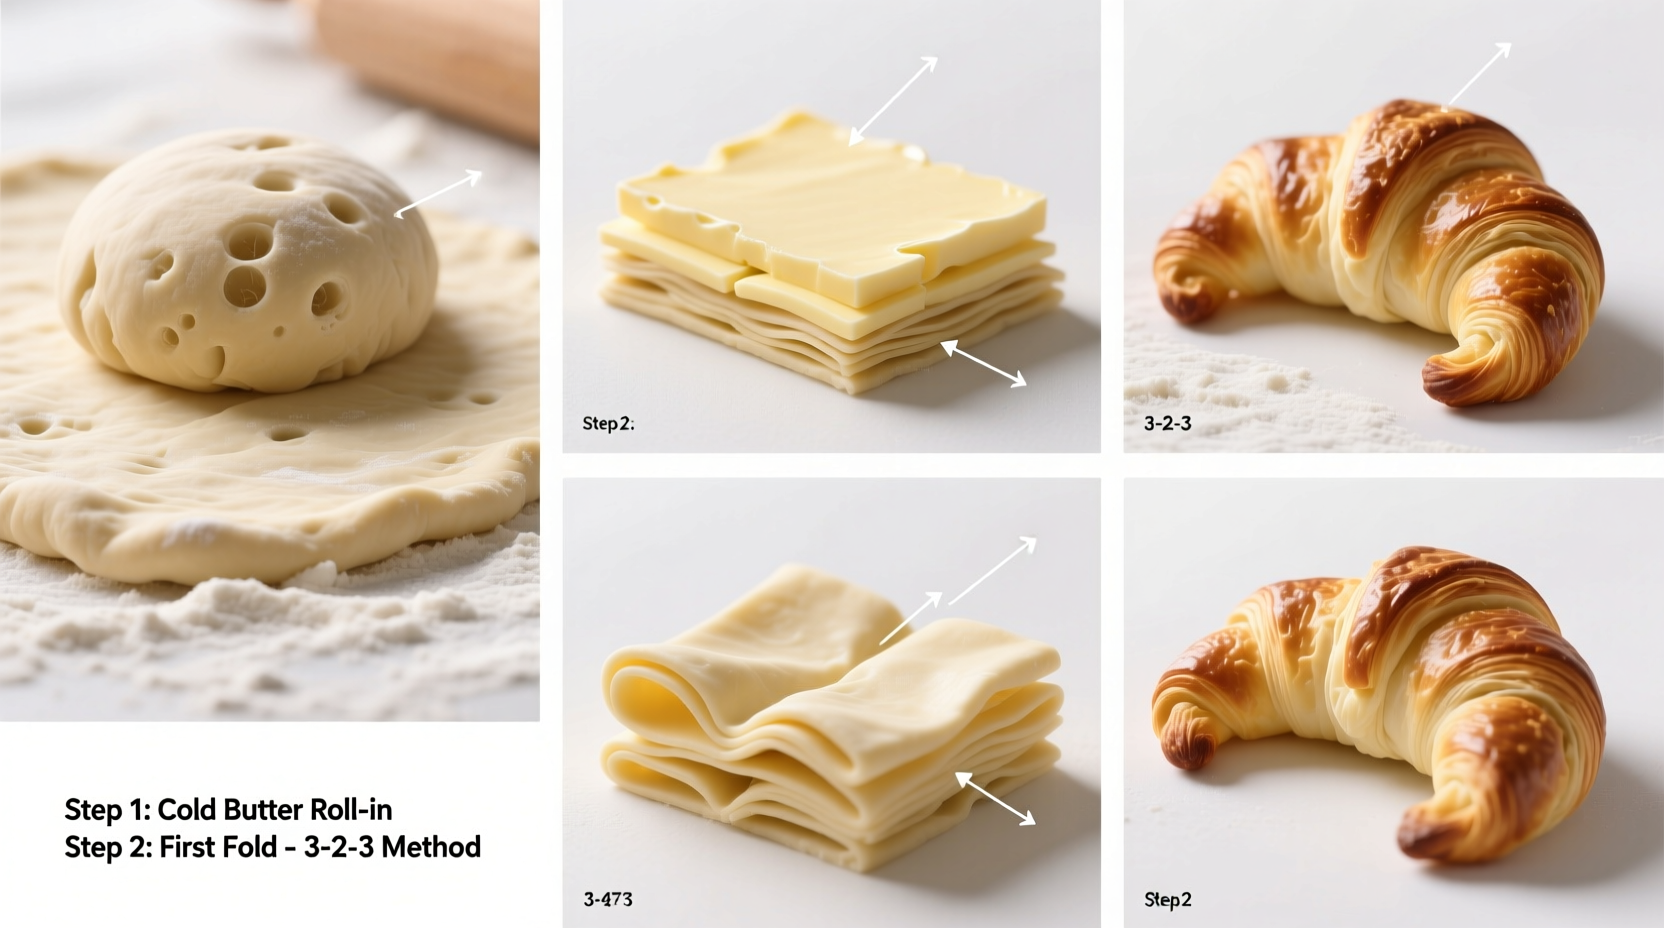
Step-by-Step Guide to Laminated Dough
This process takes place over two days. Rushing leads to poor layering and butter leakage. Follow this timeline precisely for optimal results.
- Day 1 – Morning: Make the Détrempe (dough base)
In a bowl or stand mixer, combine flour, salt, sugar, and yeast. Warm milk to about 30°C (86°F), then mix in the 60g softened butter. Gradually add to dry ingredients and mix until a smooth, elastic dough forms (~8 minutes). Wrap in plastic and refrigerate for 1 hour. - Prepare Butter Block
Place 280g chilled butter between two sheets of parchment. Roll into a 20x20cm square. It should be pliable but not soft. Refrigerate alongside the dough. - Laminate: First Turn (Single Fold)
On a floured surface, roll the chilled dough into a rectangle three times longer than the butter block. Place the butter diagonally in the center, then fold the dough corners over it like an envelope. Seal edges gently. Roll out gently to 50cm long, then fold into thirds like a letter. This is one single fold. Wrap and chill for 1 hour. - Second and Third Turns
Repeat rolling and folding twice more, chilling 1 hour between each. After the third fold, refrigerate overnight (minimum 8 hours). - Day 2 – Roll, Cut, Shape
Remove dough from fridge. Roll to 4mm thickness into a 30x60cm rectangle. Trim edges for clean lines. Cut into long right triangles (base ~10cm). Gently stretch each triangle slightly, then roll tightly from base to tip. Curve ends inward to form crescents. - Proofing
Place shaped croissants on parchment-lined trays, cover lightly with plastic, and proof at room temperature (24°C / 75°F) for 2–3 hours. They should feel airy when touched and wobble slightly. - Bake to Perfection
Preheat oven to 200°C (390°F). Lightly egg-wash croissants (1 egg + 1 tbsp milk). Bake 18–22 minutes, rotating halfway, until deeply golden and hollow-sounding when tapped.
Common Pitfalls and How to Avoid Them
Even experienced bakers encounter issues. Understanding what went wrong helps refine future batches.
| Issue | Possible Cause | Solution |
|---|---|---|
| Butter leaks during baking | Butter too soft during lamination; oven too cold | Keep butter firm; ensure oven is fully preheated |
| Dense, bready texture | Under-proofed; over-handled | Allow full rise; minimize touching after shaping |
| No visible layers | Fewer than 3 turns; dough warmed too much | Complete all folds; rest adequately in fridge |
| Tears while rolling | ||
| Gluten tight; rolled too thin too fast | Let dough relax 10 mins if resisting; roll gradually |
Real Example: From Failure to Bakery-Quality Results
Sophie, a home baker in Portland, tried making croissants three times before succeeding. Her first batch leaked butter because she used standard American butter (80% fat) and skipped chilling between folds. The second attempt was under-proofed—she baked them after only 90 minutes, resulting in chewy centers. On her third try, she followed this guide exactly: used Kerrygold butter, completed four-hour chilling periods, proofed for 2.5 hours, and preheated a baking stone. The result? “They opened like blooming flowers,” she said. “The crunch, the pull-apart layers—I finally tasted real croissant.”
FAQ: Your Croissant Questions Answered
Can I freeze croissants before baking?
Yes. After shaping and proofing, place croissants on a tray and freeze solid. Transfer to a freezer bag. When ready, bake straight from frozen—add 3–5 minutes to baking time. For best results, egg wash just before baking.
Why use milk instead of water in the dough?
Milk adds tenderness, richness, and browning due to lactose. It also improves shelf life and flavor depth. Water-only versions are crispier but less tender.
Can I reduce the sugar or use margarine?
Sugar aids browning and yeast activity. Reducing beyond 30g may affect rise and color. Margarine is not recommended—it contains more water and less fat, increasing risk of breakage and sogginess.
Final Tips for Consistent Success
- Label your folds: Mark the edge of the dough with fingertips—one indent for first fold, two for second, etc., to track progress.
- Use a scale: Precision matters. Volume measurements vary; grams ensure consistency.
- Don’t skip fermentation: Cold fermentation develops flavor and strengthens gluten slowly.
- Rotate pans: Ovens have hot spots. Rotate trays halfway through baking for even color.
“The beauty of croissants lies in their transformation—from humble flour and butter to something almost magical. Each fold is a promise of what’s to come.” — Pierre Hermé, Pastry Chef & Author
Conclusion: Take the Challenge
Mastering flaky croissants isn’t about perfection on the first try—it’s about learning the rhythm of dough and butter, understanding how temperature shapes texture, and embracing the quiet discipline of slow craftsmanship. With this guide, you now have the tools, timeline, and troubleshooting knowledge to create puff pastry from scratch with confidence. Whether you enjoy them warm with jam or use them as a base for gourmet sandwiches, homemade croissants offer unmatched satisfaction.


 浙公网安备
33010002000092号
浙公网安备
33010002000092号 浙B2-20120091-4
Comments
No comments yet. Why don't you start the discussion?