
In today’s fast-moving world, carrying cash or even a wallet is becoming optional. With just a tap of your Android phone, you can complete transactions at grocery stores, transit stations, online shops, and even street vendors. Mobile payments are not only convenient—they’re often more secure than traditional card swipes. Yet many users still hesitate, unsure how to set up their device or whether it’s safe. This guide breaks down everything you need to know to confidently use your Android phone as a digital wallet—anytime, anywhere.
Understanding How Mobile Payments Work on Android
Mobile payments on Android rely primarily on Near Field Communication (NFC) technology, which allows two devices to exchange data when held close together—typically within four centimeters. When you tap your phone at a payment terminal, your device sends encrypted payment information via NFC to complete the transaction. Unlike swiping a physical card, your actual card number is never shared. Instead, Android uses tokenization: a unique digital code represents your account for each transaction.
The most widely used platform for Android is Google Pay, though Samsung Pay (on compatible devices) and various bank-specific apps also offer similar functionality. These services integrate directly with your device’s security features, including biometrics like fingerprint or facial recognition, ensuring that only you can authorize a payment.
“Mobile payments reduce fraud risk because they use dynamic encryption and one-time tokens instead of static card numbers.” — Dr. Lena Torres, Cybersecurity Analyst at SecureTransact Labs
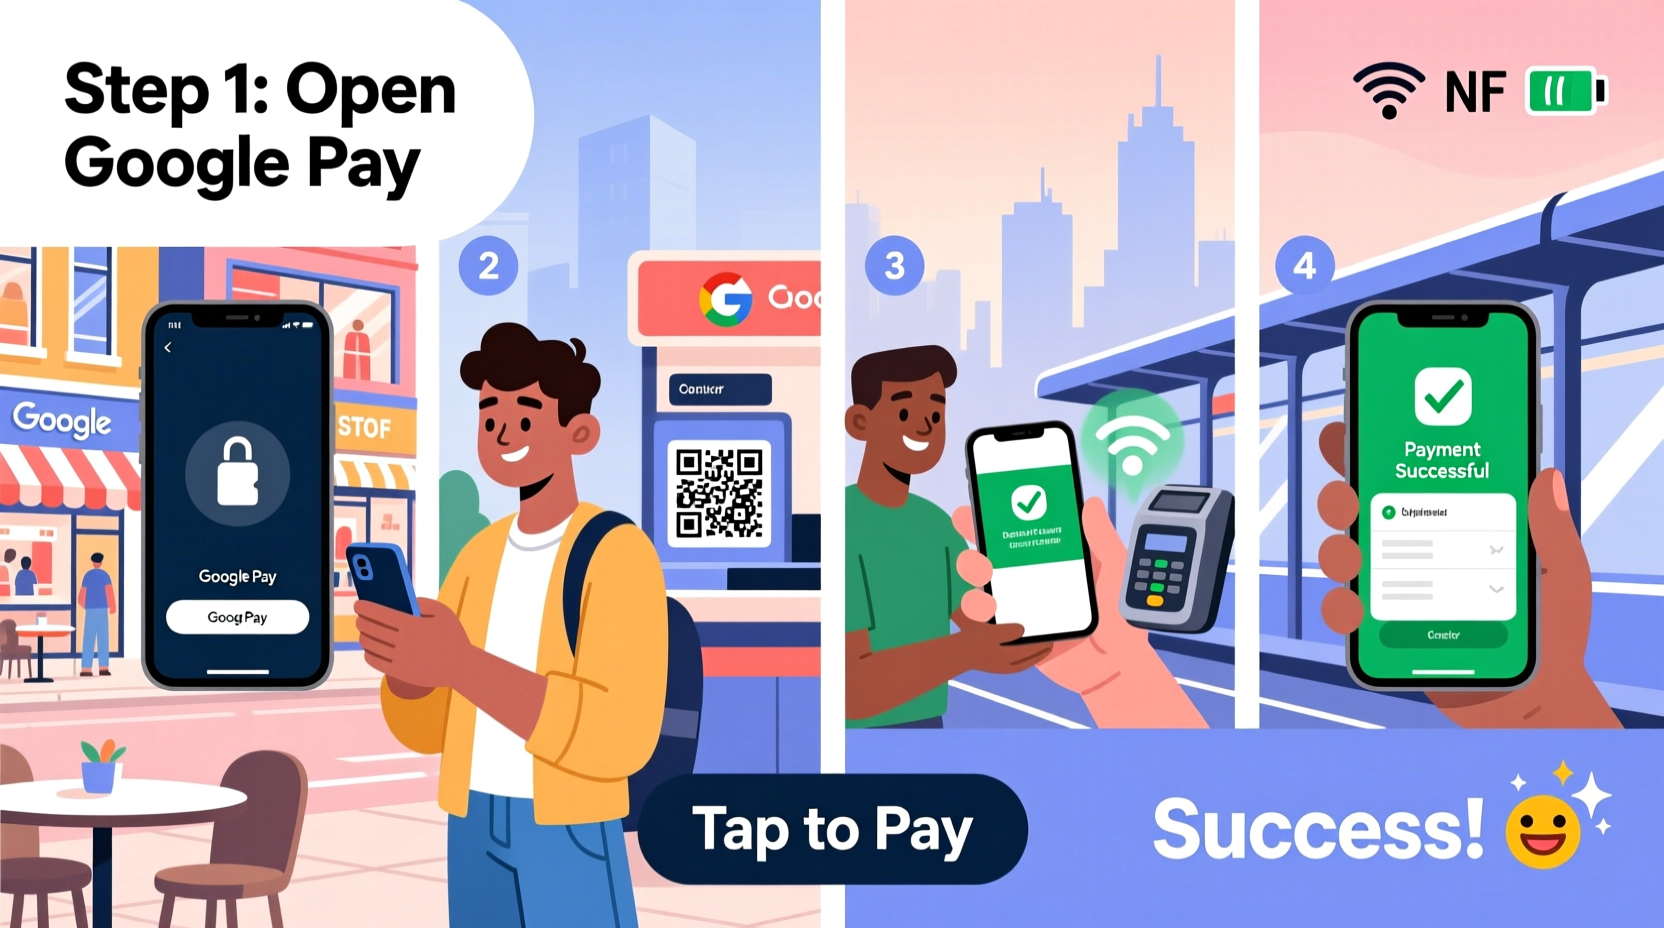
Step-by-Step Setup: Activating Mobile Payments on Your Device
Getting started with mobile payments takes less than ten minutes if you follow this sequence:
- Check NFC Compatibility: Ensure your Android phone supports NFC. Most models from 2015 onward do. Go to Settings > Connected Devices > Connection Preferences > NFC to verify it’s available and toggle it on.
- Download Google Pay: Open the Google Play Store and install Google Pay (formerly Android Pay). It's free and optimized for all major Android brands.
- Add a Payment Method: Open the app and tap “Add” under Payment. You can add a credit, debit, or prepaid card. Use the camera to scan your card or enter details manually.
- Verify Your Card: Your bank may require verification via SMS, email, or an automated call. Some institutions instantly approve; others take up to 48 hours.
- Set as Default (Optional): In Google Pay settings, designate your preferred card to avoid selecting one every time.
- Enable Lock Screen Access: Allow Google Pay to appear on your lock screen for faster access. This works only if your device has a secure lock method (PIN, pattern, biometrics).
Using Your Phone to Pay: Where and How It Works
Once set up, paying is straightforward. At checkout, look for the contactless symbol—a curved wave resembling a Wi-Fi icon—on the terminal. Wake your phone (no need to open the app), hold the back near the reader, and wait for a vibration or sound confirming success.
You can use mobile payments in diverse environments:
- Retail Stores: Major chains like Target, Walmart, and Best Buy accept Google Pay.
- Public Transit: Cities including London, New York, Chicago, and Tokyo allow NFC-enabled phones on subways and buses.
- Online & In-App Purchases: Use Google Pay at checkout on supported websites and apps like Uber, Airbnb, or Amazon.
- Peer-to-Peer Transfers: Send money to friends using Google Pay’s send feature via phone number or email.
No internet connection? No problem. Offline mode stores recent tokens so you can still pay, though receipts sync once connectivity resumes.
Security and Best Practices for Safe Transactions
One common concern is safety. Mobile payments are generally safer than physical cards. Here’s why:
| Feature | Physical Card Risk | Mobile Payment Protection |
|---|---|---|
| Data Exposure | Full card number visible | Tokenized, masked data |
| Skimming | Vulnerable at compromised terminals | Dynamic encryption prevents reuse |
| Lost Device | Anyone can use found card | Biometric/PIN required per transaction |
| Fraud Liability | Up to $50 under U.S. law | $0 liability with most issuers |
To maximize protection:
- Always enable device encryption and screen lock.
- Install updates promptly—they often patch security flaws.
- Use Find My Device to remotely lock or erase your phone if lost.
- Avoid adding cards on public Wi-Fi without a VPN.
Real-World Example: Maria’s First Week Using Mobile Payments
Maria, a teacher in Portland, decided to go wallet-free for seven days using only her Pixel 6. On Monday, she paid for coffee at a local café by simply tapping her phone—no fumbling for change. Tuesday, she rode the MAX light rail by holding her phone to the fare gate. Wednesday, she bought school supplies at Office Depot and split the cost with a colleague via Google Pay Send. By Friday, she’d saved time, reduced clutter, and received three cashback rewards through her linked credit card. The only hiccup? A small farmer’s market vendor didn’t have NFC capability, reminding her that not all locations are equipped yet. Still, she found the experience overwhelmingly positive and plans to continue full-time.
Essential Checklist Before Going Fully Digital
Before relying solely on your phone for payments, ensure these items are in place:
- ✅ NFC is enabled in device settings
- ✅ Google Pay (or alternative) is installed and updated
- ✅ At least one verified payment card is added
- ✅ Biometric or PIN lock is active
- ✅ Battery saver mode won’t disable NFC
- ✅ Find My Device is activated
- ✅ You’ve tested a small transaction (e.g., vending machine)
Frequently Asked Questions
Can I use mobile payments without an internet connection?
Yes. Once your card is loaded into Google Pay, transactions work offline using stored tokens. However, you’ll need connectivity later to sync transaction history and receive updated card details.
Are all banks compatible with Google Pay?
Most major U.S. banks and credit unions support Google Pay, including Chase, Bank of America, Citi, and Capital One. To confirm, visit g.co/pay/banks or check directly in the app during setup.
What happens if my phone dies while I’m out?
If your battery runs out, you won’t be able to make payments. Consider carrying a backup card for emergencies or enabling Extreme Battery Saver mode to preserve power for essential functions, including payments.
Conclusion: Embrace the Future of Frictionless Payments
Mobile payments are no longer a novelty—they’re a practical, secure upgrade to outdated payment methods. By setting up Google Pay and understanding how to use it across different scenarios, you gain speed, convenience, and enhanced financial control. Whether you're commuting, shopping, or splitting dinner with friends, your Android phone can handle it all with a simple tap. The transition is smooth, the benefits are real, and the future is already here.


 浙公网安备
33010002000092号
浙公网安备
33010002000092号 浙B2-20120091-4
Comments
No comments yet. Why don't you start the discussion?