
Concrete footings are the foundation of stability for decks, sheds, fences, and even small buildings. When done correctly, they prevent settling, shifting, and structural failure caused by frost heave or soil movement. A poorly constructed footing can compromise an entire project, leading to costly repairs or complete rebuilds. This guide walks through every critical phase of creating strong, lasting concrete footings using proven methods and practical insights from construction professionals.
Why Durable Footings Matter
Footings transfer the weight of a structure into the ground, distributing load over a broader area to prevent sinking. In regions with freeze-thaw cycles, footings must extend below the frost line to avoid uplift during winter. Beyond code compliance, durability comes from proper depth, reinforcement, drainage, and curing practices. Skipping steps might save time initially but risks long-term integrity.
“Over 60% of structural failures in residential builds begin with inadequate footings.” — James Ralston, Civil Engineer & Foundation Specialist
Planning and Preparation
Before breaking ground, assess the site’s soil type, drainage patterns, and local building codes. Clay soils expand when wet and contract when dry, increasing pressure on footings. Sandy or gravelly soils offer better drainage and load-bearing capacity. Use online resources like the USDA Web Soil Survey or consult your local building department to determine required depth and diameter.
Mark the layout using batter boards and mason’s string to ensure precise alignment. For multi-footing projects like decks or pergolas, square the corners using the 3-4-5 triangle method: measure 3 feet along one string, 4 feet along the adjacent, and confirm the diagonal is exactly 5 feet.
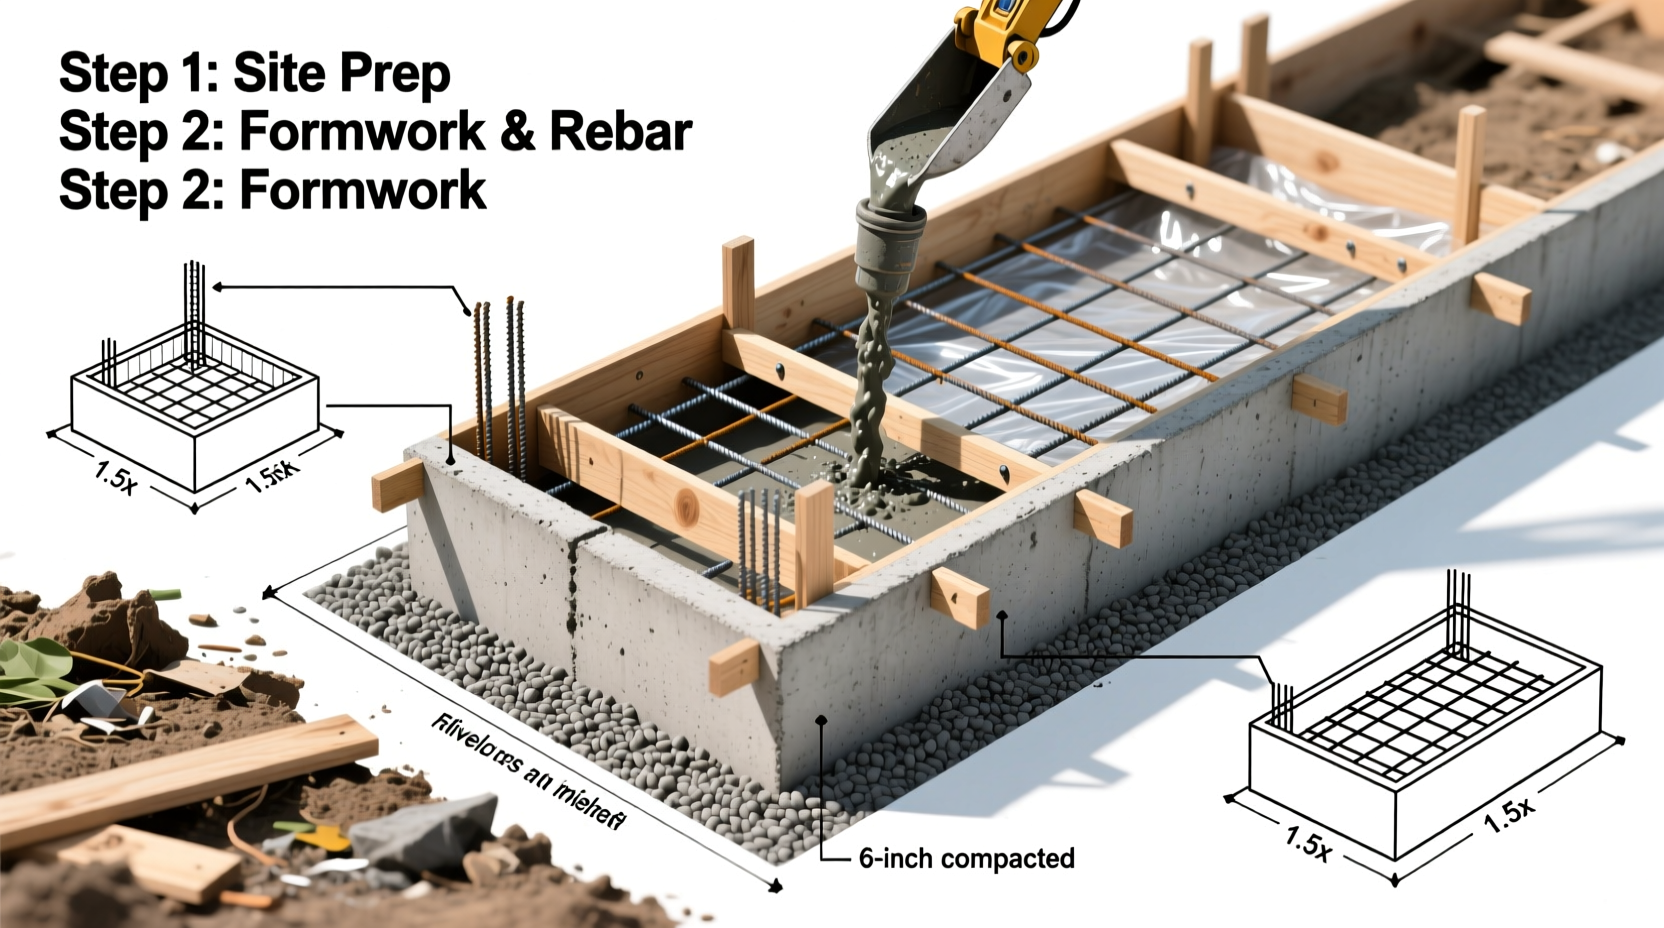
Step-by-Step Guide to Building Concrete Footings
- Determine Frost Depth and Load Requirements
Check local building codes for minimum depth. In northern climates, this may be 48 inches; in warmer zones, 12–24 inches may suffice. Larger structures require wider footings (typically 12”–16” in diameter). - Excavate Holes Accurately
Use a power auger or spade bit to dig holes slightly larger than the planned form (e.g., 12” hole for a 10” sonotube). Ensure vertical sides and consistent depth. Slope the bottom slightly toward the center to aid water runoff. - Add a Gravel Base
Pour 4–6 inches of compacted gravel at the bottom of each hole. This improves drainage and prevents moisture buildup under the concrete, reducing freeze damage risk. - Install Forms (Sonotubes or Cardboard Tubes)
Cut cardboard forms (sonotubes) to extend at least 3–4 inches above grade. Brace them vertically using stakes and straps. Ensure tops are level across all footings for uniform height. - Insert Reinforcement
Place rebar cages or J-bolts inside the form. Use two or three pieces of #4 rebar (½ inch diameter), extending at least 24 inches into the concrete and bent at the base for anchoring. Secure with wire ties. - Pour Concrete in One Session
Mix concrete to a medium slump—not too wet. Fill the hole in layers, vibrating or poking with a rod to eliminate air pockets. Top off just below the form edge. - Finish and Cure Properly
Slope the top surface slightly away from the center to shed water. Cover with plastic sheeting after initial set and let cure for at least 7 days. Avoid loading until 28-day strength is reached.
Best Practices During Pouring
- Avoid adding excess water to improve workability—it weakens the final product.
- Pour early in the day to allow full daylight for leveling and finishing.
- In cold weather, use heated water and insulating blankets; in heat, shade the area and mist-cure to prevent cracking.
Do’s and Don’ts of Concrete Footing Construction
| Do’s | Don’ts |
|---|---|
| Compact gravel base thoroughly | Don’t skip the gravel layer |
| Use proper rebar spacing and embedment | Don’t rely solely on concrete without reinforcement |
| Cure slowly with moisture retention | Don’t let concrete dry too quickly |
| Verify level and alignment before pouring | Don’t assume the ground is flat |
| Inspect forms for leaks and stability | Don’t pour if forms wobble or bulge |
Real-World Example: Fixing a Sinking Deck Footing
A homeowner in upstate New York built a deck with shallow 18-inch footings, assuming local code allowed it. After two winters, one corner sank nearly 4 inches due to frost heave. A contractor diagnosed the issue: insufficient depth and no gravel base. The fix involved removing the affected section, excavating to 48 inches, installing a new rebar-reinforced footing on compacted gravel, and allowing 10 days of curing before reconnecting the beam. The deck has remained level for five years since. This case underscores that cutting corners on footings leads to expensive corrections later.
Essential Tools and Materials Checklist
- Measuring tape and string line
- Batter boards and stakes
- Power auger or post-hole digger
- Gravel (¾ inch crushed stone)
- Sonotubes or rigid forms
- #4 Rebar (cut and bent as needed)
- Concrete mix (use 4,000 psi or higher)
- Trowel, level, and float
- Plastic sheeting for curing
- Wire ties and rebar chairs (optional)
Frequently Asked Questions
Can I use pre-mixed concrete bags for footings?
Yes. Pre-mixed bags (like Quikrete or Sakrete) are ideal for small projects. Mix on-site according to instructions—typically 3–4 gallons of water per 80-lb bag. For deeper holes, pour in lifts of 12–18 inches and tamp each layer.
How deep should footings be for a freestanding shed?
Minimum depth depends on your region’s frost line. For most areas, 36 inches is safe. The footing should be at least 10 inches in diameter and 8–10 inches thick at the top. Always check local codes—some municipalities require permits for structures over 120 sq ft.
Is it okay to pour footings in the rain?
Light rain isn’t fatal, but heavy precipitation can wash cement fines from fresh concrete, weakening it. If rain is forecast, delay the pour or protect the site with tarps. Never pour into standing water—pump it out first.
Final Thoughts and Action Plan
Durable concrete footings aren’t about complexity—they’re about consistency, attention to detail, and respect for foundational engineering principles. Whether you're anchoring a mailbox or framing a backyard studio, taking the time to build footings right ensures decades of service without maintenance headaches.
Start small: test your technique on a single post. Measure twice, dig once, and never rush the cure. Your future self—and any inspector who shows up—will thank you.


 浙公网安备
33010002000092号
浙公网安备
33010002000092号 浙B2-20120091-4
Comments
No comments yet. Why don't you start the discussion?