
Programming a LiftMaster garage door remote doesn’t have to be complicated. Whether you’re replacing a lost remote, adding one for a family member, or installing a new opener, the process is straightforward when you know the right steps. LiftMaster has designed their systems for user-friendly setup across multiple models and generations. This comprehensive guide walks you through every stage—from identifying your model type to final testing—with practical tips, troubleshooting advice, and expert insights to ensure success on the first try.
Understanding Your LiftMaster Remote System
LiftMaster produces several types of remotes and openers, primarily falling into two categories: those using fixed-code technology (older models) and those using rolling-code security (modern units). The most visible indicator is the presence of a “Learn” button on the motor unit. Models manufactured after 1993 typically use rolling codes, enhancing security by changing the signal each time the remote is used.
Common remote types include:
- 380UT: Universal handheld remote compatible with many LiftMaster and Chamberlain models.
- 893MAX: Multi-function remote that can control up to three devices (garage doors, gates, lights).
- 896LM: Compact remote with Security+ 2.0 encryption for newer openers.
To determine compatibility, check the color of the “Learn” button on your garage door opener motor:
| Learn Button Color | Model Range | Remote Compatibility |
|---|---|---|
| Purple, Blue, or Green | 2010–present | Security+ 2.0 remotes (e.g., 896LM) |
| Orange or Red | 1993–2010 | Standard Security+ remotes (e.g., 375UT) |
| No Learn Button | Pre-1993 | Fixed-code remotes (DIP switches required) |
Step-by-Step Guide to Programming Your LiftMaster Remote
Follow this universal procedure for modern LiftMaster openers equipped with a Learn button. This method applies to over 90% of installations from the past two decades.
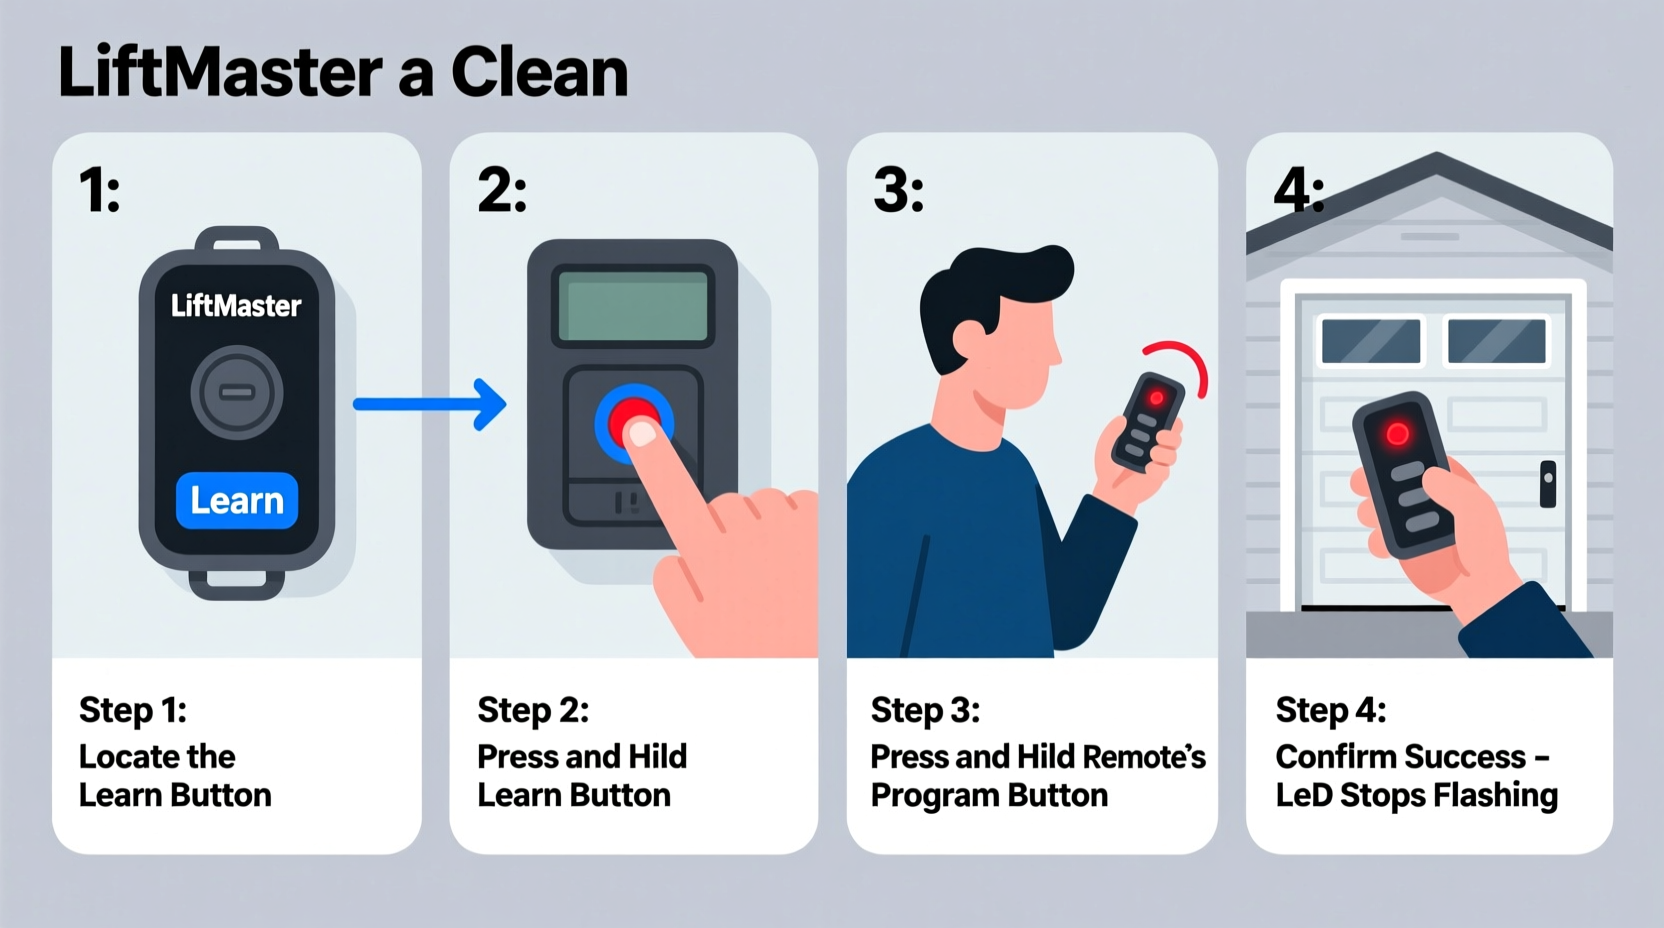
- Locate the Learn Button – Find the small button on the back or side of the motor housing. It’s often labeled “Learn” and may glow when pressed.
- Press and Release the Learn Button – Use a ladder if needed. Press it once; the adjacent LED will glow steadily for about 30 seconds.
- Program the Remote – Within 30 seconds, press and hold the button on your remote that you want to program. Hold for about two seconds until the motor unit’s lights flash or click.
- Test the Remote – Stand outside the garage and press the programmed button. The door should respond immediately.
- Repeat for Additional Remotes – You can pair up to seven devices (remotes, keypads, or smart controls) per opener.
If programming fails, wait 30 seconds and repeat. Ensure batteries are fresh and you're within range (under 10 feet during setup).
“Modern LiftMaster openers use frequency-hopping encryption, which means even if someone captures one signal, they can’t replicate it. Always reprogram all remotes after a power outage for optimal sync.” — David Reynolds, Certified Garage Systems Technician
Troubleshooting Common Issues
Even with careful steps, problems can arise. Here are frequent challenges and how to resolve them:
- Remote not working after programming: Replace the battery first. Test with another known-working remote to isolate the issue.
- Door only moves slightly then stops: Check safety sensors near the floor. Misalignment triggers auto-reverse.
- Multiple remotes fail simultaneously: Power cycle the opener by unplugging it for 30 seconds, then reprogram all remotes.
- Intermittent response: Interference from nearby electronics (routers, microwaves) may disrupt signals. Relocate such devices if possible.
Mini Case Study: Sarah’s Weekend Fix
Sarah returned from vacation to find her garage remote unresponsive. Her LiftMaster opener had a purple Learn button, indicating a newer model. She replaced the remote’s battery but still saw no results. After reading the manual, she realized a recent lightning storm might have reset the system. Following the standard programming steps—pressing Learn, then holding the remote button—she successfully re-paired the device in under two minutes. She then added her husband’s old remote as a backup, ensuring both cars were operational again before Monday morning.
Checklist: Preparing to Program Your Remote
Before starting, gather what you’ll need and confirm conditions are ideal:
- ✔ Fresh batteries for all remotes
- ✔ Ladder (to reach the motor unit)
- ✔ Working garage door opener (plugged in and powered)
- ✔ Compatible remote model verified
- ✔ Clear space around the door path
- ✔ Someone to assist with testing (optional but helpful)
- ✔ Owner’s manual or access to LiftMaster’s online support
This preparation reduces frustration and increases the likelihood of a smooth setup.
Advanced Tips for Long-Term Reliability
Beyond initial setup, maintaining your remote system ensures years of trouble-free operation. Consider these best practices:
- Label Each Remote: Use colored tape or labels to distinguish between vehicles or users.
- Keep a Spare Remote: Store a backup in your home safe or glove compartment for emergencies.
- Update Firmware (if applicable): Some Wi-Fi-enabled LiftMaster openers receive automatic updates via MyQ app integration.
- Limit Sun Exposure: Prolonged heat from direct sunlight can degrade remote casings and internal components.
For households with multiple vehicles, consider upgrading to a multi-car remote like the 893MAX, which consolidates functions and reduces clutter.
Frequently Asked Questions
Can I program a LiftMaster remote without the Learn button?
Yes, but only if it's a pre-1993 fixed-code model. Open the remote and the motor unit to reveal DIP switches. Set each switch identically on both devices. Aligning all eight switches correctly is critical for communication.
How many remotes can I program to one LiftMaster opener?
You can register up to seven devices total. This includes handheld remotes, keypad entries, and in-car smart controls. If you exceed this limit, older devices will be automatically removed.
Why does my remote work intermittently?
Intermittent performance usually points to low battery, physical obstructions, or radio frequency interference. Try replacing the battery and moving other wireless devices away from the opener. Also, verify that the antenna hanging from the motor unit is fully extended and undamaged.
Conclusion: Take Control of Your Garage Access Today
Programming your LiftMaster garage door remote is a simple task that enhances convenience, security, and daily efficiency. With the correct tools, a clear understanding of your model, and attention to detail, you can complete the process in minutes. Regular maintenance and smart usage habits extend the life of your system and prevent avoidable service calls. Don’t let a malfunctioning remote disrupt your routine—apply these steps today and enjoy seamless access to your garage.


 浙公网安备
33010002000092号
浙公网安备
33010002000092号 浙B2-20120091-4
Comments
No comments yet. Why don't you start the discussion?