
A well-fitted watch enhances both comfort and style. Yet many people struggle with bands that are too long, especially when first purchasing a new timepiece. While professional resizing is an option, it’s often unnecessary. With the right tools and technique, you can safely remove links from most metal watch bands at home. This guide walks through the entire process—covering preparation, execution, and post-adjustment care—so you can achieve a precise fit without risking damage to your watch.
Understanding Watch Band Types and Link Mechanisms
Before attempting to remove links, it's essential to identify your watch band type. Most metal bands fall into two categories: solid link bracelets (common on Rolex, Omega, or Seiko models) and folded link bracelets (often found on fashion watches). Solid link bands use small pins or screws to connect each link, while folded styles may use spring bars or rivets.
The key to safe removal lies in understanding whether your band uses push pins, threaded screws, or solid rivets. Push pins require force to drive out, whereas screw-type links unscrew with a precision tool. Using the wrong method can bend pins, strip threads, or scratch the case.
Essential Tools for Safe Link Removal
Attempting to remove links without proper tools increases the risk of slipping, scratching, or damaging the clasp mechanism. Here’s what you’ll need:
- Precision screwdriver set – For bands with screw-in pins.
- Watch link removal tool (pin press or punch) – Allows controlled pressure to push out pins.
- Hammer (nylon or rubber-tipped) – Only if using a manual punch; reduces impact shock.
- Soft jaw pliers or bench vise – To hold the band securely during work.
- Magnifying glass or loupe – Helps identify pin types and alignment.
- Micro tray or container – Keeps tiny screws and pins from getting lost.
“Using improper tools like nails or knives might save money short-term but often leads to irreversible cosmetic damage.” — Daniel Reeves, Master Watchmaker
Step-by-Step Guide to Removing Watch Links
Follow these steps carefully to avoid misalignment or deformation of the band.
- Determine how many links to remove. Wrap the watch around your wrist and count excess links. Remember: removing one link from each side maintains symmetry.
- Lay the watch face-down on a soft cloth. Protects the crystal and finish during handling.
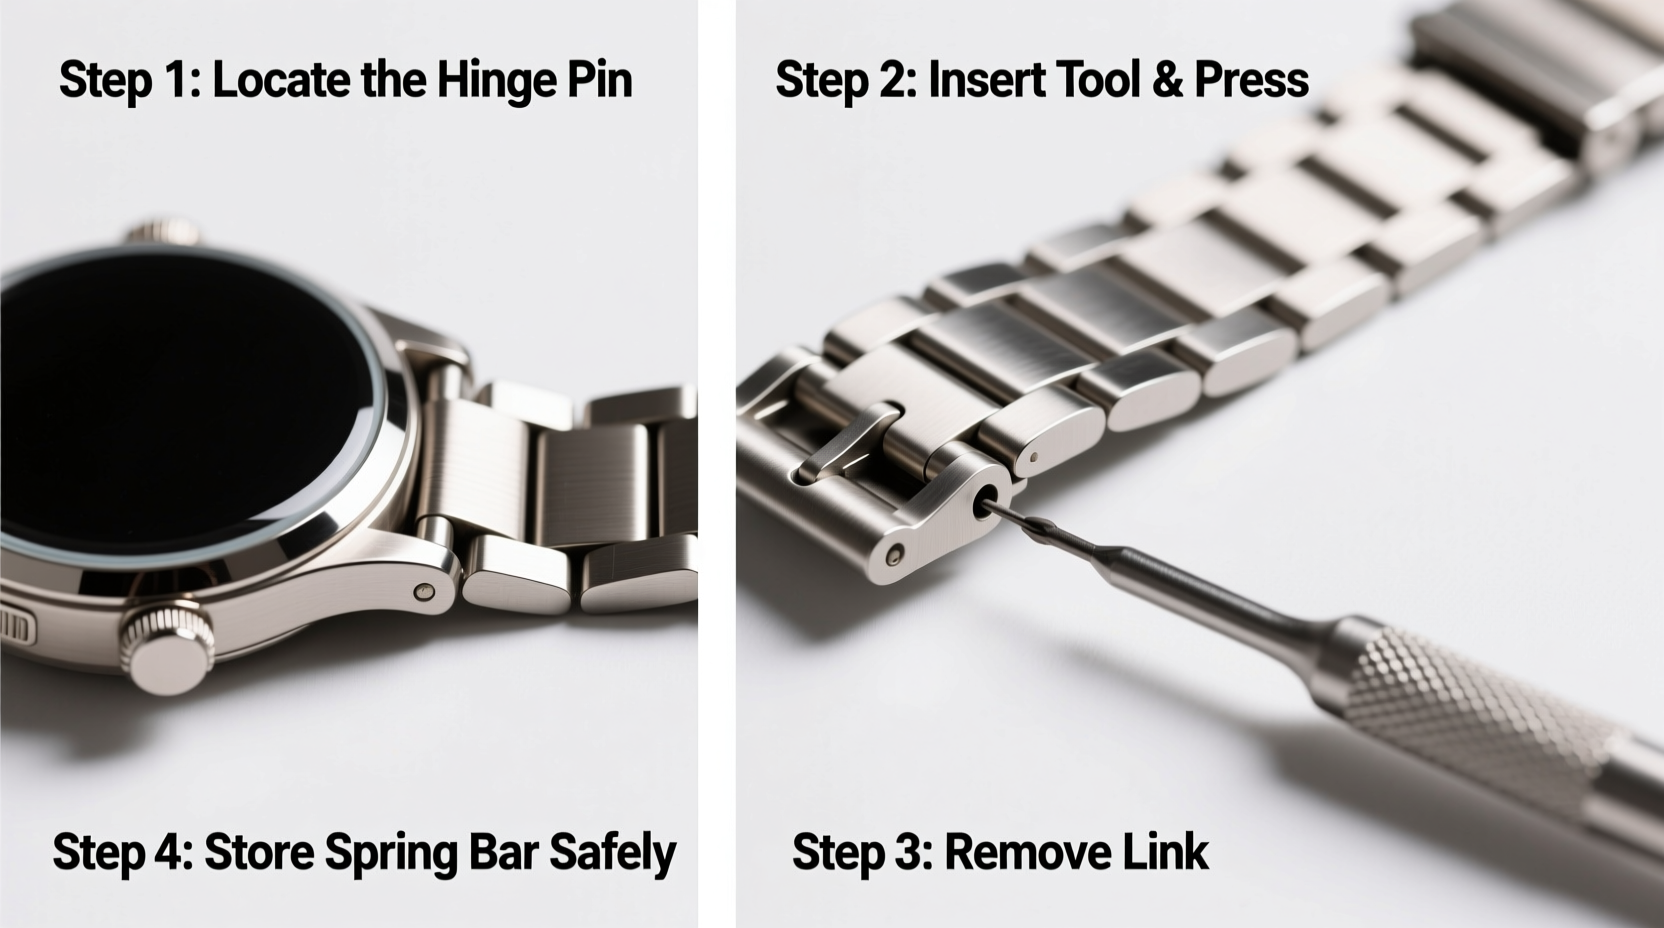
- Locate the pins or screws. Use a magnifier to inspect the inner side of the links. Look for arrows indicating removal direction.
- Secure the band. Place it in a padded vise or hold firmly with soft-jaw pliers to prevent movement.
- Align the punch tool with the pin. Insert the tip precisely into the exposed end of the pin. Do not angle the tool.
- Apply steady pressure. If using a pin press, turn the knob slowly. With a manual punch, tap gently with a rubber mallet. Stop once the pin clears the opposite side enough to pull out.
- Remove the pin completely. Use fine tweezers or needle-nose pliers to extract it fully.
- Detach the unwanted link(s). Slide them out carefully. Keep all removed pins and screws in a labeled container.
- Reconnect the remaining links. Align the holes and reinsert the pins. Tap gently until flush. For screw pins, tighten securely but do not over-torque.
- Test the fit and function. Fasten the clasp and wear the watch. Ensure smooth articulation and no snagging.
| Tool | Use Case | Caution |
|---|---|---|
| Screwdriver Set | Screw-type pins (e.g., Citizen, Casio) | Avoid metal tips that can scratch |
| Pin Press Tool | Push pins (e.g., stainless steel bands) | Don’t force; uneven pressure bends pins |
| Manual Punch & Hammer | Budget-friendly alternative | High risk of slippage; use only with experience |
| Tweezers / Pliers | Handling small components | Use non-magnetic, fine-tip versions |
Common Mistakes and How to Avoid Them
Even experienced DIYers make errors when adjusting watch bands. The most frequent issues include:
- Removing too many links at once: It’s easier to take off more than add back. Start conservatively—one or two links max.
- Using excessive force: Metal pins can be stubborn, but brute strength risks cracking the clasp or bending the bridge.
- Ignoring directional arrows: Pushing a pin the wrong way can jam internal mechanisms or damage retaining clips.
- Skipping cleaning after adjustment: Dust and debris introduced during work can affect clasp operation over time.
Real Example: Adjusting a Stainless Steel Seiko Bracelet
Mark purchased a Seiko 5 Sports SRPD77K1 and found the band draped over his slim wrist. He decided to remove three links—two from the sides and one from the center section near the clasp. Using a $25 pin press kit, he followed the arrow indicators on the inner links. By securing the band in a padded vise and applying gradual pressure, he successfully removed the pins without bending them. After reattaching the remaining links, he noticed the clasp closed smoothly and the watch sat flush against his wrist. Total time: 22 minutes.
Post-Adjustment Care and Maintenance
Once the band is resized, maintain its longevity with regular care. Clean the bracelet monthly with mild soapy water and a soft toothbrush, especially around the pin areas where sweat and oils accumulate. Dry thoroughly before wearing. Inspect pins every few months for looseness—tighten screw-type pins as needed.
If your band uses solid pins without threading, consider applying a drop of low-strength thread locker (like Loctite 222) to prevent gradual loosening from vibration and motion.
Frequently Asked Questions
Can I remove links from a gold-plated watch band?
Yes, but extra caution is required. Gold plating is thin and scratches easily. Always use plastic-tipped tools when possible and avoid metal-on-metal contact. Consider professional service if the band has significant value.
What if I can’t get the pin back in?
This usually happens due to misalignment. Recheck hole positioning and ensure the pin isn’t bent. Gently wiggle the adjacent links to realign the holes. Never hammer aggressively—this can deform the tube inside the link.
Do all watch bands allow link removal?
No. Some minimalist designs or integrated bracelets (like certain Apple Watch bands or fabric straps) aren’t designed for resizing. Leather, nylon, and silicone bands typically use multiple holes or buckles instead of removable links.
Final Checklist Before You Begin
- Preparation
- ✔ Identify band type and pin mechanism
- ✔ Gather correct tools
- ✔ Work in a clean, well-lit area
- During Adjustment
- ✔ Follow directional arrows
- ✔ Apply even, controlled pressure
- ✔ Store removed pins safely
- After Completion
- ✔ Test clasp security
- ✔ Clean and dry the band
- ✔ Verify comfort and alignment
Conclusion
Resizing a watch band doesn’t require a trip to the jeweler or a hefty service fee. With patience and the right approach, you can achieve a custom fit that feels natural and looks professional. Whether you're tailoring a gift or fine-tuning your daily wearer, mastering link removal empowers you to maintain your timepieces with confidence. Take your time, respect the mechanics, and enjoy the satisfaction of a job done right.


 浙公网安备
33010002000092号
浙公网安备
33010002000092号 浙B2-20120091-4
Comments
No comments yet. Why don't you start the discussion?