
Every holiday season, millions of households face the same frustrating ritual: plugging in a string of Christmas lights only to find it completely dark—despite looking intact. A single flickerless bulb, a barely visible hairline crack in the glass, or even a loose connection inside a socket can render dozens—or hundreds—of lights useless. This isn’t faulty manufacturing or bad luck. It’s physics, circuit design, and decades of cost-driven engineering converging in your living room. Understanding why this happens—and how to diagnose and resolve it—isn’t just about convenience. It’s about saving time, reducing seasonal stress, extending the life of your lights, and avoiding unnecessary replacements that contribute to electronic waste.
The Physics Behind the Failure: Why One Bulb Breaks the Whole Chain
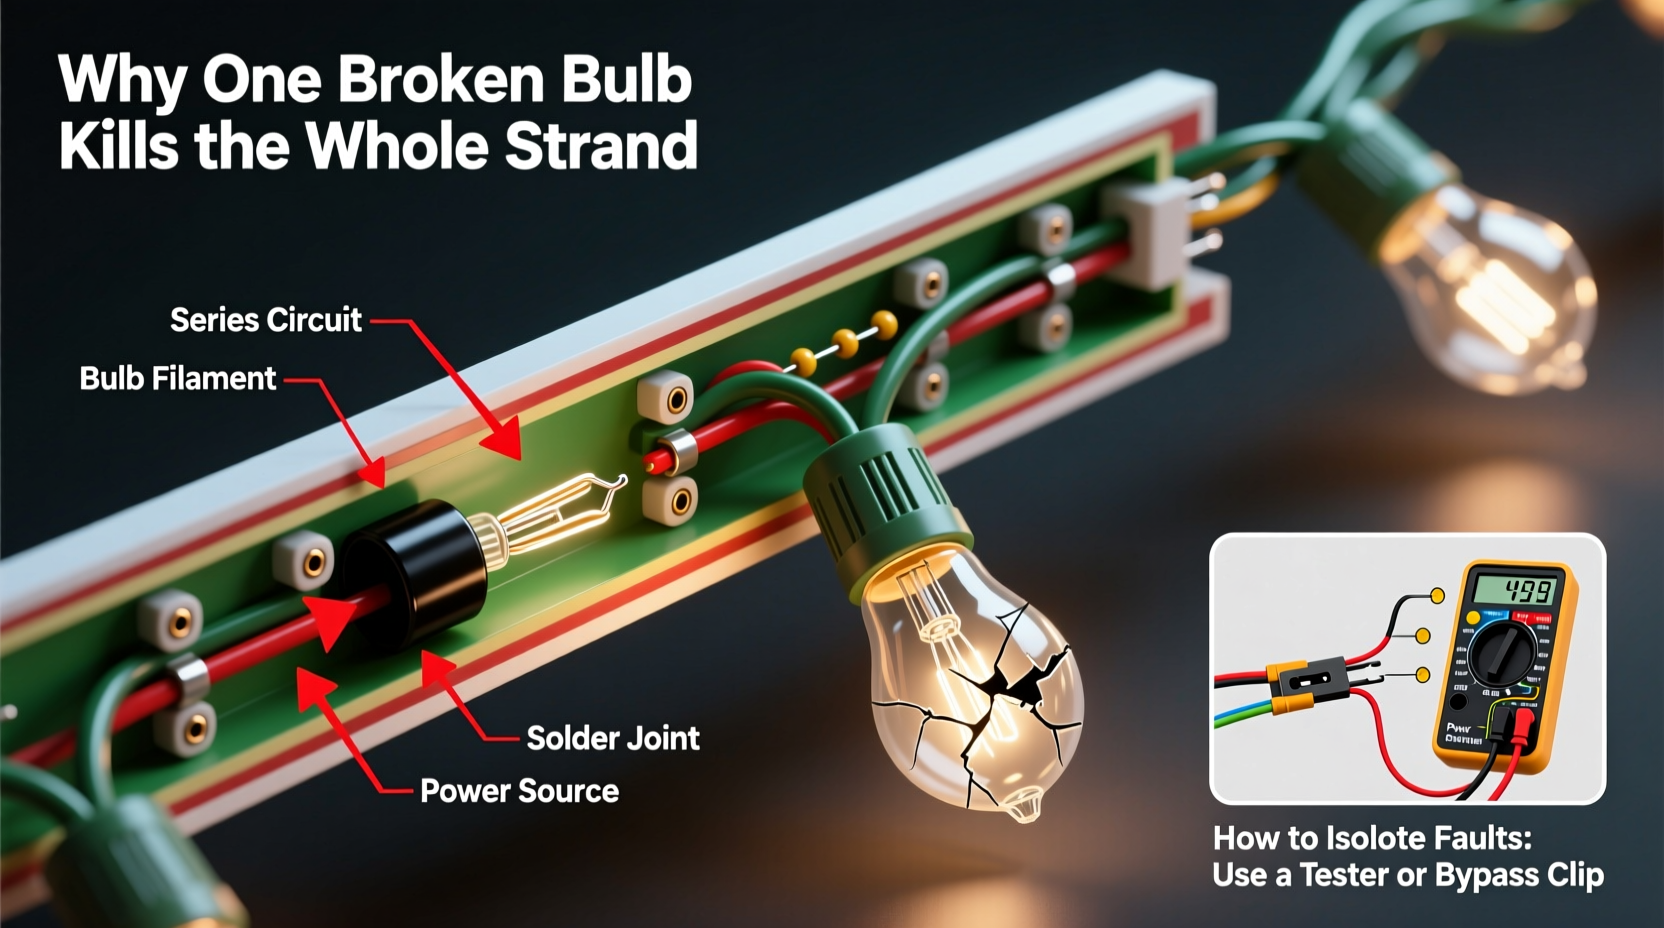
Most traditional incandescent mini-light strands (the kind with 50, 100, or 150 bulbs) are wired in series—not parallel. In a series circuit, electricity flows through each bulb in sequence: from the plug, into bulb #1, out of bulb #1 into bulb #2, and so on, until it returns to the outlet. There is no alternate path. If any point along that single conductive path is interrupted—by a broken filament, a corroded contact, or a detached wire—the current stops entirely. No current means no light, anywhere downstream.
This design wasn’t chosen for reliability—it was chosen for simplicity, low cost, and voltage distribution. Household outlets supply 120 volts AC. A 50-bulb strand divides that voltage roughly evenly: ~2.4 volts per bulb. That allows manufacturers to use inexpensive, low-voltage filaments. But it also means the entire system hinges on continuity. Modern LED strands often use hybrid wiring—segments of series-connected LEDs grouped in parallel—but many still rely on series sub-circuits within each section. A failed shunt (a tiny bypass device inside the bulb base) or open circuit in one segment can still disable that whole group.
Crucially, most mini-lights include “shunt wires” inside the bulb base—thin nickel-chromium strips designed to activate when the filament burns out. When the filament breaks, arcing heats the shunt, causing it to melt and bridge the gap, restoring continuity. But shunts fail too: they can oxidize, corrode, or never activate if the break is too clean or the voltage too low during testing. That’s why a dead bulb doesn’t always cause total failure—but when it does, it’s usually because the shunt didn’t engage.
How to Isolate Faults: A Practical Step-by-Step Diagnostic Process
Replacing bulbs at random rarely works. Success comes from methodical isolation. Follow this field-tested sequence—no special tools required beyond a working outlet, a known-good replacement bulb, and patience.
- Verify the power source: Plug another device (e.g., a lamp) into the same outlet to rule out tripped breakers or GFCI issues.
- Inspect the plug and cord: Look for cuts, kinks, or melted insulation near the plug. Wiggle the plug gently while the strand is powered—if lights flicker, the issue is likely internal to the plug or first few inches of wire.
- Check the fuse (if present): Many older strands have a small removable fuse cartridge inside the plug housing. Use needle-nose pliers to extract it and inspect the thin wire inside. If broken, replace with an identical amperage fuse (usually 3A or 5A). Never substitute with foil or wire.
- Divide and conquer: Unplug the strand. Starting at the *end opposite the plug*, remove one bulb. Insert a known-working bulb (or use a bulb tester—see below). If the strand lights, the fault lies *between that socket and the plug*. If it remains dark, move toward the plug and repeat—removing and testing every 5–10 bulbs—until you locate the non-responsive socket.
- Test the suspect socket: With the bulb removed, insert a bulb tester (or carefully use a multimeter on continuity mode) across the two contacts inside the socket. No continuity indicates a broken wire, corroded spring contact, or damaged socket housing.
This process typically takes 8–15 minutes for a 100-light strand—and nearly always identifies the precise failure point. Resist the urge to skip steps: assuming the first bulb is faulty leads to wasted time and missed root causes like pinched wires inside the plug casing.
Bulb Testers, Multimeters, and Low-Tech Alternatives
A dedicated bulb tester—a handheld device with two spring-loaded probes and an internal battery-powered circuit—is the fastest way to verify both bulb and socket integrity. Press the probes into the bulb’s base contacts: a green LED confirms continuity and shunt functionality. Without one, a digital multimeter set to continuity (or Ω) mode works well: touch probes to the bulb’s metal base and tip. A reading near zero ohms indicates a closed circuit; “OL” (open loop) means the filament or shunt is broken.
For those without tools, the “paperclip bypass” method works cautiously: unplug the strand, straighten a paperclip, and gently insert its ends into the suspect socket’s contacts to bridge the circuit. Then plug in the strand. If the rest of the strand lights, the bulb was faulty—or the socket contacts were bent and needed reseating. Warning: Never perform this with the strand plugged in. Never force metal into plastic sockets—it can crack them.
LED strands add complexity: many use rectifier diodes and constant-current drivers. A single LED failure may not break the circuit, but a failed driver chip or capacitor will. If half the strand glows dimly or erratically, suspect driver failure—not individual bulbs. In such cases, repair is rarely economical; replacement is advised unless you’re experienced with micro-soldering.
Do’s and Don’ts of Christmas Light Maintenance & Repair
| Action | Do | Don’t |
|---|---|---|
| Storing Lights | Wind loosely around a cardboard tube or use a light-reel organizer; store in climate-controlled space. | Wrap tightly around a box or bundle haphazardly—causes wire kinks and socket stress. |
| Cleaning Bulbs | Wipe gently with a dry microfiber cloth; use isopropyl alcohol on stubborn grime (only on glass, not plastic). | Soak bulbs in water or use abrasive cleaners—damages coatings and seals. |
| Replacing Bulbs | Match voltage, wattage, and base type exactly; test new bulb before inserting. | Use higher-wattage bulbs for “brighter” effect—overloads circuit and risks fire. |
| Troubleshooting | Label faulty sections with tape as you go; document which sockets were tested. | Force bulbs into tight sockets—bends contacts and breaks solder joints. |
| Safety | Always unplug before handling; inspect cords annually for cracks or exposed copper. | Repair damaged cords with electrical tape alone—use heat-shrink tubing or replace the entire cord. |
Real-World Case Study: The “Ghost Socket” in a 20-Year-Old Strand
Mark, a facilities manager in Vermont, inherited his parents’ vintage 1978 Noma C7 strand—120 warm-white incandescents, hand-strung on cloth-covered wire. For years, it worked flawlessly on their porch. Last December, it went dark. He tried all standard fixes: replaced fuses, swapped bulbs, checked outlets. Nothing worked. Frustrated, he brought it to a local electrician who spotted something subtle: the third socket from the plug had a hairline fracture in its ceramic base—so fine it was invisible without magnification. More critically, the internal brass contact spring had lost tension after decades of thermal expansion cycles, creating intermittent contact. When Mark wiggled the plug, the strand would flash briefly—confirming an intermittent fault. The electrician used a jeweler’s loupe and replaced only that socket with a modern ceramic equivalent, then re-tensioned the spring with fine-nosed pliers. Total repair time: 12 minutes. Cost: $1.75 for the socket. The strand has lit every night since.
This case underscores two key truths: first, age-related material fatigue—not just bulb failure—causes many “mystery outages.” Second, targeted intervention beats wholesale replacement when you understand where and how to look.
“Over 85% of ‘dead’ light strands we examine in our repair clinic have just one primary fault point—often hidden in plain sight. The real problem isn’t the technology; it’s the assumption that ‘all-or-nothing’ means ‘all bulbs are suspect.’ Precision diagnosis saves money, time, and landfill waste.” — Rafael Torres, Founder, Holiday Circuit Labs (certified lighting technician since 1994)
Frequently Asked Questions
Why do some strands stay lit even with a dead bulb?
Because the shunt inside that bulb successfully activated when the filament broke, creating a bypass path. Shunts work reliably in newer bulbs but degrade with moisture, heat cycling, and age. If multiple bulbs in a strand have failed but the strand stays lit, the shunts are still functional—but the strand is operating at higher voltage per remaining bulb, accelerating further failures.
Can I cut and splice a broken section of wire?
Yes—but only if you use proper waterproof, UL-listed wire nuts or heat-shrink butt connectors rated for outdoor use, and fully insulate the joint. Never use tape alone. For indoor-only strands, solder + heat-shrink is acceptable. However, cutting interrupts the factory-sealed circuit design; if the break occurs near a socket, replacing the entire socket assembly is safer and more reliable than splicing.
Are LED strands really more reliable—or just different failure modes?
LED strands last longer *overall* (25,000+ hours vs. 3,000 for incandescents), but their failure modes are less intuitive. Instead of one dead bulb, you get sections going dark, color shifts, or flickering—all pointing to driver board issues, poor surge protection, or incompatible dimmer switches. They’re more energy-efficient and cooler-running, but diagnosing requires understanding electronics, not just bulbs.
Conclusion: Master the Circuit, Not Just the Bulbs
Christmas lights aren’t disposable novelties—they’re engineered electrical systems operating under real-world conditions: temperature swings, moisture, physical stress, and voltage fluctuations. When an entire strand fails, it’s rarely random. It’s a signal: a filament fractured, a shunt oxidized, a socket fatigued, or a wire nicked during storage. Treating the symptom—replacing bulbs—without investigating the cause guarantees recurrence. But applying systematic diagnostics transforms frustration into competence. You’ll spend less, waste less, and gain quiet confidence knowing that behind every glowing strand is a circuit you understand, maintain, and respect. Start this season not by buying new lights, but by auditing last year’s strands: test each bulb, inspect every socket, label weak points, and store with intention. That single hour of attention pays dividends for years—and turns a seasonal chore into a meaningful, sustainable tradition.


 浙公网安备
33010002000092号
浙公网安备
33010002000092号 浙B2-20120091-4
Comments
No comments yet. Why don't you start the discussion?