
Candles are more than just sources of light—they create ambiance, evoke memories, and enhance well-being. Yet nothing disrupts the experience quite like a candle that burns unevenly, forming a deep hole down the center while wax clings stubbornly to the edges. This phenomenon, known as \"candle tunneling,\" is frustrating and wasteful. It shortens burn time, diminishes fragrance throw, and often leaves behind perfectly good wax you can't access. The good news? Tunneling isn’t inevitable. With the right knowledge and habits, you can prevent it—and even reverse it—permanently.
The Science Behind Candle Tunneling
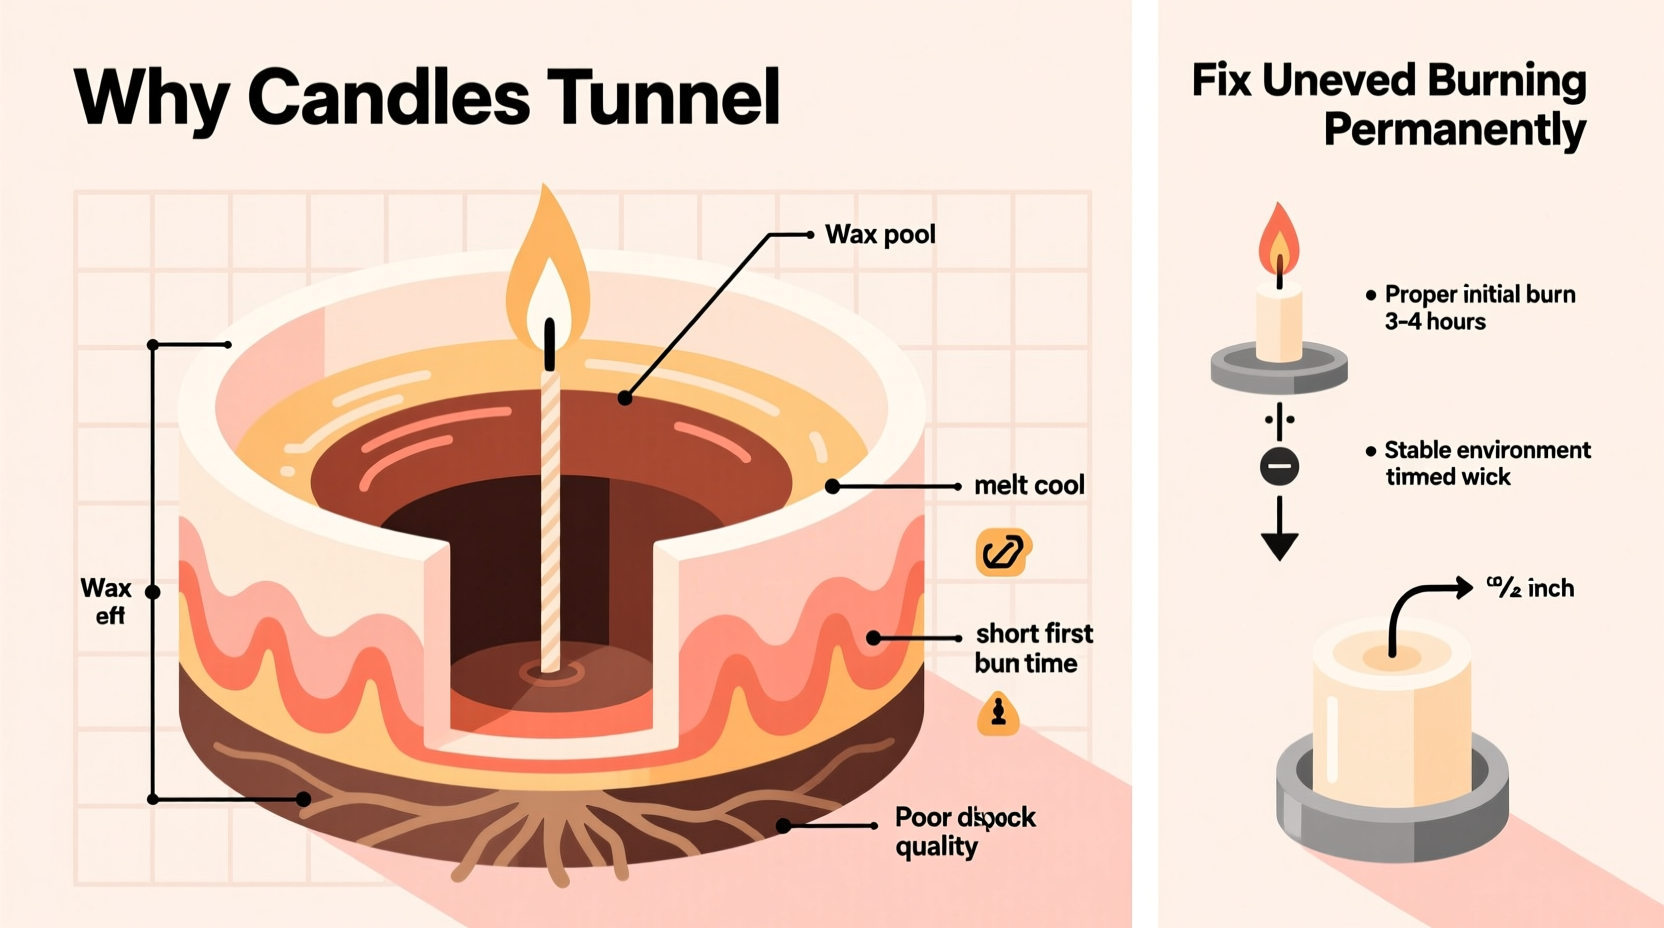
Candle tunneling occurs when the flame only melts wax in a narrow column around the wick, leaving a thick ring of unburned wax along the container’s sides. This happens because wax has a \"memory.\" The first burn sets the pattern for all future burns. If the initial melt pool doesn’t reach the edges of the container, subsequent burns will follow the same shallow path, deepening the tunnel over time.
The root cause lies in incomplete liquefaction during early burns. When a candle is lit for too short a period, heat doesn’t have enough time to spread evenly across the surface. The wax near the wick melts quickly, but the outer layers remain solid. Over time, this creates a well-like cavity, trapping usable wax and reducing the candle’s lifespan by up to 50%.
“Candle wax remembers its first melt. Get that burn right, and you set the stage for clean, even performance throughout its life.” — Dr. Lena Peterson, Materials Scientist & Candle Formulation Consultant
Common Causes of Uneven Burning
Tunneling rarely stems from a single mistake. More often, it’s the result of repeated small oversights. Understanding these causes is the first step toward prevention.
- Under-burning: Lighting a candle for less than one hour per inch of diameter prevents full melt pool formation.
- Poor wick selection: A wick that’s too thin won’t generate enough heat to spread across the surface.
- Low-quality wax blends: Paraffin-heavy or improperly cured soy blends may not flow evenly when melted.
- Drafty environments: Air currents cause flickering flames, leading to inconsistent heat distribution.
- Container material: Thick glass or ceramic retains cold, slowing side-wall melting.
How to Fix an Already-Tunneled Candle
If your candle has already started tunneling, don’t discard it. You can rehabilitate it with patience and the right method. The goal is to retrain the wax memory by encouraging a full melt pool.
Step-by-Step Guide: Rescuing a Tunneled Candle
- Trim the wick to 1/4 inch to ensure a controlled, steady flame.
- Wrap aluminum foil around the rim of the container, leaving an opening over the wick to allow oxygen flow. This reflects heat back into the sides.
- Light the candle and let it burn for 2–4 hours, checking every 30 minutes.
- Monitor the melt pool. Once liquid wax reaches the edges, extinguish the flame safely.
- Repeat if necessary. Deep tunnels may require 2–3 correction burns.
This method works best with container candles made from natural waxes like soy or coconut blends. For pillar or taper candles, gently warming the exterior with a hairdryer (on low) before lighting can help initiate even melting.
Preventing Tunneling Before It Starts
Prevention is simpler and more effective than correction. By establishing good burning habits from day one, you eliminate the risk of tunneling entirely.
Best Practices for First-Time Burns
- Burn for at least 1 hour per inch of candle diameter (e.g., a 3-inch candle needs 3 hours).
- Aim for a melt pool depth of 1/4 to 1/2 inch before extinguishing.
- Avoid burning for more than 4 consecutive hours to prevent overheating.
- Keep candles away from vents, fans, and open windows.
Wax Type Comparison: Tunneling Risk by Material
| Wax Type | Tunneling Risk | Why | Best Prevention Strategy |
|---|---|---|---|
| Soy Wax | Medium | Natural shrinkage; requires longer first burn | Burn 3–4 hours minimum on first use |
| Paraffin Wax | High | Rigid structure resists edge melting | Foil-wrap method recommended |
| Coconut-Blend Wax | Low | Excellent hot throw and even melt | Proper wick trimming sufficient |
| Beeswax | Very Low | Dense, self-trimming wick behavior | Minimal intervention needed |
Real-World Example: Sarah’s Scented Candle Recovery
Sarah bought a premium 14-ounce soy candle in a wide mason jar. Excited to try it, she lit it during dinner—one hour. The next night, another hour. After a week, she noticed a growing tunnel nearly an inch deep, with hardened wax walls trapping over half the candle.
Following online advice, she trimmed the wick, wrapped foil around the rim, and burned it for three hours. On the second attempt, the melt pool finally reached the edges. She continued proper burning habits thereafter. Not only did the candle stop tunneling, but its scent throw improved dramatically. She ended up using 95% of the wax—far more than the estimated 40% she would have accessed otherwise.
Sarah’s experience underscores a key truth: tunneling is reversible when addressed early and consistently.
Expert Tips for Permanent, Even Burning
Maintaining even combustion isn’t just about the first burn—it’s an ongoing practice. These advanced strategies ensure long-term success.
Wick Maintenance Matters
A poorly maintained wick leads to weak flames and poor heat dispersion. Always trim the wick before each use. A mushroomed or elongated wick produces a smoky, erratic flame that fails to radiate heat outward.
Use Heat Reflectors Strategically
For stubborn containers or thick-walled vessels, consider placing the candle on a heat-resistant plate or trivet. This helps retain ambient warmth and promotes lateral melting. Alternatively, pre-warm the candle slightly in a warm room before lighting—never in direct sunlight or a microwave.
Rotate Multiple Candles
If you own several candles, rotate them rather than finishing one at a time. This allows each candle to cool completely between uses, preventing thermal stress and promoting consistent crystallization of wax.
Store Candles Properly
Exposure to temperature swings and UV light alters wax composition. Store unused candles in a cool, dark place between 60–75°F (15–24°C). Avoid attics, garages, or windowsills where heat fluctuates.
“Most tunneling issues stem from user error, not product flaws. Educating consumers on burn times could reduce waste by millions of pounds annually.” — Marcus Tran, Sustainable Candle Manufacturer
Checklist: Achieve Perfect Candle Burns Every Time
- ✅ Burn for 1 hour per inch of diameter on first use
- ✅ Trim wick to 1/4 inch before each lighting
- ✅ Ensure melt pool reaches container edges within first few hours
- ✅ Keep away from drafts and airflow
- ✅ Use foil wrap technique if tunneling begins
- ✅ Limit continuous burn time to 4 hours max
- ✅ Store candles in stable, cool environments
- ✅ Rotate usage among multiple candles
Frequently Asked Questions
Can I fix a severely tunneled candle?
Yes. Even deeply tunneled candles can be rescued using the foil-wrap method. It may take two or three extended burns to fully correct, but most retain their functionality if the wick remains centered and undamaged.
Does candle size affect tunneling risk?
Absolutely. Larger-diameter candles require longer initial burns to achieve full melt pools. A 4-inch wide candle needs at least 4 hours on its first burn—shorter durations almost guarantee tunneling.
Are certain wicks better for preventing tunneling?
Cotton and wood wicks generally perform better than zinc-core or synthetic varieties. Flat braided cotton wicks provide steady, broad flames ideal for even heating. For wide containers, dual wicks are often necessary to distribute heat effectively.
Conclusion: Take Control of Your Candle Experience
Tunneling doesn’t have to be the fate of your favorite candles. Armed with the right knowledge, you can enjoy clean, complete burns from the very first light to the last flicker. The key lies in respecting wax memory, committing to proper burn times, and maintaining your candles like the delicate home essentials they are.
By applying these techniques—especially the critical first burn—you’ll extend candle life, maximize fragrance output, and reduce waste. Whether you’re lighting a birthday candle or setting a mood with a luxury diffuser, consistency is everything.


 浙公网安备
33010002000092号
浙公网安备
33010002000092号 浙B2-20120091-4
Comments
No comments yet. Why don't you start the discussion?