
Baking bread at home should be a rewarding experience—golden crust, soft crumb, the aroma of fresh yeast filling your kitchen. But when your dough refuses to rise, it’s not just disappointing; it can feel like a mystery with no solution. The truth is, many factors influence dough development, from ingredient quality to environmental conditions. Understanding these elements is key to mastering consistent, reliable rises. Whether you're a beginner or have been baking for years, this guide breaks down the most common reasons behind failed fermentation and offers actionable fixes so your next loaf turns out perfectly risen and delicious.
Understanding the Science Behind Dough Rising
Dough rises because of fermentation—a biological process driven by yeast. When active dry or fresh yeast is mixed with warm water and food (usually sugar or starch from flour), it consumes those carbohydrates and releases carbon dioxide gas and alcohol. The gas gets trapped in the elastic gluten network formed during kneading, causing the dough to expand. This process doesn’t happen automatically; it requires specific conditions to thrive.
Yeast is a living organism, sensitive to temperature, moisture, pH levels, and nutrient availability. If any of these are off, fermentation slows or stops entirely. For example, water that's too hot kills yeast, while cold water fails to activate it. Similarly, salt added directly to yeast can inhibit its activity due to osmotic pressure. These small details often make the difference between a light, airy loaf and a dense brick.
“Fermentation isn’t magic—it’s microbiology. Treat your yeast well, and it will reward you with flavor and volume.” — Dr. Laura Chen, Food Microbiologist and Artisan Baker
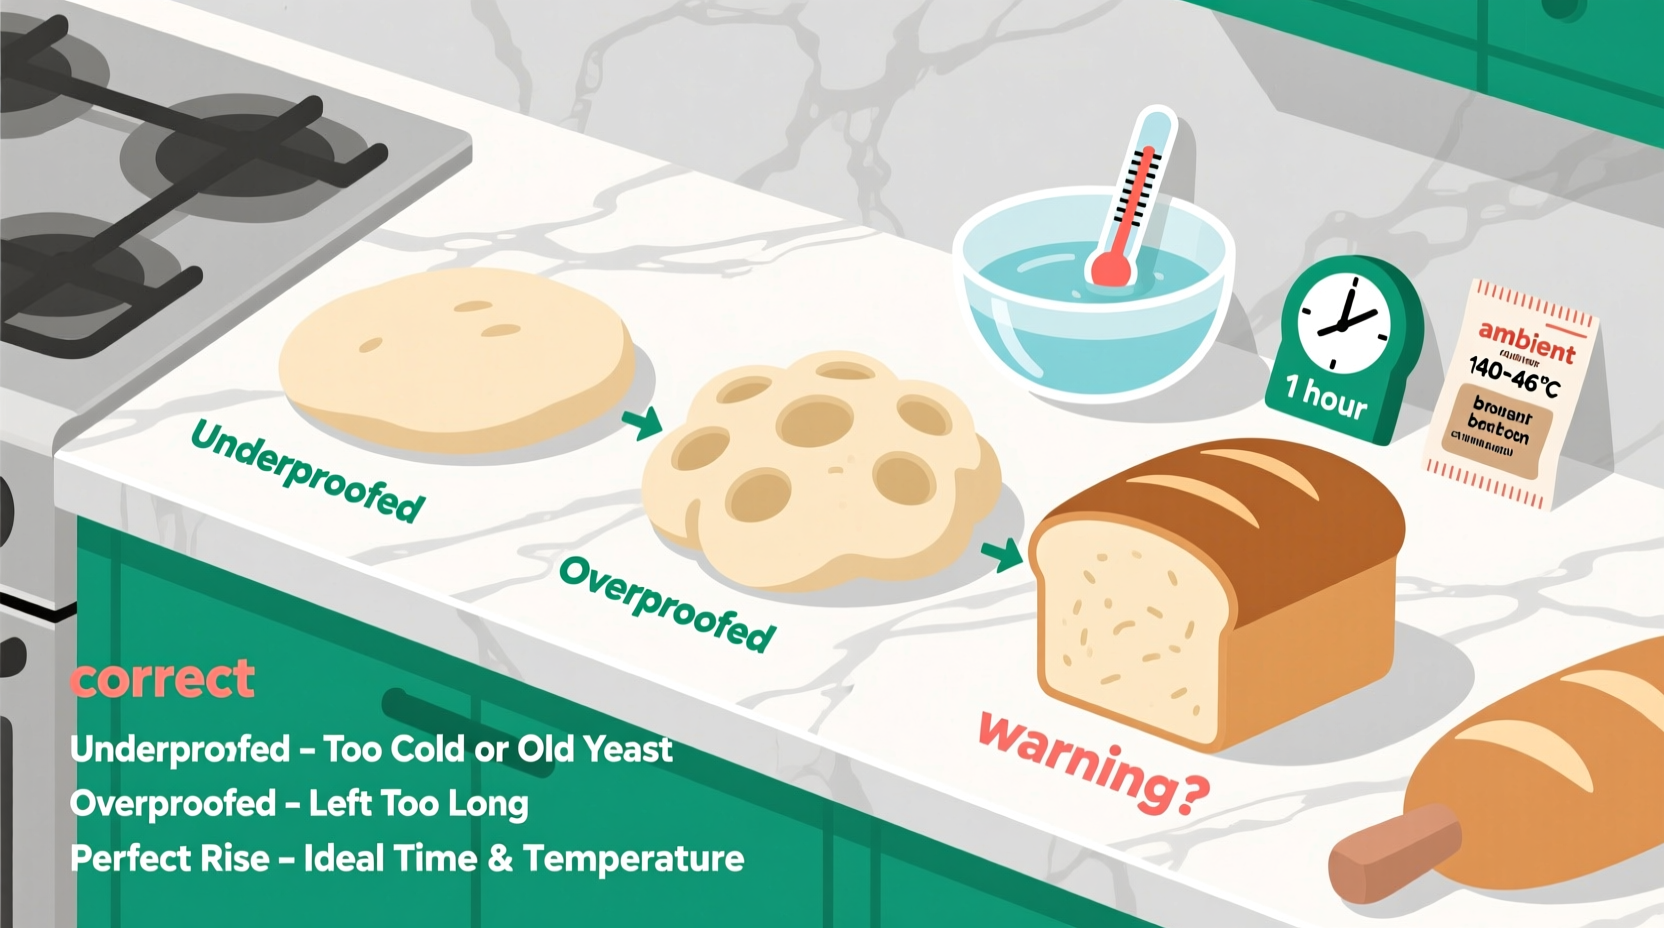
Common Causes of Poor Dough Rise (and How to Fix Them)
1. Inactive or Dead Yeast
The most frequent culprit behind flat dough is inactive yeast. Yeast has a shelf life and loses potency over time, especially if stored improperly. Expired yeast won’t produce enough gas to leaven dough. To test if your yeast is still alive, perform a “proofing” test:
Using water outside the ideal range (too hot or too cold) also affects viability. Water above 130°F kills yeast instantly. Below 95°F, activation is sluggish. Use a thermometer for accuracy—your oven or tap may not deliver consistent temperatures.
2. Incorrect Flour Type or Quality
Not all flours behave the same. Bread flour contains more protein (12–14%) than all-purpose flour (8–11%), which means it forms stronger gluten networks capable of trapping more gas. Using cake flour or low-protein blends results in weak structure and poor rise.
Additionally, old or improperly stored flour can lose its ability to support fermentation. Moisture exposure leads to mold or insect infestation, while prolonged storage degrades starch quality. Store flour in airtight containers in a cool, dark place—and consider freezing whole grain flours to extend shelf life.
3. Temperature Extremes During Proofing
Fermentation speed depends heavily on ambient temperature. Ideal rising occurs between 75°F and 80°F. Cooler environments slow yeast activity dramatically—overnight bulk fermentation in the fridge is fine, but same-day proofing in a cold kitchen may take twice as long.
Conversely, overheated spaces (like near radiators or ovens) can create uneven rises or kill yeast. A cold countertop or drafty room prevents consistent warmth. Solutions include placing the bowl in a turned-off oven with a bowl of hot water, using a proofing box, or wrapping the bowl in a towel soaked in warm water.
4. Over- or Under-Kneading the Dough
Kneading develops gluten—the protein matrix that traps CO₂. Too little kneading leaves the structure weak, allowing gas to escape. Too much damages the gluten, making it tight and less elastic. Both result in poor expansion.
The windowpane test is the best way to assess gluten development: stretch a small piece of dough between your fingers. If it forms a thin, translucent membrane without tearing, it’s ready. If it breaks easily, keep kneading.
5. Imbalanced Ingredient Ratios
Too much salt inhibits yeast; too much sugar feeds it but can create osmotic stress if over 10% of flour weight. Fats like butter or oil enrich texture but slow fermentation by coating gluten strands. While acceptable in moderation, excessive fat delays rise times significantly.
Always follow recipes closely when troubleshooting. Deviations—even seemingly minor ones like extra salt or substituting honey for sugar—can disrupt microbial balance.
Troubleshooting Checklist: Why Isn’t My Dough Rising?
Use this checklist to diagnose and correct rising problems step-by-step:
- ✅ Is the yeast fresh and within expiration date?
- ✅ Did I proof the yeast successfully before mixing?
- ✅ Was the water temperature between 105°F and 110°F?
- ✅ Am I using bread flour or another high-gluten option?
- ✅ Is the room warm enough (75–80°F)?
- ✅ Have I kneaded sufficiently (passed the windowpane test)?
- ✅ Are salt and sugar proportions balanced?
- ✅ Is the dough covered to prevent drying out?
- ✅ Has sufficient time been allowed for both bulk and final rise?
- ✅ Is my oven properly preheated for baking? (A weak initial oven spring indicates poor prior fermentation.)
Step-by-Step Guide to Guarantee a Successful Rise
Follow this methodical approach to eliminate variables and ensure optimal conditions for yeast activity:
- Check Your Ingredients: Open new yeast if unsure. Measure flour accurately using the spoon-and-level method (don’t scoop directly).
- Activate the Yeast: Dissolve yeast and a pinch of sugar in warm water. Wait 5–10 minutes until bubbly and frothy.
- Mix Gently: Combine wet and dry ingredients. Add salt separately after yeast activation to avoid direct contact.
- Knead Until Elastic: By hand (10–15 min), mixer (6–8 min), or through stretch-and-fold techniques during bulk fermentation.
- First Rise (Bulk Fermentation): Place dough in an oiled bowl, cover with damp cloth or plastic wrap, and let rise in a warm spot until doubled (~1–2 hours).
- Punch Down & Shape: Gently deflate, shape into loaf or rolls, then place in pan or on tray.
- Second Rise (Proofing): Allow shaped dough to rise again until puffy (30–60 min). Don’t skip this step—even quick breads benefit from final proofing.
- Bake Immediately After Proofing: Preheat oven thoroughly. Sudden heat causes “oven spring,” the final burst of rise before crust sets.
Do’s and Don’ts: What Helps (and Hurts) Dough Rise
| Do’s | Don’ts |
|---|---|
| Use lukewarm water (105–110°F) to activate yeast | Use boiling or ice-cold water |
| Store yeast in the freezer for long-term freshness | Leave yeast in a hot pantry or humid cabinet |
| Allow adequate time for each rise stage | Rush the process with excessive heat |
| Cover dough to retain moisture and warmth | Leave dough exposed to dry air |
| Use a digital thermometer to verify temps | Guess water or room temperature |
| Test gluten development with the windowpane test | Assume kneading time alone determines readiness |
Real Example: Sarah’s Sourdough Struggles
Sarah had been trying to bake sourdough for months. Her starter bubbled nicely, but her loaves remained dense and flat. She followed online recipes exactly, yet nothing worked. After reviewing her process, she realized three issues: her kitchen averaged 65°F in winter, she used all-purpose flour exclusively, and she was shaping the dough immediately after mixing instead of allowing bulk fermentation.
She adjusted by moving the bowl to a warmed oven with a tray of hot water, switching to bread flour, and extending her first rise to 4 hours. On her next attempt, the dough doubled properly, held shape, and rose beautifully in the oven. The change wasn’t one big fix—it was addressing multiple subtle flaws simultaneously.
Frequently Asked Questions
Can I rescue dough that hasn’t risen?
Yes, in most cases. If the dough hasn’t risen due to cold temperatures, move it to a warmer area and give it more time. If the yeast was dead, you can mix in a new batch of activated yeast (½ tsp instant yeast + 1 tbsp warm water), work it into the dough, and restart fermentation. Avoid adding too much yeast, which can create off-flavors.
How long should dough take to rise?
Typically 1–2 hours at room temperature (75–80°F). Cooler rooms extend this to 3+ hours. Some artisan methods use overnight refrigerated fermentation (12–18 hours), which enhances flavor. The key is visual cues: the dough should nearly double and bounce back slowly when poked.
Why did my dough rise but collapse in the oven?
This usually means over-proofing. If dough proofs too long, the gluten structure weakens and can’t support expansion under heat. The gas escapes suddenly, causing deflation. Stick to recommended times and use the finger poke test: gently press the dough. If the indentation springs back slowly, it’s ready. If it stays indented, it’s over-proofed.
Final Tips for Consistent Success
Consistency comes from control. Track your environment, measure ingredients precisely, and respect fermentation timelines. Keep a baking journal noting room temperature, rise duration, and outcomes. Over time, patterns emerge that help refine your technique.
Also, don’t underestimate the value of patience. Bread-making is part science, part rhythm. Rushing stages undermines the entire process. Let the dough tell you when it’s ready—not the clock alone.
“Good bread takes time. There’s no substitute for understanding what happens between mixing and baking.” — Ken Forkish, Author of *The Elements of Pizza* and Founder of Ken’s Artisan Bakery
Conclusion: Take Control of Your Dough’s Destiny
Your bread dough doesn’t rise because something is missing or interfering—not because you’re doing everything wrong. With attention to yeast health, temperature, flour quality, and technique, you can diagnose and resolve nearly every rising issue. Apply the checklist, follow the step-by-step guide, and learn from real-world examples like Sarah’s journey. Each loaf brings you closer to mastery.


 浙公网安备
33010002000092号
浙公网安备
33010002000092号 浙B2-20120091-4
Comments
No comments yet. Why don't you start the discussion?