
Sourdough bread with an open, airy crumb is one of the most satisfying achievements in home baking. Yet, many bakers struggle with consistently dense loaves—loaves that feel heavy, lack volume, or have a tight, cake-like texture. The good news? Dense sourdough is rarely due to a single mistake. It’s usually the result of several subtle factors stacking up over the entire process, from starter health to shaping technique. Understanding these elements—and adjusting them systematically—is the key to transforming your loaf from compact to cloud-like.
The Science Behind Airy Sourdough Crumb
An airy crumb structure depends on three critical components: gas production, gluten development, and oven spring. During fermentation, wild yeast in your sourdough starter consumes carbohydrates in the flour and produces carbon dioxide. This gas gets trapped in a strong gluten network formed during mixing and bulk fermentation. When the dough hits the hot oven, the gases expand rapidly (oven spring), creating large, irregular holes characteristic of artisan sourdough.
If any part of this system fails—weak starter, underdeveloped gluten, insufficient fermentation, or poor heat transfer—the bread collapses into density. Fixing it isn’t about one magic trick; it’s about refining each step for optimal synergy.
“Great sourdough isn’t made in the oven—it’s made during the 18 hours before it gets there.” — Ken Forkish, author of *Flour Water Salt Yeast*
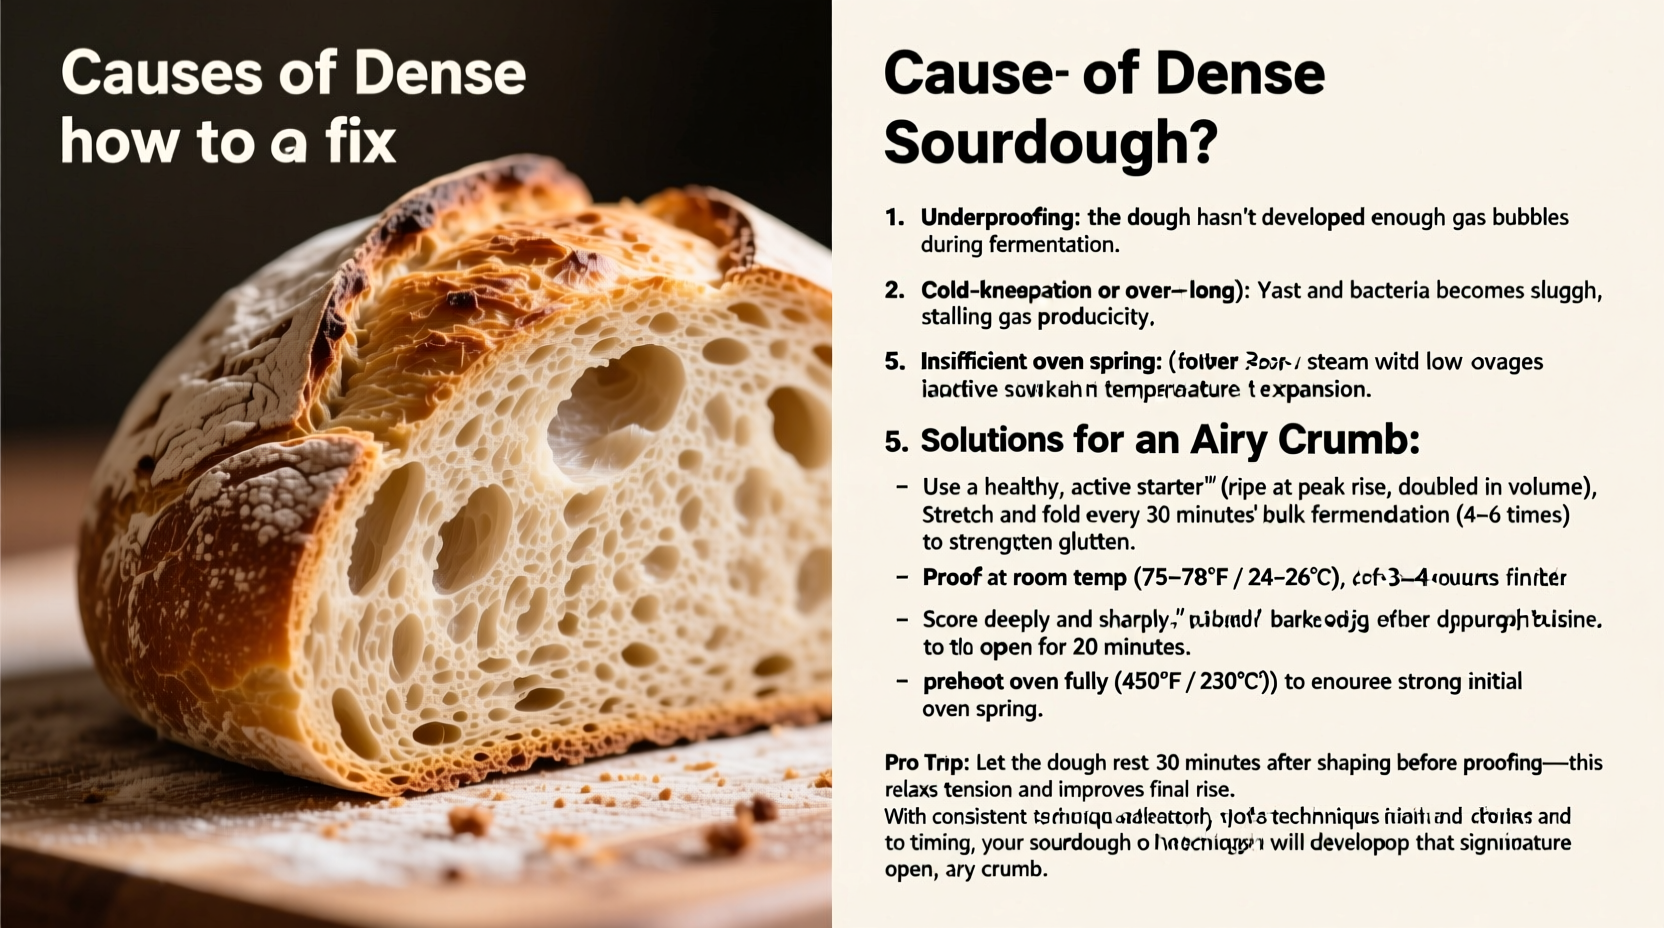
Common Causes of Dense Sourdough Bread
Dense sourdough can stem from multiple sources. Often, it's not just one issue but a combination. Here are the most frequent culprits:
- Inactive or weak starter: If your starter isn’t peaking with vigor, it won’t produce enough gas to lift the dough.
- Under-fermentation: Short bulk fermentation limits both flavor and gas production.
- Over-fermentation: Letting the dough go too long breaks down gluten, causing collapse.
- Poor gluten development: Insufficient mixing or folding leads to weak structure unable to hold air.
- Incorrect hydration: Too little water restricts extensibility; too much makes handling hard and risks deflation.
- Dense shaping: Over-tightening the loaf seals off gas pockets instead of preserving them.
- Low oven temperature or lack of steam: Without proper heat and moisture, the crust sets too early, halting oven spring.
Step-by-Step Guide to Achieving an Airy Crumb
Follow this detailed sequence to troubleshoot and improve your results. Each stage builds upon the last, so consistency matters more than perfection in any single step.
- Start with a healthy, active starter. Your starter should double within 4–8 hours after feeding, smell pleasantly tangy and fruity (not alcoholic), and pass the float test (a spoonful placed in water floats). Use it at peak ripeness—right before it begins to fall.
- Use high-protein flour. Bread flour or high-extraction flour (like Type 85 or whole grain blends) provides better gluten formation than all-purpose flour. For beginners, a mix of 80% bread flour and 20% whole wheat boosts strength and flavor without compromising workability.
- Autolyse for 30–60 minutes. Mix only flour and water first, then let rest. This allows gluten to form naturally, improving extensibility and reducing mixing time later.
- Add salt and starter, then perform stretch and folds. Over the next 2–3 hours, do 4 sets of stretch-and-folds spaced 30 minutes apart. This develops gluten gently without overworking the dough.
- Monitor bulk fermentation closely. Ferment until the dough has risen 30–50%, feels jiggly like jelly, and shows visible bubbles. This usually takes 3.5 to 5 hours at 75°F (24°C). Cooler temperatures extend this time but deepen flavor.
- Pre-shape gently, then final shape loosely. Pre-shaping tightens the surface slightly, but final shaping should preserve gas, not compress it. Use minimal tension—think “taut surface, inflated interior.”
- Proof properly—either at room temp or cold. Room-temperature proof: 1–2 hours until slightly puffy. Cold proof: 12–16 hours in the fridge. Under-proofed dough doesn’t expand well; over-proofed dough collapses.
- Bake with sufficient heat and steam. Preheat your Dutch oven at 450°F (230°C) for at least 45 minutes. Bake covered for 20 minutes to trap steam, then uncover and bake 20–25 more minutes until deeply browned.
Troubleshooting Table: Do’s and Don’ts for Airy Sourdough
| Stage | Do | Don't |
|---|---|---|
| Starter | Feed 1:1:1 (starter:water:flour) 8 hours before use | Use a sluggish or collapsed starter |
| Mixing | Autolyse flour and water before adding salt/starter | Mix everything at once and knead aggressively |
| Fermentation | Perform 3–4 sets of stretch and folds over 2.5 hours | Let dough sit untouched for 4+ hours |
| Shaping | Create surface tension without degassing | Roll dough tightly like a cinnamon roll |
| Baking | Use preheated Dutch oven with lid on for first 20 min | Bake directly on stone without steam |
Real Example: From Brick to Boule
Jamie, a home baker in Portland, had been making sourdough weekly for two months. Every loaf was dense, gummy inside, and barely rose. She followed recipes exactly but saw no improvement. After recording her process, she noticed three issues: her starter peaked at 6 a.m., but she didn’t bake until 3 p.m.; she skipped stretch and folds entirely; and she baked at 400°F without preheating the Dutch oven.
She adjusted: fed her starter the night before, used it at 8 a.m., performed four sets of stretch and folds, extended bulk fermentation to 4 hours, and preheated her pot at 450°F. Her next loaf had a dramatic rise, crackling crust, and an open crumb with holes the size of quarters. The change wasn’t in ingredients—it was in timing, technique, and heat management.
Essential Checklist for Light, Airy Sourdough
Before you bake, run through this checklist to catch preventable errors:
- ✅ Starter doubled and bubbly within 8 hours of feeding
- ✅ Autolyse completed (flour + water rested 30–60 min)
- ✅ 3–4 sets of stretch and folds performed during bulk ferment
- ✅ Dough increased by ~40%, jiggles when shaken, full of bubbles
- ✅ Final shape has taut surface but isn’t overly tight
- ✅ Banneton proofed until slightly puffy (or cold-proofed 12–16 hrs)
- ✅ Dutch oven preheated empty for 45+ minutes
- ✅ Baked covered for first 20 minutes to retain steam
Hydration: Finding Your Sweet Spot
Water content dramatically affects crumb openness. Most beginner recipes use 65–70% hydration (e.g., 650g water per 1000g flour). At this level, dough is manageable and forgiving. As you gain skill, increasing to 75–80% hydration enhances hole structure—but demands stronger gluten development and careful handling.
Higher hydration makes dough more extensible, allowing gas bubbles to expand freely. However, if your gluten network isn’t strong enough, the dough will spread instead of rise. Build confidence at lower hydration first, then gradually increase as your technique improves.
“The difference between a tight crumb and an open one often comes down to 5% more water and one extra set of folds.” — Suas, M., *Advanced Bread and Pastry*
Frequently Asked Questions
Why does my sourdough rise in the oven but deflate as it cools?
This typically indicates over-fermentation. The gluten structure weakened during proofing and couldn’t support the gas during cooling. Try shortening your bulk fermentation by 30–60 minutes or refrigerating earlier during cold proof.
Can I fix dense sourdough after baking?
No—but you can repurpose it. Slice and toast for crostini, cube for croutons, or blend into breadcrumbs. The lesson lies in the process, not the outcome. Analyze what changed from your last bake and adjust accordingly.
Does whole wheat flour always make denser bread?
Not necessarily. While whole grains contain bran that can cut gluten strands, using up to 20–30% whole wheat with proper fermentation actually enhances flavor and can improve crumb if balanced with strong white flour. Just expect slightly less expansion than 100% white flour loaves.
Mastering the Details for Consistent Results
Great sourdough is reproducible—not lucky. That means tracking variables: room temperature, fermentation times, feeding ratios, and even mixing methods. Keep a simple baking journal with notes on:
- Starter feed time and peak time
- Autolyse duration
- Bulk fermentation length and environment
- Final proof time and appearance
- Oven temperature and bake time
Within a few bakes, patterns will emerge. You’ll notice that at 78°F, your dough needs only 3.5 hours for bulk ferment, but at 70°F, it needs 5. Or that scoring deeper gives better oven spring. These insights turn guesswork into mastery.
Conclusion: Turn Density Into Delight
Dense sourdough doesn’t mean failure—it means feedback. Each loaf tells you something about your starter, your timing, your technique. With attention to gluten development, fermentation control, and baking conditions, you can consistently achieve that dreamy, open crumb. Don’t chase perfection; pursue progress. Adjust one variable at a time, document your results, and celebrate the small wins. The airy boule you’re after isn’t reserved for experts. It’s waiting for the next time you fold with patience, proof with care, and trust the process from jar to crust.


 浙公网安备
33010002000092号
浙公网安备
33010002000092号 浙B2-20120091-4
Comments
No comments yet. Why don't you start the discussion?