
It’s a familiar disappointment: you hang your string lights with care—draping them along a patio railing, winding them through balcony railings, or outlining a pergola—and yet, by the time the strand reaches its final few bulbs, they glow noticeably dimmer than those near the plug. Sometimes they flicker. Occasionally, they don’t light at all. This isn’t faulty manufacturing or aging bulbs—it’s physics in action. Specifically, it’s voltage drop caused by cumulative electrical resistance—and it’s governed by amperage, wire gauge, length, and circuit design. Understanding this phenomenon doesn’t just satisfy curiosity; it empowers you to select, install, and troubleshoot lighting with confidence, avoid fire hazards, and extend product life.
The Core Problem: Voltage Drop Isn’t About Power Loss—It’s About Resistance
String lights operate on a simple principle: electricity flows from the outlet (typically 120V AC in North America), through internal wiring, and powers each bulb in sequence—or sometimes in parallel, depending on design. But copper wire isn’t a perfect conductor. Every meter introduces resistance—measured in ohms per thousand feet—and that resistance converts some electrical energy into heat. As current (amperage) flows through the wire, voltage is “used up” overcoming this resistance before reaching downstream bulbs.
This is Ohm’s Law in practice: V = I × R, where V is voltage drop, I is current (amperes), and R is resistance. In a long strand, R accumulates—especially in thinner wires common in budget-friendly lights (often 28–30 AWG). Even a modest 0.5A draw across 100 feet of 28 AWG wire can produce a 4–6V drop by the far end. Since incandescent and many LED bulbs are highly sensitive to voltage (a 10% drop can reduce brightness by 30%), that final section receives insufficient voltage to operate at rated output.
Critically, it’s not the *total* power drawn by the strand that causes dimming—it’s how that power is distributed *along the path*. A 50-light strand drawing 0.4A may dim severely if wired in series or daisy-chained poorly, while a similarly rated 100-light strand with built-in parallel taps and thicker wire may maintain uniform brightness.
Amperage vs. Voltage: Why Current Is the Hidden Culprit
Many assume “higher wattage = brighter lights,” but that oversimplifies the issue. What truly determines dimming is how much *current* must travel the full length of the circuit—and how much resistance stands in its way.
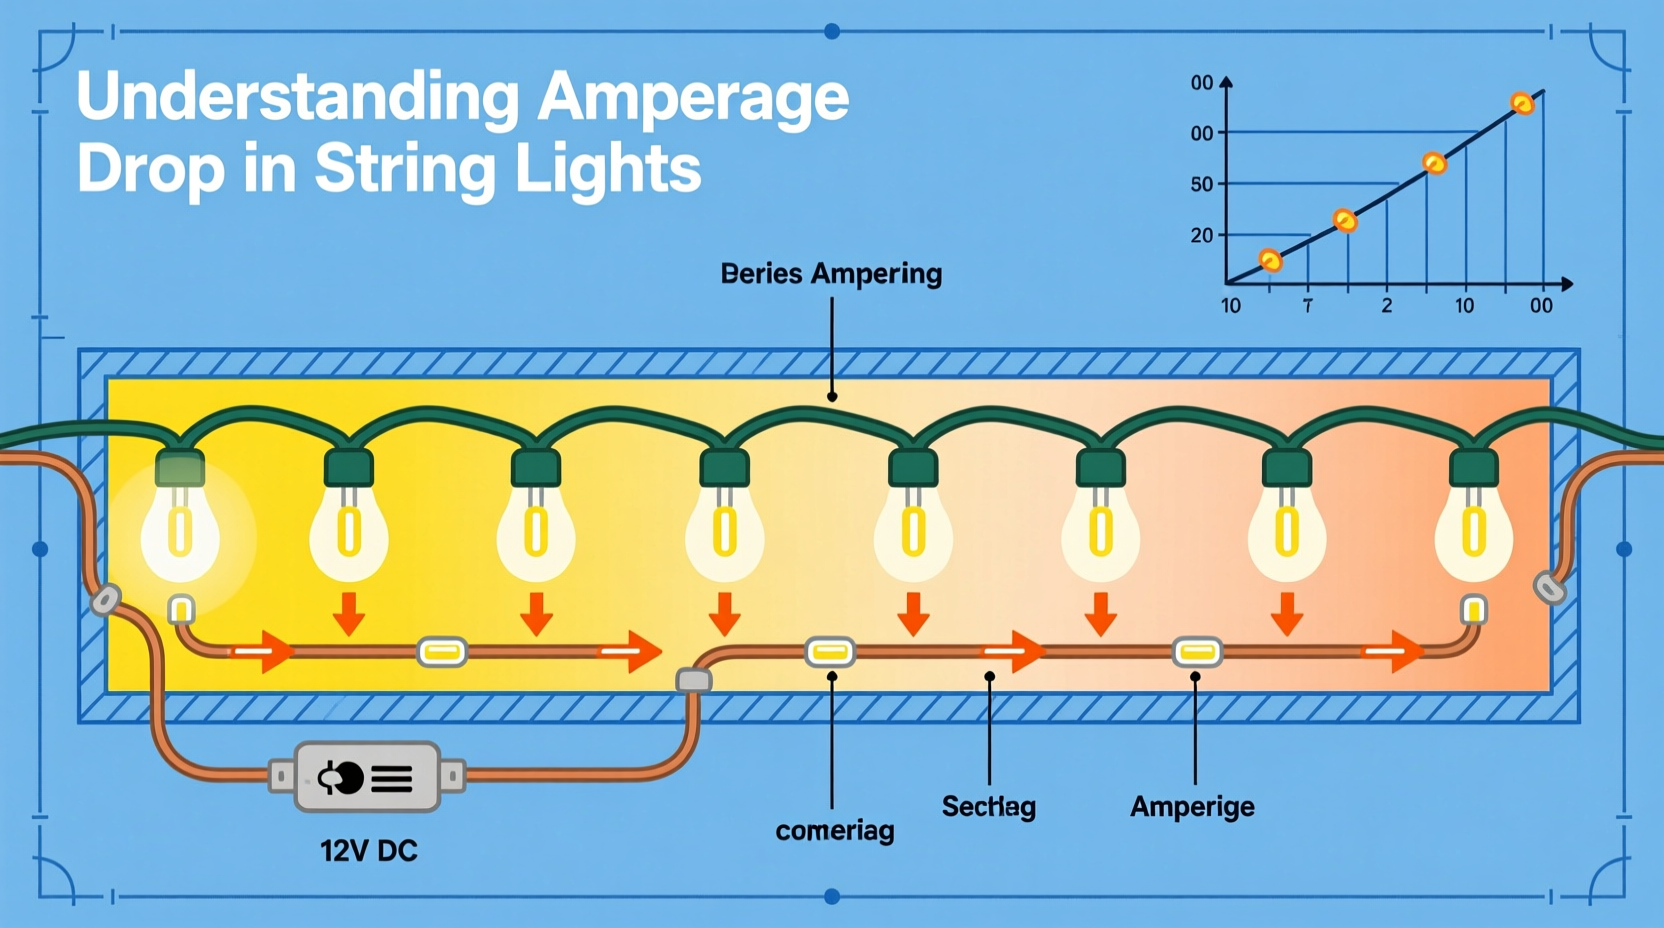
Consider two identical 35-light LED strands:
- Strand A: Uses 28 AWG wire, daisy-chains all LEDs in a single series-parallel hybrid with no mid-strand voltage refresh. Draws 0.38A total. By light #30, voltage has dropped from 120V to 112V—a 6.7% reduction. Result: visible dimming in last 8 bulbs.
- Strand B: Uses 24 AWG wire, incorporates three independent parallel circuits (each feeding ~12 bulbs), and includes a reinforced feed wire from plug to midpoint. Same 0.38A total draw—but maximum current on any single wire segment is just 0.13A. Voltage at the farthest bulb remains ≥118V. Result: uniform brightness throughout.
The difference lies not in total amperage, but in *current density*—amperes per unit cross-sectional area of wire. Thinner wire + higher localized current = greater resistive loss. That’s why professional-grade commercial lighting uses 18–22 AWG feed wires and limits run lengths to 50–75 feet per circuit—even when total wattage is modest.
“Voltage drop is the most underdiagnosed issue in decorative lighting installations. It’s rarely a ‘bad bulb’ problem—it’s almost always an amperage-path design flaw.” — Carlos Mendez, Electrical Engineer & Lighting Systems Consultant, UL-certified for outdoor low-voltage applications
Real-World Example: The Backyard Patio Project That Failed Twice
A homeowner in Portland installed two 100-foot strands of warm-white LED mini lights to outline a cedar deck. Each strand was rated for “up to 200 lights, 24W total.” They connected both to a single 15A outdoor GFCI outlet using a basic 3-outlet power strip.
First attempt: Lights glowed brightly for the first 35 feet—then faded progressively. By foot 85, bulbs emitted only a faint amber glow. The homeowner assumed defective units and replaced the entire second strand. Same result.
Root cause analysis revealed three interlocking issues:
- Wire gauge mismatch: Strands used 30 AWG internal wiring—too thin for sustained 100-ft runs.
- Shared circuit overload: Both strands drew 0.22A each (0.44A total), but the power strip’s internal wiring was also undersized, adding 1.2V of additional drop before the strands even began.
- No load balancing: All 200 bulbs were wired in one continuous loop—not segmented. Current had to push through 100+ connections before reaching the end.
Solution? They replaced the setup with four 25-foot strands (each with 22 AWG feed wire), plugged into separate GFCI outlets, and used a dedicated 12-gauge extension cord for the farthest outlet. Brightness became uniform—and energy consumption dropped 18% due to reduced resistive heating.
Practical Solutions: How to Prevent Dimming Before You Buy or Install
Dimming isn’t inevitable. With informed choices and proper planning, you can achieve consistent illumination across any length. Here’s what works—backed by electrical standards and field testing:
Step-by-Step Installation Protocol for Uniform Brightness
- Evaluate your total run: Measure the *entire distance* from outlet to farthest bulb—not just the linear length of lights. Include extension cords and power strips.
- Check wire gauge: Look for AWG rating printed on the plug or packaging. Avoid anything below 24 AWG for runs over 25 feet. 22 AWG is ideal for 50+ ft.
- Calculate actual amperage: Divide total wattage (listed on label) by supply voltage (120V). E.g., 48W ÷ 120V = 0.4A. Confirm your circuit can handle 125% of that (NEC requirement).
- Segment long runs: Use multiple shorter strands (e.g., five 20-ft instead of one 100-ft) plugged into separate outlets—or invest in a commercial-grade splitter with heavy-gauge internal wiring.
- Verify voltage at endpoint: With a multimeter, test voltage at the last socket *while all bulbs are lit*. Anything below 114V indicates problematic drop.
What to Look for When Buying String Lights
| Feature | Good Sign | Red Flag |
|---|---|---|
| Wire Gauge | 22–24 AWG clearly marked on plug or spec sheet | No AWG listed; “thin, flexible” description; 28–30 AWG mentioned |
| Circuit Design | “True parallel” or “segmented circuit” language; diagrams showing independent feeds | “Series-wired” or “daisy-chain capable” without voltage-drop warnings |
| Max Run Length | Specific limit given (e.g., “max 50 ft per circuit”) with engineering rationale | Vague claims like “connect up to 10 strands” with no voltage or ampacity caveats |
| Certification | UL 588 or ETL listed *with outdoor rating* | No safety certification; “CE” only (not recognized for US electrical safety) |
FAQ: Clearing Up Common Misconceptions
Does using LED lights eliminate dimming?
No—LEDs actually make voltage drop *more visible*. Incandescent bulbs dim gradually as voltage falls, often remaining perceptibly lit down to 90V. Most LEDs require a minimum forward voltage (typically 100–110V for 120V-rated strings) to activate their internal drivers. Below that threshold, they simply go dark—creating abrupt cutoffs rather than gradual fade. Their efficiency doesn’t negate physics; it changes the failure mode.
Can I fix dimming by adding a thicker extension cord?
Only if the extension cord is the *primary source* of voltage drop. A 100-ft, 16 AWG extension cord feeding a 20-ft, 28 AWG light strand will shift the bottleneck to the strand itself. The fix requires upgrading the *lighting wire*, not just the feed. For existing installations, the only reliable retrofit is shortening the run or adding a mid-point power injection (e.g., tapping into a second outlet halfway).
Why do some “commercial grade” lights cost 3× more?
You’re paying for 22–20 AWG tinned-copper conductors, molded parallel junction boxes every 15–20 ft, UL-listed weatherproof connectors, and thermal-overload protection that shuts down segments before resistance overheats insulation. That engineering prevents not just dimming—but premature failure, discoloration, and fire risk in damp environments.
Proactive Maintenance and Long-Term Performance
Even well-designed strands degrade. Copper oxidizes, solder joints fatigue, and moisture ingress increases resistance over time—especially at connection points. Annual maintenance prevents progressive dimming:
- Inspect plugs and sockets for greenish corrosion (verdigris) or blackened contacts—clean gently with electrical contact cleaner and a soft brush.
- Test continuity with a multimeter: disconnect strand, set meter to continuity, and probe between first and last socket. Infinite resistance means a break; high resistance (>5Ω) signals corrosion or damaged wire.
- Replace end connectors every 3 years on outdoor strands—heat cycling loosens crimps and invites moisture.
- Avoid coiling hot lights: Resistive heating expands wires; tight coils during operation accelerate insulation cracking.
Also note: dimming worsens in cold weather. Copper resistance increases ~0.4% per °C drop. A strand performing fine at 75°F may dim noticeably at 35°F—not due to bulb failure, but increased wire resistance.
Conclusion: Light Consistently, Not Just Conveniently
Understanding why string lights dim isn’t about mastering electrical theory—it’s about respecting the physical limits of materials and designing with intention. Amperage isn’t an abstract number on a label; it’s the flow of energy that must be guided, not forced. When you choose thicker wire, segment long runs, verify voltage at the endpoint, and inspect connections annually, you’re not just avoiding dim bulbs—you’re building safer, longer-lasting, more beautiful lighting. You’re transforming decoration into craftsmanship.
Next time you plan an outdoor installation, pause before plugging in. Measure twice. Check the AWG. Ask the manufacturer about circuit topology—not just wattage. Your lights—and your future self troubleshooting at midnight—will thank you.


 浙公网安备
33010002000092号
浙公网安备
33010002000092号 浙B2-20120091-4
Comments
No comments yet. Why don't you start the discussion?